Page 46 of 435
45 Getting started
Driving
�
Repeat the starting procedure
(�page 43). Remember that extended
starting attempts can drain the battery.
�
Get a jump start (
�page 369).
If the engine does not start after several
starting attempts, there could be a mal-
function in the engine electronics or in the
fuel supply system.
�
Notify an authorized Mercedes-Benz
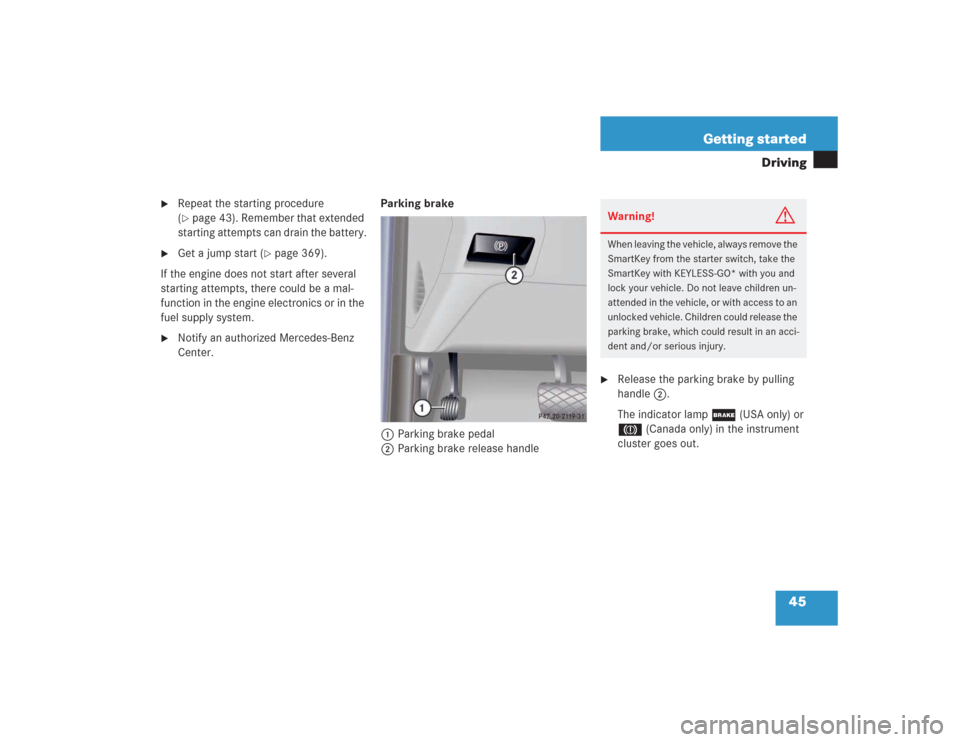
Center.Parking brake
1Parking brake pedal
2Parking brake release handle
�
Release the parking brake by pulling
handle2.
The indicator lamp ; (USA only) or
3 (Canada only) in the instrument
cluster goes out.Warning!
G
When leaving the vehicle, always remove the
SmartKey from the starter switch, take the
SmartKey with KEYLESS-GO* with you and
lock your vehicle. Do not leave children un-
attended in the vehicle, or with access to an
unlocked vehicle. Children could release the
parking brake, which could result in an acci-
dent and/or serious injury.
Page 49 of 435
48 Getting startedDrivingHigh beam�
Push the combination switch forward.
The high beam headlamps are switched
on.
The high beam headlamp
indicatorA in the tachometer
comes on.
For more information, see “High beam
flasher” (
�page 128).
Windshield wipers
The combination switch is located on the
left of the steering column.Combination switch1Single wipe
2Switching on windshield wipers�
Make sure the ignition is switched on.
All the lamps in the instrument cluster
come on.Switching on windshield wipers
�
Turn the combination switch to the de-
sired position depending on the inten-
sity of the rain.
0Windshield wipers off
IIntermittent wiping (interval depen-
dent on wetness of windshield)
IINormal wiper speed
IIIFast wiper speediThe intermittent wiping interval is de-
pendent on wetness of windshield.
Wiping will not occur with a door open.
Page 53 of 435
 or
3 (Canada only) in th")
52 Getting startedParking and lockingParking brake
1Parking brake
2Release handle�
Step firmly on parking brake1.
When the engine is running, the
indicator lamp ; (USA only) or
3 (Canada only) in the instrument
cluster illuminates.
Warning!
G
When leaving the vehicle, always remove the
SmartKey from the starter switch, take the
SmartKey with KEYLESS-GO* with you and
lock your vehicle. Do not leave children un-
attended in the vehicle, or with access to an
unlocked vehicle. Children could release the
parking brake and/or move the gear selec-
tor lever from positionP, either of which
could result in an accident and/or serious
injury.
Warning!
G
Getting out of your vehicle with the gear se-
lector lever not fully engaged in positionP is
dangerous. Also, when parked on an incline,
positionP alone may not prevent your vehi-
cle from moving, possibly hitting people or
objects.
Always set the parking brake in addition to
shifting to positionP (
�page 166).
When parked on an incline, turn front wheels
towards the road curb.
Page 59 of 435

58 Safety and SecurityOccupant safety
�Occupant safetyIn this section you will learn the most im-
portant facts about the restraint systems
of the vehicle.
The restraint systems are:�
Seat belts
�
Emergency tensioning device
�
Airbags
�
Child seats
�
Child seat recognition
�
Lower anchors and tethers for children
(LATCH)
As independent systems, their protective
effects work in conjunction with each oth-
er.The 1 indicator lamp in the instrument
cluster comes on
�
for about four seconds when you turn
the SmartKey in the starter switch to
position1 or press the KEYLESS-GO*
start/stop button once. It then goes
out briefly, comes on again and re-
mains lit until you start the engine.
�
for about four seconds when you start
the engine by turning the SmartKey or
pressing the KEYLESS-GO* start/stop
button.The restraint systems are fully operational
if the 1 indicator lamp is not lit when
the engine is running.
A malfunction in the system has been de-
tected if the1 indicator lamp:
�
fails to extinguish after approximately
four seconds.
�
does not come on at all.
�
comes on after the engine was started
or while driving.
For safety reasons, we strongly recom-
mend that you visit an authorized
Mercedes-Benz Center immediately to
have the system checked.
For more information, see “Practical hints”
(
�page 303).
iFor information on infants and children
traveling with you in the vehicle and re-
straint systems for infants and chil-
dren, see “Children in the vehicle”
(�page 69).
iThe 1 indicator lamp remains lit if
the SmartKey is turned to position 2
and left there or the KEYLESS-GO*
start/stop button is pressed twice. The
indicator lamp will go out when you
start the engine.
Page 79 of 435

78 Safety and SecurityDriving safety systemsThe - indicator lamp in the instrument
cluster comes on when you turn the
SmartKey in the starter switch to
position2 or press the KEYLESS-GO*
start/stop button twice. It goes out when
the engine is running.
Braking
At the instant one of the wheels is about to
lock up, a slight pulsation can be felt in the
brake pedal, indicating that the ABS is in
the regulating mode. �
Keep firm and steady pressure on the
brake pedal while experiencing the pul-
sation.
Continuous, steady brake pedal pressure
yields the advantages provided by the ABS,
namely braking power and the ability to
steer the vehicle.
The pulsating brake pedal can be an indica-
tion of hazardous road conditions and
functions as a reminder to take extra care
while driving.Emergency brake maneuver
�
Keep continuous full pressure on the
brake pedal.
For more information, see “Practical hints”
(
�page 303).
BAS
The Brake Assist System (BAS) operates in
emergency situations. If you apply the
brakes very quickly, the BAS automatically
provides full brake boost, thereby poten-
tially reducing the braking distance. Apply
continuous full braking pressure until the
emergency braking situation is over. The
ABS will prevent the wheels from locking.
When you release the brake pedal, the
brakes function again as normal. The BAS
is then deactivated.
Warning!
G
The ABS cannot prevent the natural laws of
physics from acting on the vehicle, nor can
it increase braking or steering efficiency be-
yond that afforded by the condition of the
vehicle brakes and tires or the traction af-
forded. The ABS cannot prevent accidents,
including those resulting from excessive
speed in turns, following another vehicle too
closely, or hydroplaning. Only a safe, atten-
tive, and skillful driver can prevent acci-
dents. The capabilities of an ABS equipped
vehicle must never be exploited in a reck-
less or dangerous manner which could jeop-
ardize the user’s safety or the safety of
others.
Page 88 of 435
87 Controls in detail
Locking and unlocking
Seats
Memory function
Lighting
Instrument cluster
Control system
Automatic transmission
Good visibility
Automatic climate control
Power windows
Sliding/pop-up roof
Driving systems
Loading
Useful features
Page 111 of 435
110 Controls in detailSeatsRear seat head restraints
Folding head restraints back
The rear seat head restraints and the rear
seat power head restraints* can be folded
backward for increased visibility.
1Switch in the front center console
�
Make sure the ignition is switched on.
All the lamps in the instrument cluster
come on.
�
Press switch1 in the front center con-
sole briefly.
The rear head restraints will fold back-
ward.Placing head restraints upright
�
Pull the rear head restraint upright until
it locks into position.
!The rear head restraints cannot be re-
moved.
Warning!
G
For safety reasons, always drive with the
rear head restraints in the upright position
when the rear seats are occupied.
Keep the area around head restraints clear
of articles (e.g. clothing) to not obstruct the
folding operation of the head restraints.
!Make sure the head restraints engage
when placing them upright manually.
Otherwise their protective function
cannot be ensured.
Page 112 of 435

111 Controls in detailSeats
Placing power head restraints* upright�
Make sure the ignition is switched on.
All the lamps in the instrument cluster
come on.
�
Press switch1 in the front center con-
sole and hold.
The rear head restraints will fold up-
right.Folding back and placing upright power
head restraints* with the switches in
the rear doors
You can fold the rear power head restraints
backward or upright using the head re-
straint folding switches in the respective
rear doors.
1Head restraint switch, rear
�
Make sure the ignition is switched on.
All the lamps in the instrument cluster
come on.
�
Press switch up in direction of
arrow1.
The rear power head restraint will fold
upright.
�
Press switch down in direction of
arrow1.
The rear power head restraint will fold
backward.
Head restraint tilt
You can adjust the angle manually by pull-
ing or pushing the head restraints by hand.Warning!
G
For safety reasons, always drive with the
rear head restraints in the upright position
when the rear seats are occupied.
Keep the area around head restraints clear
of articles (e.g. clothing) to not obstruct the
folding operation of the head restraints.