Page 23 of 344
23 At a glance
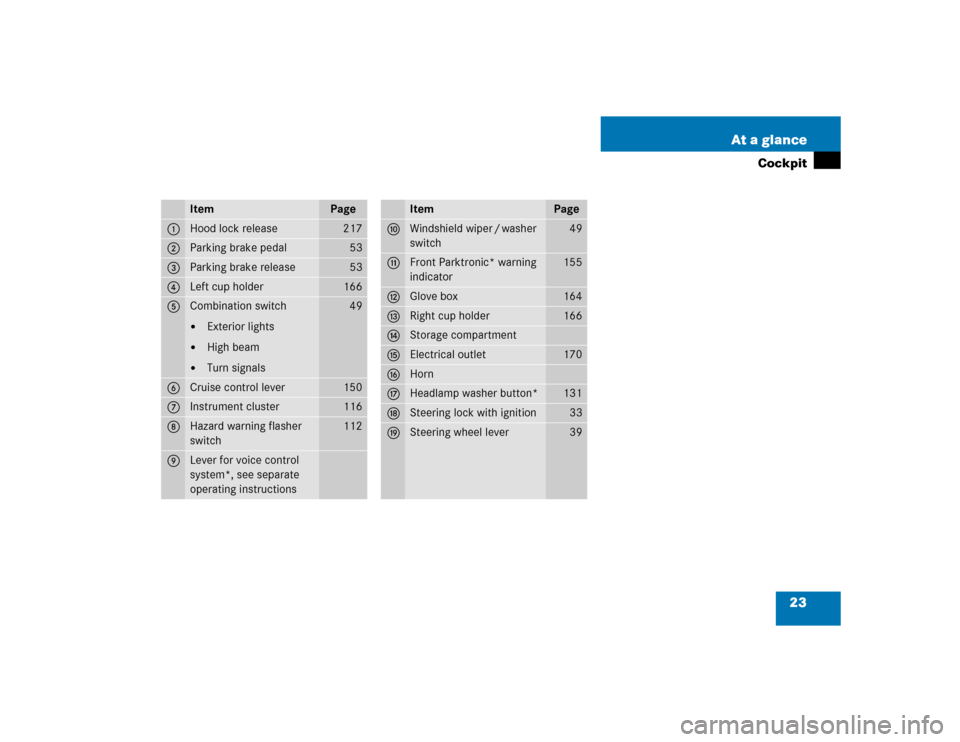
Cockpit
Item
Page
1
Hood lock release
217
2
Parking brake pedal
53
3
Parking brake release
53
4
Left cup holder
166
5
Combination switch�
Exterior lights
�
High beam
�
Turn signals
49
6
Cruise control lever
150
7
Instrument cluster
116
8
Hazard warning flasher
switch
112
9
Lever for voice control
system*, see separate
operating instructions
Item
Page
a
Windshield wiper / washer
switch
49
b
Front Parktronic* warning
indicator
155
c
Glove box
164
d
Right cup holder
166
e
Storage compartment
f
Electrical outlet
170
g
Horn
h
Headlamp washer button*
131
j
Steering lock with ignition
33
k
Steering wheel lever
39
Page 33 of 344

33 Getting started
Unlocking
Steering lock positions
0For removing key
The steering is locked when the key is
removed from the steering lock. If
necessary, move steering wheel
slightly to allow the locking mechanism
to engage.
1Unlocking steering
Power supply to some electrical con-
sumers, such as seat adjustment.
2Ignition (power supply for all electrical
consumers) and driving position
3Starting position
Warning!
G
When leaving the vehicle, always remove the
key from the steering lock and lock the vehi-
cle. Do not leave children unattended in the
vehicle, or with access to an unlocked vehi-
cle. Unsupervised use of vehicle equipment
may cause an accident and / or serious per-
sonal injury.iThe key can only be withdrawn in
position0.
If necessary, move steering wheel
slightly to allow the key to be turned
clockwise to position1.
A warning sounds when the driver’s
door is opened and the key is in steer-
ing lock position0 or1.
The key can only be removed from the
steering lock with the gear selector le-
ver in positionP.
!To prevent accelerated battery dis-
charge and a possible dead battery, al-
ways remove the key from the steering
lock when the engine is not in opera-
tion.
Page 41 of 344

41 Getting started
Adjusting
The buttons are on the lower part of the
center console.
1Driver’s side exterior rear view mirror
2Passenger-side exterior rear view
mirror
3Adjustment button
�
Switch on the ignition by turning the
key in the steering lock to position2
(�page 33).
All lamps in the instrument cluster
come on.
�
Press button1 for the left mirror or
button2 for the right mirror.
�
Push adjustment button3 up, down,
left, or right according to the desired
setting.
For more information, see “Electrically
folding exterior rear view mirrors”
(
�page 128).
!For information on how to reposition
the exterior mirror housing when it was
forcibly pushed forward (hit from the
rear) or forcibly pushed rearward (hit
from the front), see “Folding exterior
mirrors in and out manually*”
(�page 128).
iWith the front doors closed, the exteri-
or mirrors can still be adjusted for ap-
proximately 30 minutes after the
ignition has been switched off.iThe memory function* (
�page 105)
lets you save the exterior mirror set-
tings together with the seat and
steering wheel settings.
iAt low outside temperatures, the exte-
rior mirrors will be automatically
heated.
Page 50 of 344

50 Getting startedDriving
Switching on windshield wipers�
Make sure the ignition is switched on.
�
Turn the wiper switch to the desired po-
sition 1,2 or3, depending on the
intensity of the rain.
Single wipe
�
Press wiper switch briefly in the direc-
tion of arrow2.
The windshield wipers wipe one time
without washer fluid.
Wiping with windshield washer fluid
�
Pull and hold wiper switch in direction
of arrow4.
The windshield wiper operates with
washer fluid.
Information on filling up the washer reser-
voir can be found in the “Operation” sec-
tion (�page 224).
!Vehicles with rain sensor*:
Do not leave windshield wipers in inter-
mittent setting when the vehicle is tak-
en to an automatic car wash or during
windshield cleaning. Wipers will oper-
ate in the presence of water sprayed on
the windshield, and wipers may be
damaged as a result.
The switch should not be left in inter-
mittent setting as the wipers will wipe
the windshield once every time the en-
gine is started. Dust that accumulates
on the windshield might scratch the
glass and / or damage the wiper blades
when wiping occurs on a dry wind-
shield.
!If anything blocks the windshield wip-
ers (leaves, snow, etc.), switch them off
immediately.�
For safety reasons, withdraw key
from steering lock before attempt-
ing to remove any blockage.
�
Remove blockage.
�
Turn the windshield wipers on
again.
If windshield wipers fail to function at
all in switch position1,
�
set the combination switch to the
next highest wiper speed
�
have the windshield wipers
checked at the nearest authorized
Mercedes-Benz Light Truck Center
Page 51 of 344
51 Getting started
Driving
Rear window wiper
The button is on the upper part on the cen-
ter console.
1Intermittent wiping
2Indicator lamp
3Wiping with washer fluidSwitching on intermittent wiping
Make sure the ignition is switched on.
�
Press upper half1 of the button.
Switching off intermittent wiping
�
Press upper half1 of the button
again.
Wiping with washer fluid
�
Press and hold lower half3 of the but-
ton.
After releasing the button the wiper op-
erates for additional five seconds.
More information on windshield wipers can
be found in the “Controls in detail” section
(
�page 129).
Problems while driving
The engine runs erratically and misfires�
An ignition cable may be damaged.
�
The engine electronics may not be
operating properly.
�
Unburned gasoline may have entered
the catalytic converter and damaged it.
�
Give very little gas.
�
Have the problem repaired by an au-
thorized Mercedes-Benz Light Truck
Center as soon as possible.
Page 84 of 344

84 Safety and SecurityAnti-theft systemsDisarming the alarm system
The alarm system is disarmed when you
unlock your vehicle with the remote con-
trol. The turn signal lamps flash once to in-
dicate that the alarm system is
deactivated.Canceling the alarm
To cancel the alarm:
�
Switch on the ignition by turning the
key in the steering lock to position2.
or
�
Press theŒ or ‹button on the
remote control.
The alarm is canceled.
Tow-away alarm, glass breakage
sensor
The tow-away alarm and the glass break-
age sensor are part of the anti-theft alarm
system.Once the tow-away alarm is armed, a visual
and audible alarm will be triggered when
someone:
�
attempts to raise the vehicle
�
breaks a window and reaches into the
passenger compartment
iIf the turn signal lamps do not flash
three times, the tow-away - glass
breakage sensor is malfunctioning or
one of the following elements may not
be properly closed:�
a door
�
the liftgate
�
the hood
Close the respective element and lock
the vehicle again.
iThe alarm system will rearm automati-
cally again after approximately
40 seconds if one of the doors or the
liftgate is not opened.
iThe tow-away protection alarm is trig-
gered, for example, if the vehicle is
lifted on one side.
If the alarm stays on for more than
20 seconds, an emergency call is initi-
ated automatically by the Tele Aid* sys-
tem (
�page 171) provided Tele Aid
service was subscribed to and properly
activated, and that necessary cellular
service and GPS coverage are avail-
able.
Page 86 of 344
86 Safety and SecurityAnti-theft systemsVehicles without trip computer
The buttons are located in the overhead
control panel.
1Switching off tow-away alarm and glass
breakage sensor
�
Turn key in steering lock to position2
(�page 33).
�
Return key to position0 and remove it
from the steering lock.
�
Within 30 seconds press button1 on
the right or left side.
�
Exit vehicle and lock vehicle with
remote control (
�page 32).
The tow-away alarm and glass breakage
sensor remain switched off until the key is
inserted in steering lock and turned to
position1.Canceling the alarm
To cancel the alarm:
�
Switch on the ignition by turning the
key in the steering lock to position2.
or
�
Press theŒ or ‹button on the
remote control.
The alarm is canceled.
Page 91 of 344
91 Controls in detail
Locking and unlocking
Opening the liftgate
Opening the liftgate from outside
A minimum height clearance of 7 ft
(2.15 m) is required to open the liftgate.
The handle is located above the rear
license plate recess.
1Grip molding
2Handle�
Pull on handle2.
�
Swing the liftgate upward by using the
grip molding.Opening the liftgate from inside
A minimum height clearance of 7 ft
(2.15 m) is required to open the liftgate.
The release lever is located on the inside of
the liftgate.
1Handle
2Catch
iIf the vehicle has previously been
locked from the outside with the re-
mote control, opening a door from the
inside will trigger the alarm.
To cancel the alarm, do one of the
following:
Switch on the ignition by turning the
key in the steering lock to position2.
or
Press the‹ or Œbutton on the
remote control.
The alarm is cancelled.
!Always make sure that there is suffi-
cient overhead clearance.iThe vehicle must be unlocked.


 is required to open the liftgate.
The handle is located")