Page 168 of 344

168 Controls in detailUseful featuresAshtrays and cigarette lighter Ashtray and cigarette lighter in the
front center console
1Ashtray
2Cigarette lighter
3Cover plate
Opening the ashtray
�
Briefly touch cover plate3.
The ashtray opens automatically.Removing ashtray insert
�
Secure vehicle from movement by set-
ting the parking brake. Move the gear
selector lever to positionN.
Now you have more room to take out
the insert.
�
Grip the insert on the sides and pull it
out upwards.
Reinstalling ashtray insert
�
Install ashtray insert.
�
Close the ashtray.
Warning!
G
Never touch the heating element or sides of
the cigarette lighter; they are extremely hot.
Hold the knob only.
When leaving the vehicle always remove the
key from the steering lock. Do not leave chil-
dren unattended in the vehicle, or with ac-
cess to an unlocked vehicle. Unsupervised
use of vehicle equipment may cause an ac-
cident and / or serious personal injury.iThe cigarette lighter socket can be
used to accommodate electrical acces-
sories up to a maximum of 50 W.
If the engine is off, the battery may be-
come discharged when used for long
periods of time.
Warning!
G
Remove ashtray only with vehicle standing
still. Set the parking brake to secure vehicle
from movement. Move gear selector lever to
positionN. With gear selector lever in
positionN, turn off the engine.
Page 201 of 344

�
LOW RANGE")
201 Operation
Driving instructions
Special driving features for off-road
driving
The following driving features are available
for specific kind of operation:�
LOW RANGE mode (
�page 125)
�
LOW RANGE – ABS (
�page 77)
�
LOW RANGE – 4-ETS (
�page 80)
�
LOW RANGE – ESP (
�page 81)
Off-road driving rules
Engage the LOW RANGE mode before driv-
ing under off-road conditions
(
�page 125).
Fasten items being carried as securely as
possible (
�page 157).Checklist before off-road driving
Tires
�
Check the tread depth and maintain
specified tire pressure (see tire pres-
sure label inside the fuel filler flap).
�
Check tires for possible damage and
remove foreign objects.
�
Replace missing valve caps.
iWe recommend keeping doors, liftgate,
windows, and sliding / pop-up roof*
closed whenever driving in off-road
mode.
!Observe the following during off-road
driving:�
Adjust vehicle speed to condition of
terrain. The more uneven, rutty and
steeper the terrain, the lower the
speed should be
�
Watch out for obstacles, such as
rocks, holes, tree stumps and ruts.
�
Be especially careful when driving
in unknown territory. It may be nec-
essary to get out of the vehicle and
scout the path you intend to take.
�
Before driving through water, deter-
mine is depth.
�
Do not stop vehicle while immersed
in water, and do not shut off the
engine.
�
In sandy soil, please drive at a
steady speed as allowed by condi-
tions. This helps overcome the vehi-
cle rolling resistance and reduces
the likelihood of the vehicle sinking
into the ground.
�
Do not initiate jumps with the vehi-
cle. It interrupts the forward mo-
mentum of the vehicle.
�
Always drive onto slopes with the
the engine running and the vehicle
in gear.
Page 209 of 344

209 Operation
Driving instructions
Towing a trailer
There are many different laws, including
speed limit restrictions, having to do with
trailer towing. Make sure your rig will be le-
gal, not only for where you reside, but also
for where you will be driving. A good
source for this information can be the po-
lice or local authorities.
Note the following points, when driving
with the trailer:�
In order to gain skill and an under-
standing of the vehicle’s behavior, you
should practice turning, stopping and
backing up in an area which is free from
traffic.
�
Before you start driving check the�
trailer hitch
�
break-away switch
�
safety chains
�
electrical connections
�
lighting and tiresAdjust the mirrors to permit unobstructed
view beyond rear of trailer.
�
If the trailer has electric brakes, start
your vehicle and trailer moving slowly,
and then apply only the trailer brake
controller by hand to be sure the
brakes are working properly.
�
Always secure items in the trailer to
prevent load shifts while driving.
�
When towing a trailer, check occasion-
ally to be sure that the load is secure,
and that lighting and trailer brakes (if
so equipped) are functioning properly.
�
Take into consideration that when tow-
ing a trailer, the handling characteris-
tics are different and less stable from
those when operating the vehicle with-
out a trailer.
It is important to avoid sudden maneu-
vers.
!Do not connect a trailer brake system
(if trailer is so equipped) directly to the
vehicle’s hydraulic brake system, as
your vehicle is equipped with antilock
brakes. If you do, neither the vehicle’s
brakes nor the trailer’s brakes will func-
tion properly.iThe provided vehicle electrical wiring
harness for trailer towing has a brake
signal wire (color orange) for hook-up
to a brake controller.
You should consider using a trailer
sway control system. For further infor-
mation see your authorized
Mercedes-Benz Light Truck Center.
Page 211 of 344

211 Operation
Driving instructions
Passenger compartment
Driving abroad
Abroad, there is an extensive
Mercedes-Benz service network at your
disposal. If you plan to drive into areas
which are not listed in the index of your
Mercedes-Benz Light Truck Center directo-
ry, you should request pertinent informa-
tion from your authorized Mercedes-Benz
Light Truck Center.Control and operation of radio trans-
mitters
MCS, radio and telephone*
Warning!
G
Always fasten items being carried as secure-
ly as possible.
In an accident, during hard braking or sud-
den maneuvers, loose items will be thrown
around inside the vehicle, and cause injury
to vehicle occupants unless the items are
securely fastened in the vehicle.
The rear cargo compartment is the preferred
place to carry objects. Always use the parti-
tion net when transporting cargo. Partition
net cannot secure hard or heavy objects. Al-
ways fasten items being carried as securely
as possible using the cargo tie-down rings in
the cargo floor area and fastening materials.
Warning!
G
Do not forget that your primary responsibili-
ty is to drive the vehicle. Only operate the
MCS, radio or telephone
1 if road, weather
and traffic conditions permit.
Bear in mind that at a speed of just 30 mph
(approximately 50 km / h), your vehicle is
covering a distance of approximately
44 feet (approximately 13.5 m) every
second.
1Observe all legal requirements.
Page 260 of 344
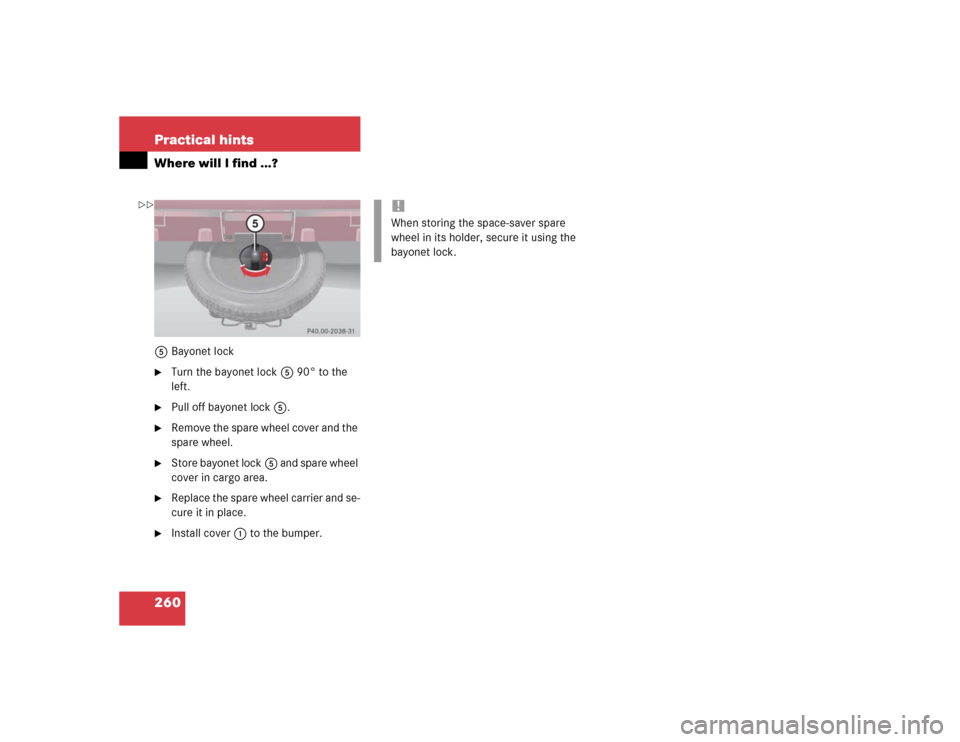
260 Practical hintsWhere will I find ...?5Bayonet lock�
Turn the bayonet lock5 90° to the
left.
�
Pull off bayonet lock5.
�
Remove the spare wheel cover and the
spare wheel.
�
Store bayonet lock5 and spare wheel
cover in cargo area.
�
Replace the spare wheel carrier and se-
cure it in place.
�
Install cover1 to the bumper.
!When storing the space-saver spare
wheel in its holder, secure it using the
bayonet lock.
��
Page 279 of 344

279 Practical hints
Battery
Disconnecting the battery�
Depress parking brake firmly or move
gear selector lever to positionP.
�
Turn off all electrical consumers.
�
Remove key from the steering lock.
�
Open the hood (
�page 217).
�
Disconnect the battery negative lead.
�
Remove the cover from the positive ter-
minal.
�
Disconnect the battery positive lead.
Removing the batteries�
Remove the screw securing the bat-
tery.
�
Remove the battery support and brack-
et. Take out the battery.
Charging and reinstalling batteries�
Charge battery in accordance with the
instructions of the battery charger
manufacturer.
�
Reinstall the charged battery. Follow
the previously described steps in re-
verse order.
Reconnecting the batteries�
Turn off all electrical consumers.
�
Connect the positive lead and fasten its
cover.
�
Connect the negative lead.
Warning!
G
With a disconnected battery�
you will no longer be able to turn the key
in the steering lock
�
the gear selector lever will remain
locked in positionP
Warning!
G
Never charge a battery while still installed in
the vehicle. Gases may escape during charg-
ing and cause explosions that may result in
paint damage, corrosion or personal injury.
!Never invert the terminal connections!!The battery, its filler caps and the vent
tube must always be securely installed
when the vehicle is in operation.
Page 285 of 344
285 Practical hints
Towing the vehicle
Front towing eye
The front towing eye is located on the pas-
senger side below the bumper.
1Towing eyeRear towing eye The rear towing eye is located behind the
right side cover in the bumper panel.
ML 350, ML 5001Cover
2Towing eye
To remove cover:�
Pry out the cover1 using a flat blade
screwdriver (
�page 257).
To reinstall cover:
�
Engage cover at bottom and press in
top securely.
iThe gear selector lever will remain
locked in positionP and the key will not
turn in the steering lock if the battery is
disconnected or discharged. See notes
on the battery (
�page 278) or on jump
starting (
�page 281).
Manual unlocking transmission gear
selector lever (
�page 264).
Warning!
G
In order to avoid possible serious burns or
injury, use extreme caution when removing
the cover, because the rear exhaust pipe is
extremely hot.
Page 286 of 344
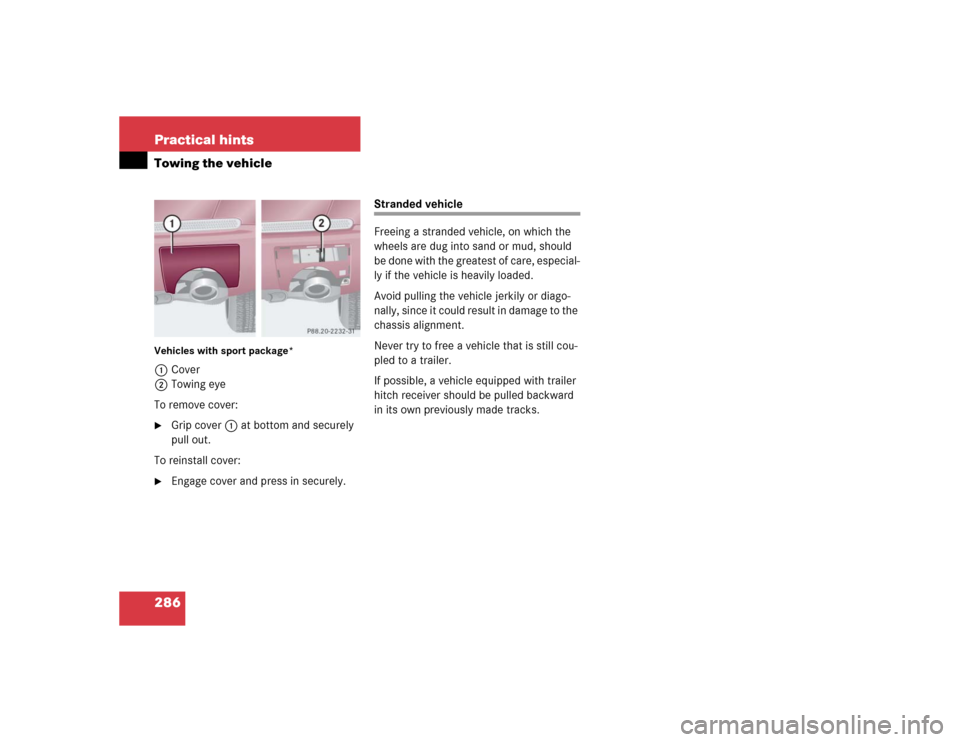
286 Practical hintsTowing the vehicleVehicles with sport package*1Cover
2Towing eye
To remove cover:�
Grip cover1 at bottom and securely
pull out.
To reinstall cover:
�
Engage cover and press in securely.
Stranded vehicle
Freeing a stranded vehicle, on which the
wheels are dug into sand or mud, should
be done with the greatest of care, especial-
ly if the vehicle is heavily loaded.
Avoid pulling the vehicle jerkily or diago-
nally, since it could result in damage to the
chassis alignment.
Never try to free a vehicle that is still cou-
pled to a trailer.
If possible, a vehicle equipped with trailer
hitch receiver should be pulled backward
in its own previously made tracks.