Page 125 of 344

125 Controls in detail
Transmission control – LOW RANGE mode
�Transmission control – LOW RANGE mode
In the following situations you should
switch to LOW RANGE mode:�
during off-road driving
�
when crossing water
�
when towing up or down on steep
gradients
Switching on LOW RANGE modeLOW RANGE mode switch�
Stop the vehicle.
�
Move the gear selector lever to
positionN.
�
Press on the upper part of the switch.
During the changeover the indicator
lamp (
�page 25) flashes three times.
Once the changeover is complete, the
indicator lamp comes on continuously.
Switching off LOW RANGE mode�
Stop the vehicle.
�
Move the gear selector lever to
positionN.
�
Press on the upper part of the switch.
During the changeover the indicator
lamp (
�page 25) flashes three times.
Once the changeover is complete, the
indicator lamp goes out.
For information on driving safety systems
during LOW RANGE mode see the “Safety
and Security” section (
�page 76).
!Only switch the LOW RANGE mode on
or off, when the vehicle is�
at a complete standstill
�
the engine speed is less than
1500 rpm
Failure to do so may result in transmis-
sion or engine damage which is not
covered by the Mercedes-Benz Limited
Warranty.
!You should only operate the vehicle on
a single axle dynamometer for briefly
testing the brakes.
The key must be in steering lock
position1 (
�page 33).
Page 129 of 344
.
The mirrors fold in.Folding out
�
Briefly press button2.
The mirrors fold out.
Windshield wipers
Information on t")
129 Controls in detail
Good visibility
Folding in�
Briefly press button1 (
�page 127).
The mirrors fold in.Folding out
�
Briefly press button2.
The mirrors fold out.
Windshield wipers
Information on the windshield wipers is
found in the “Getting started” section
(�page 49).
!Before you drive the vehicle through an
automatic car wash, fold the exterior
mirrors in, otherwise they may get
damaged.iIf you are driving at more than approxi-
mately 9 mph (15 km / h), you will not
able to fold the exterior mirrors in.
!If an exterior rear view mirror housing
is forcibly pushed forward (hit from the
rear), reposition it manually by applying
firm pressure until it snaps back into
place.
If an exterior rear view mirror is forcibly
pushed rearward (hit from the front)
press button1 to fold mirrors in, then
press button2 to fold mirrors out. Do
not force mirrors by hand as this may
damage the adjustment mechanism.
The mirror housing is now properly po-
sitioned and you can adjust the mirror
normally.
!If leaves, snow, etc. block the wind-
shield wipers, the wiper motor turns
off.�
For safety reasons, withdraw key
from steering lock. Remove block-
age.
�
Turn the windshield wipers on
again.
If windshield wipers fail to function at
all in switch position1,
�
set the wiper switch to the next
highest wiper speed.
�
have the windshield wipers
checked at the nearest authorized
Mercedes-Benz Light Truck Center.
Page 130 of 344
 the wiper switches automati-
cally to continuous wiping")
130 Controls in detailGood visibilityIntermittent wiping
Windshield wipers without rain sensor*
At speeds of approximately 105 mph
(170 km / h) the wiper switches automati-
cally to continuous wiping. Always obey lo-
cal speed limits.Windshield wipers with rain sensor*
A rain sensor automatically controls the
windshield wipers depending on how wet
the windshield is.
�
Switch on ignition.
�
Set the wiper switch to position1
(�page 49).
After the initial wipe, pauses between
wipes are automatically controlled by the
rain sensor which monitors the wetness of
windshield.
iIntermittent wiping is interrupted when
the vehicle is at a standstill and a front
door is opened.
iWhen intermittent wiping is on and the
key is turned from position1 to
position2 in the steering lock
(�page 33), and kept in that position
for longer than two seconds, the wipe
interval will be set to approximately
five seconds.
!Do not leave windshield wipers in inter-
mittent setting when the vehicle is tak-
en to an automatic car wash or during
windshield cleaning. Wipers will oper-
ate in the presence of water sprayed on
the windshield, and wipers may be
damaged as a result.
The switch should not be left in inter-
mittent setting as the wipers will wipe
the windshield once every time the en-
gine is started. Dust that accumulates
on the windshield might scratch the
glass and / or damage the wiper blades
when wiping occurs on a dry wind-
shield.
Page 132 of 344
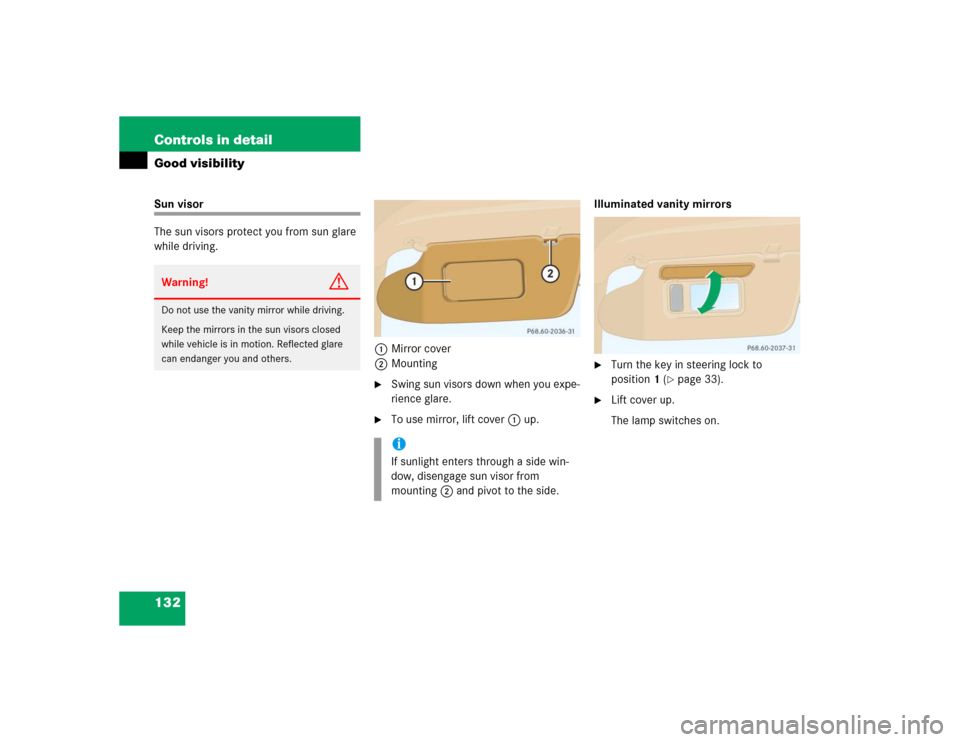
132 Controls in detailGood visibilitySun visor
The sun visors protect you from sun glare
while driving.
1Mirror cover
2Mounting
�
Swing sun visors down when you expe-
rience glare.
�
To use mirror, lift cover1 up.Illuminated vanity mirrors
�
Turn the key in steering lock to
position1 (
�page 33).
�
Lift cover up.
The lamp switches on.
Warning!
G
Do not use the vanity mirror while driving.
Keep the mirrors in the sun visors closed
while vehicle is in motion. Reflected glare
can endanger you and others.
iIf sunlight enters through a side win-
dow, disengage sun visor from
mounting2 and pivot to the side.
Page 140 of 344

140 Controls in detailAutomatic climate control
Residual heat and ventilation
With the engine switched off, it is possible
to continue to heat or ventilate the interior
for up to 30 minutes. This feature makes
use of the residual heat produced by the
engine.
Activating�
Turn the key in the steering lock to
position0 or1 (
�page 33).
�
Press button° (
�page 135).
The indicator lamp on button°
comes on.Deactivating
�
Press button°.
The indicator lamp on button°
goes out.
!If the °button on the automatic
climate control panel starts to flash,
this indicates that the air conditioning
system is losing refrigerant. The com-
pressor has turned itself off. The air
conditioning cannot be turned on
again.
Have the air conditioning system
checked at the nearest authorized
Mercedes-Benz Light Truck Center.
iHow long the system will provide heat-
ing depends on the coolant tempera-
ture and the temperature set in the
climate control. The blower will run at
lower speed regardless of the air vol-
ume control setting.
iThe residual heat is automatically
turned off:�
when the ignition is switched on
�
after about 30 minutes
�
if the coolant temperature is too
low
�
if the battery voltage drops
Page 144 of 344

144 Controls in detailPower windows
�Power windowsOpening and closing the side windows
The side windows can be opened and
closed electrically. The switches for all the
side windows are on the driver’s door. The
switches for the respective windows are
on the passenger door and on the rear cen-
ter console.
1Left front window
2Right front window
3Right rear window
4Left rear window
5Rear window override switch
(
�page 73).
Additional switches for the rear windows
are located on the rear center console.6Left rear window
7Right rear window
�
Turn key in the steering lock to
position1 or2.
Warning!
G
When closing the windows, make sure that
there is no danger of anyone being harmed
by the closing procedure.
The closing of the door windows can be im-
mediately halted by releasing the switch or,
if switch was pressed past the resistance
point and released, by pressing the respec-
tive switch.
If the window encounters an obstruction
that blocks its path in a circumstance where
you pressed the switch past the resistance
point and released it to close the window,
the automatic reversal function will stop the
window and open it slightly.
If the window encounters an obstruction
that blocks its path in a circumstance where
you are closing the window by pressing the
switch and holding it there, the automatic
reversal function will not operate.
When leaving the vehicle, always remove the
key from the steering lock, and lock your ve-
hicle. Do not leave children unattended in
the vehicle, or with access to an unlocked
vehicle. Unsupervised use of vehicle equip-
ment can cause an accident and / or serious
personal injury.
Page 146 of 344

146 Controls in detailPower windowsSynchronizing power windows
The power window must be resynchroni-
zed each time�
after the battery has been discon-
nected.
�
if the power windows cannot be fully
opened (Express-open) or closed (Ex-
press-close).
Synchronizing the power windows
�
Switch on ignition.
�
Press the power window switches at
the symbolj until the side win-
dows are closed.
Hold the switches for approximately
one second.
The power window are synchronized.
Rear quarter windows*
The switches are on the upper part of the
center console.
1Left side
2Right side�
Turn key in the steering lock to
position1 or2.Opening the windows
�
Press and hold the upper part of
switches1 or2.
The corresponding window will move
downwards until you release the
switch.Warning!
G
When closing the windows, make sure that
there is no danger of anyone being harmed
by the closing procedure. The closing of the
windows can be immediately halted by
releasing the switch.
When leaving the vehicle, always remove the
key from the steering lock, and lock the ve-
hicle. Do not leave children unattended in
the vehicle, or with access to an unlocked
vehicle. Unsupervised use of vehicle equip-
ment may cause an accident and / or seri-
ous personal injury.
Page 148 of 344

148 Controls in detailSliding / pop-up roof*
�Sliding / pop-up roof*Opening and closing the sliding / pop-up roof
The sliding / pop-up roof can be opened
and closed electrically. The switch for the
sliding / pop-roof is on the overhead
control panel.
1Push up to raise roof at rear
2Push back to slide roof open
3Push down to lower roof at rear
4Push forward to slide roof closedWith the roof closed or tilted open, a
screen can be slid into the roof opening to
guard against sun rays. When sliding the
roof open, the screen will also retract.
Warning!
G
When closing the sliding / pop-up roof, make
sure that there is no danger of anyone being
harmed by the closing procedure.
The closing procedure can be immediately
reversed by moving the switch in
direction1 or2.
When leaving the vehicle, always remove the
key from steering lock and lock your vehicle.
Do not leave children unattended in the ve-
hicle, or with access to an unlocked vehicle.
Unsupervised use of vehicle equipment may
cause an accident and / or serious personal
injury.!To avoid damaging the seals, do not
transport any objects with sharp edges
which can stick out of the
sliding / pop-up roof.
Do not open the sliding / pop-up roof if
there is snow or ice on the roof, as this
could result in malfunctions.
The sliding / pop-up roof can be opened
or closed manually should an electrical
malfunction occur (
�page 265).