Page 132 of 344
132 Controls in detailGood visibilitySun visor
The sun visors protect you from sun glare
while driving.
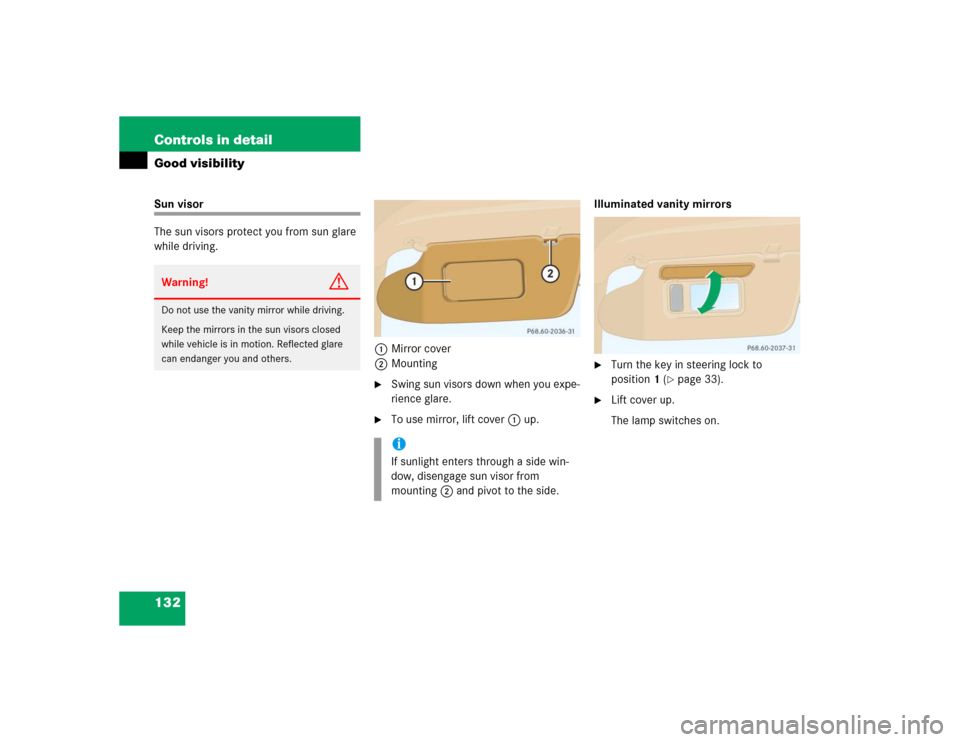
1Mirror cover
2Mounting
�
Swing sun visors down when you expe-
rience glare.
�
To use mirror, lift cover1 up.Illuminated vanity mirrors
�
Turn the key in steering lock to
position1 (
�page 33).
�
Lift cover up.
The lamp switches on.
Warning!
G
Do not use the vanity mirror while driving.
Keep the mirrors in the sun visors closed
while vehicle is in motion. Reflected glare
can endanger you and others.
iIf sunlight enters through a side win-
dow, disengage sun visor from
mounting2 and pivot to the side.
Page 136 of 344

136 Controls in detailAutomatic climate controlThe automatic climate control is operatio-
nal whenever the engine is running. You
can operate the climate control system in
either the automatic or manual mode. The
system cools or heats the interior depend-
ing on the selected interior temperature
and the current outside temperature.
Nearly all dust particles, pollutants and
odors are filtered out before outside air en-
ters the passenger compartment through
the air distribution system.Warning!
G
When operating the automatic climate con-
trol, the air that enters the passenger com-
partment through the air vents in the
footwell can be very hot or very cold (de-
pending on the set temperature). This may
cause burns or frostbite on unprotected skin
in the immediate area of the air vents.
Always keep sufficient distance between un-
protected parts of the body and the footwell
air vents. If necessary, change the air flow
using the air distribution controls to direct
the air away from the footwell air vents
(�page 138).
Warning!
G
Follow the recommended settings for heat-
ing and cooling given on the following pag-
es. Otherwise the windows could fog up,
impairing visibility and endangering you and
others.
iSevere conditions (e.g. strong air pollu-
tion) may require replacement of the fil-
ter before its scheduled interval. A
clogged filter will reduce the air volume
to the interior.
If the vehicle interior is hot, ventilate
the interior before driving off.
Keep the air intake grille in front of the
windshield free of snow and debris.
Do not touch the interior temperature
sensor to maintain a precise tempera-
ture.
The set value is indicated by a lighted
segment on the control wheels.
Page 144 of 344

144 Controls in detailPower windows
�Power windowsOpening and closing the side windows
The side windows can be opened and
closed electrically. The switches for all the
side windows are on the driver’s door. The
switches for the respective windows are
on the passenger door and on the rear cen-
ter console.
1Left front window
2Right front window
3Right rear window
4Left rear window
5Rear window override switch
(
�page 73).
Additional switches for the rear windows
are located on the rear center console.6Left rear window
7Right rear window
�
Turn key in the steering lock to
position1 or2.
Warning!
G
When closing the windows, make sure that
there is no danger of anyone being harmed
by the closing procedure.
The closing of the door windows can be im-
mediately halted by releasing the switch or,
if switch was pressed past the resistance
point and released, by pressing the respec-
tive switch.
If the window encounters an obstruction
that blocks its path in a circumstance where
you pressed the switch past the resistance
point and released it to close the window,
the automatic reversal function will stop the
window and open it slightly.
If the window encounters an obstruction
that blocks its path in a circumstance where
you are closing the window by pressing the
switch and holding it there, the automatic
reversal function will not operate.
When leaving the vehicle, always remove the
key from the steering lock, and lock your ve-
hicle. Do not leave children unattended in
the vehicle, or with access to an unlocked
vehicle. Unsupervised use of vehicle equip-
ment can cause an accident and / or serious
personal injury.
Page 145 of 344

145 Controls in detail
Power windows
Opening the windows�
Press switch1 to4 at the
symbolk to the resistance point.
The corresponding window will move
downwards until you release the
switch.
Closing the windows
�
Press switch1 to 4 at the
symbolj to the resistance point.
The corresponding window will move
upwards until you release the switch.Fully opening the windows
(Express-open)
�
Press switch1 to4 at the
symbolk past the resistance point
and release.
The corresponding window opens com-
pletely.
Fully closing the windows
(Express-close)
�
Press switch1 to4 at symbolj
past the resistance point and release.
The corresponding window closes com-
pletely.
Stopping windows
�
Press respective switch again.
Warning
G
If you pull and hold the switch up when clos-
ing the window, and upward movement of
the window is blocked by some obstruction
including but not limited to arms, hands, fin-
gers, etc., the automatic reversal will not op-
erate.
!If the upward movement of the window
is blocked during the closing proce-
dure, the window will stop and open
slightly.
Remove the obstruction, press the
switchj again past the resistance
point and release.
If the window still does not close when
there is no obstruction, then hold the
switchj down. The side window
will then close without the obstruction
sensor function.Warning!
G
Driver’s door only:
If within five seconds switch j is again
pressed past the resistance point and
released, the automatic reversal will not
operate.
Page 154 of 344

154 Controls in detailDriving systemsMonitoring reach of sensors
The sensors must be free of dirt, ice and
snow or they will be unable to function
properly. Clean the sensors regularly with-
out scratching or damaging them.Front sensors
Rear sensorsMinimum distance
When an obstacle is located in this area, all
warning displays will light up and a warning
tone will sound. If the vehicle moves closer
than the minimum distance to an object,
the distance may no longer be displayed.
Center
approx. 39 in (100 cm)
Corners
approx. 24 in (60 cm)
Center
approx. 47 in (120 cm)
Corners
approx. 32 in (80 cm)
iDuring parking maneuvers, pay special
attention to objects located above or
below the height of the sensors (e.g.
planters or trailer hitches). The Parktro-
nic system will not detect such objects
at close range and damage to your ve-
hicle or the object may result.
Ultrasonic signals from outside sourc-
es (e.g. truck air brakes or jackham-
mers) may impair the operation of the
Parktronic system.
Center
approx. 8 in (20 cm)
Corners
approx. 6 in (15 cm)
Page 155 of 344

155 Controls in detail
Driving systems
Warning indicators
The warning indicators show the distance
between the sensor and the obstacle. The
warning indicators for the front area are lo-
cated above the center air vents in the
dashboard. The warning indicator for the
rear area is located in the rear passenger
compartment lamp.
1Segments, left side of vehicle
2Segments, right side of vehicle
Each warning indicator has six yellow and
two red segments.The gear selector lever position deter-
mines which warning indicator is activat-
ed.
As soon as the sensors detect an obstacle,
one or more segments light up, depending
on the distance. An intermittent acoustic
warning will also sound as the seventh seg-
ment comes on and a constant acoustic
warning lasting a maximum of
three seconds will sound for the eighth
segment.
Selector lever
position
Warning indicator
D, R, N, P
Front area activated
R
Rear area activated
!If all red segments light up in the warn-
ing indicators, a dirty sensor or a ultra-
sonic signal could be the reason.�
Clean the sensors (
�page 237).
After cleaning the sensors, switch
the ignition on.
Page 156 of 344
156 Controls in detailDriving systemsSwitching Parktronic system on / off
You can switch Parktronic system off
manually.
The switch is located on the lower part of
the center console.
1Parktronic off
2Indicator lamp
3Parktronic onSwitching Parktronic off
�
Press switch on the upper part1.
Indicator lamp2 comes on.
Switching Parktronic on
�
Press switch on the upper part3.
The indicator lamp2 goes out.!If the Parktronic system is malfunction-
ing, all red segments of the warning in-
dicators light up and an additional
warning sounds.
Contact your Mercedes-Benz Light
Truck Center as soon as possible.
iIf you switch the ignition on, the
Parktronic system will be automatically
switched on.
The rear Parktronic sensors will not au-
tomatically disengage when towing a
trailer. Therefore switch the Parktronic
system off.
Page 159 of 344

159 Controls in detail
Loading
Hooks
Four hooks located on the rear compart-
ment trim panels, two on each side.HooksUse the hooks to secure light weight items.
The maximum permissible weight per hook
is 9 lbs (4 kg).
Partition net*Use of the partition net is a particularly im-
portant safety factor when the vehicle is
loaded higher than the top of the seat
backrests with smaller objects.
The partition net can be installed behind
the backrests of the front or rear seats.
Engaging partition net
1Holder
2Mounting hookWarning!
G
Always lock backrest in its upright position
when rear seat bench is occupied by pas-
sengers, or cargo is being carried behind the
seat bench.
To help avoid personal injury from smaller
objects flying in the occupant area during a
collision or sudden maneuver, always use
partition net when transporting cargo.
The partition net cannot prevent the move-
ment of large, heavier objects into the pas-
senger area in an accident. Such items must
be properly secured using the cargo
tie-down rings in the cargo area floor
(�page 158).
Passenger use of seats behind installed par-
tition net is restricted because of the foot-
well being taken up by the net.