Page 146 of 344

146 Controls in detailPower windowsSynchronizing power windows
The power window must be resynchroni-
zed each time�
after the battery has been discon-
nected.
�
if the power windows cannot be fully
opened (Express-open) or closed (Ex-
press-close).
Synchronizing the power windows
�
Switch on ignition.
�
Press the power window switches at
the symbolj until the side win-
dows are closed.
Hold the switches for approximately
one second.
The power window are synchronized.
Rear quarter windows*
The switches are on the upper part of the
center console.
1Left side
2Right side�
Turn key in the steering lock to
position1 or2.Opening the windows
�
Press and hold the upper part of
switches1 or2.
The corresponding window will move
downwards until you release the
switch.Warning!
G
When closing the windows, make sure that
there is no danger of anyone being harmed
by the closing procedure. The closing of the
windows can be immediately halted by
releasing the switch.
When leaving the vehicle, always remove the
key from the steering lock, and lock the ve-
hicle. Do not leave children unattended in
the vehicle, or with access to an unlocked
vehicle. Unsupervised use of vehicle equip-
ment may cause an accident and / or seri-
ous personal injury.
Page 156 of 344
156 Controls in detailDriving systemsSwitching Parktronic system on / off
You can switch Parktronic system off
manually.
The switch is located on the lower part of
the center console.
1Parktronic off
2Indicator lamp
3Parktronic onSwitching Parktronic off
�
Press switch on the upper part1.
Indicator lamp2 comes on.
Switching Parktronic on
�
Press switch on the upper part3.
The indicator lamp2 goes out.!If the Parktronic system is malfunction-
ing, all red segments of the warning in-
dicators light up and an additional
warning sounds.
Contact your Mercedes-Benz Light
Truck Center as soon as possible.
iIf you switch the ignition on, the
Parktronic system will be automatically
switched on.
The rear Parktronic sensors will not au-
tomatically disengage when towing a
trailer. Therefore switch the Parktronic
system off.
Page 167 of 344
167 Controls in detail
Useful features
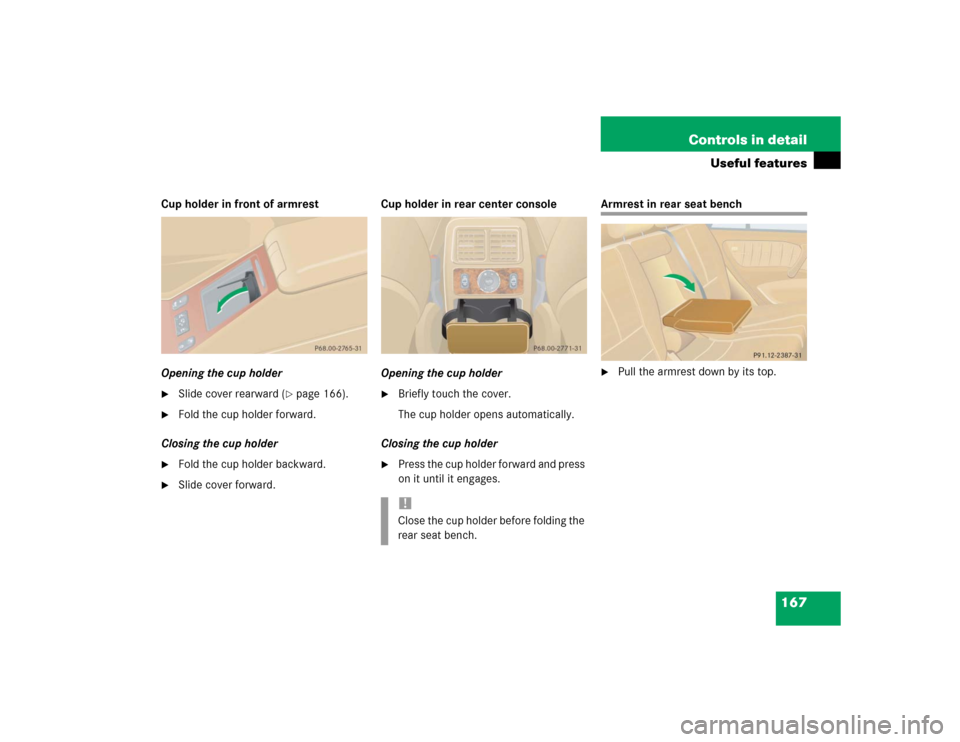
Cup holder in front of armrest
Opening the cup holder�
Slide cover rearward (
�page 166).
�
Fold the cup holder forward.
Closing the cup holder
�
Fold the cup holder backward.
�
Slide cover forward.Cup holder in rear center console
Opening the cup holder
�
Briefly touch the cover.
The cup holder opens automatically.
Closing the cup holder
�
Press the cup holder forward and press
on it until it engages.
Armrest in rear seat bench�
Pull the armrest down by its top.
!Close the cup holder before folding the
rear seat bench.
Page 168 of 344

168 Controls in detailUseful featuresAshtrays and cigarette lighter Ashtray and cigarette lighter in the
front center console
1Ashtray
2Cigarette lighter
3Cover plate
Opening the ashtray
�
Briefly touch cover plate3.
The ashtray opens automatically.Removing ashtray insert
�
Secure vehicle from movement by set-
ting the parking brake. Move the gear
selector lever to positionN.
Now you have more room to take out
the insert.
�
Grip the insert on the sides and pull it
out upwards.
Reinstalling ashtray insert
�
Install ashtray insert.
�
Close the ashtray.
Warning!
G
Never touch the heating element or sides of
the cigarette lighter; they are extremely hot.
Hold the knob only.
When leaving the vehicle always remove the
key from the steering lock. Do not leave chil-
dren unattended in the vehicle, or with ac-
cess to an unlocked vehicle. Unsupervised
use of vehicle equipment may cause an ac-
cident and / or serious personal injury.iThe cigarette lighter socket can be
used to accommodate electrical acces-
sories up to a maximum of 50 W.
If the engine is off, the battery may be-
come discharged when used for long
periods of time.
Warning!
G
Remove ashtray only with vehicle standing
still. Set the parking brake to secure vehicle
from movement. Move gear selector lever to
positionN. With gear selector lever in
positionN, turn off the engine.
Page 169 of 344
169 Controls in detail
Useful features
Cigarette lighter�
Switch on the ignition.
�
Push in cigarette lighter2
(�page 168).
The cigarette lighter will pop out auto-
matically when hot.
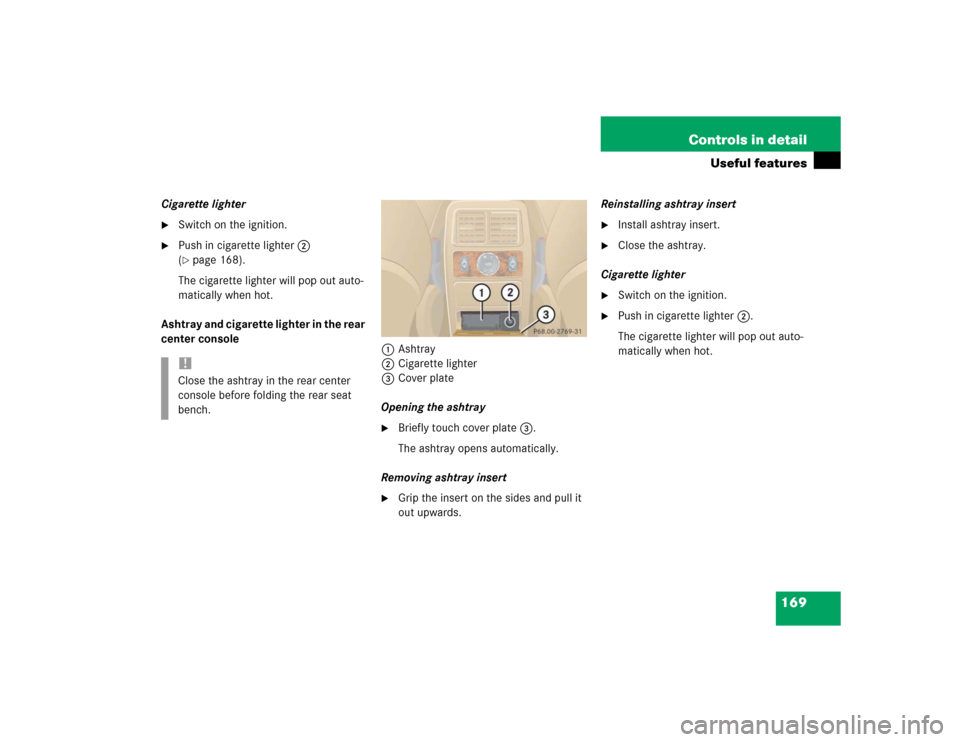
Ashtray and cigarette lighter in the rear
center console
1Ashtray
2Cigarette lighter
3Cover plate
Opening the ashtray
�
Briefly touch cover plate3.
The ashtray opens automatically.
Removing ashtray insert
�
Grip the insert on the sides and pull it
out upwards.Reinstalling ashtray insert
�
Install ashtray insert.
�
Close the ashtray.
Cigarette lighter
�
Switch on the ignition.
�
Push in cigarette lighter2.
The cigarette lighter will pop out auto-
matically when hot.
!Close the ashtray in the rear center
console before folding the rear seat
bench.
Page 318 of 344

318 IndexAir conditioning refrigerant 302
Air outlets
Automatic climate control 142
Air pressure see Tire inflation
pressure 227
Air recirculation mode 138
Activating 139
Deactivating 139
AIRBAG OFF
Warning lamp 243
Airbags 59
BabySmart
TM airbag deactivation
system 311
BabySmartTM deactivation
system 70
Children 60
Front 63
Passenger 63
Safety guidelines 62
Side impact 64
Window curtain 64Alarm
Audible 75, 84, 86
Canceling 84, 86
Visual 83
Alarm system
Anti-theft 83
Anticorrosion/antifreeze 305
Antiglare
Automatic 126
Antilock brake system (ABS) 311
Anti-theft alarm system
Arming 83
Canceling alarm 84, 86
Disarming 84
Anti-theft systems
Anti-theft alarm system 83
Immobilizer 83
Tow-away alarm, glass breakage
sensor 84
Aquaplaning see Hydroplaning 197
Armrest
Storage compartment in front of 165
Storage spaces 165Armrest in rear seat bench 167
Ashtray
Front center console 168
Rear center console 169
ATF (automatic transmission fluid) 222
Attaching a trailer 208
Automatic antiglare for rear view
mirror 126
Automatic central locking
Activating 93
Deactivating 93
Automatic climate control 134
Adjusting air distribution 137
Adjusting air volume 137
Air conditioning 139
Air outlets 142
Air recirculation mode 138
Basic setting 137
Changing basic setting 137
Defrosting 138
Economy mode 135
Page 320 of 344

320 IndexBulbs, replacing 266
Additional turn signals 266
Backup lamps 267
Brake lamps 267
Fog lamps 266
Front fog lamp 270
Front lamps 266
High beam 266
High mounted brake lamp 267, 271
License plate lamps 267, 271
Low beam 266
Parking lamps 266, 267, 269
Rear fog lamp 267
Rear fog lamps 270
Rear side marker lamp bulbs 270
Side marker lamps 266, 267, 269
Standing lamps 266, 267
Tail lamp assemblies 267, 270
Turn signal lamps 266, 267, 269C
CAC (Customer Assistance Center) 311
Calibrating compass 188
California
Important notice 11
Calling up
Service indicator 233
CAN system 311
Capacities
Fuels, coolants, lubricants, etc. 300
Cargo area cover blind* 161
Closing 161
Installing 162
Opening 161
Removing 161
Cargo area see Cargo compartment 89
Cargo compartment
Liftgate 89
Lighting 114
Tie-down rings 158Cargo floor plates 162
Installing 163
Removing 162
Storing 162
Cargo tie-down rings 158
Catalytic converter 212
CD-changer* 258
Center console 27
Lower part 28
Upper part 27
Central locking
Automatic 93
From inside 93
Switch 94
Unlocking from inside 93, 94
Central locking switch 94
Certification label 292
Charge indicator lamp 254
Charging
Vehicle battery 279
Page 321 of 344

321 Index
Chart
Fuses 287
CHECK ENGINE malfunction indicator
lamp 248
Checking
Coolant level 215, 222
Oil level 218
Tire inflate pressure 216
Vehicle lighting 216
Checking weights
Trailer and vehicle 208
Checklist
Off-road driving 201
Returning from off-road driving 206
Child safety 67
Airbags 60
Infant and child restraint systems 64,
68
LATCH child seat mounts 72
Child safety switch see Blocking of rear
door window operation 73Cigarette lighter
Front center console 168
Cleaning
Cup holder 238
Gear selector lever 238
Hard plastic trim items 238
Headlamps 131
Headliner 238
Instrument cluster 238
Leather upholstery 239
Light alloy wheels 238
MB Tex upholstery 239
Plastic and rubber parts 239
Seat belts 238
Steering wheel 238
Windows 237
Windshield 50
Wiper blades 237
Clock 26, 118Closing
Glove box 164
Hood 218
Liftgate 92
Rear quarter windows* 147
Side windows 145
Sliding/pop-up roof* 148, 265
Closing sliding/pop-up roof*
In an emergency 265
Cockpit 22, 311
Combination switch
High beam flasher 49, 110
Turn signals 49
Windshield wipers 49
Compass 187
Calibrating 188
Setting compass zone 188
Compass zone 188
Consumer information 308
Control and operation of radio
transmitters 211