Page 209 of 344

209 Operation
Driving instructions
Towing a trailer
There are many different laws, including
speed limit restrictions, having to do with
trailer towing. Make sure your rig will be le-
gal, not only for where you reside, but also
for where you will be driving. A good
source for this information can be the po-
lice or local authorities.
Note the following points, when driving
with the trailer:�
In order to gain skill and an under-
standing of the vehicle’s behavior, you
should practice turning, stopping and
backing up in an area which is free from
traffic.
�
Before you start driving check the�
trailer hitch
�
break-away switch
�
safety chains
�
electrical connections
�
lighting and tiresAdjust the mirrors to permit unobstructed
view beyond rear of trailer.
�
If the trailer has electric brakes, start
your vehicle and trailer moving slowly,
and then apply only the trailer brake
controller by hand to be sure the
brakes are working properly.
�
Always secure items in the trailer to
prevent load shifts while driving.
�
When towing a trailer, check occasion-
ally to be sure that the load is secure,
and that lighting and trailer brakes (if
so equipped) are functioning properly.
�
Take into consideration that when tow-
ing a trailer, the handling characteris-
tics are different and less stable from
those when operating the vehicle with-
out a trailer.
It is important to avoid sudden maneu-
vers.
!Do not connect a trailer brake system
(if trailer is so equipped) directly to the
vehicle’s hydraulic brake system, as
your vehicle is equipped with antilock
brakes. If you do, neither the vehicle’s
brakes nor the trailer’s brakes will func-
tion properly.iThe provided vehicle electrical wiring
harness for trailer towing has a brake
signal wire (color orange) for hook-up
to a brake controller.
You should consider using a trailer
sway control system. For further infor-
mation see your authorized
Mercedes-Benz Light Truck Center.
Page 217 of 344

217 Operation
Engine compartment
�Engine compartment
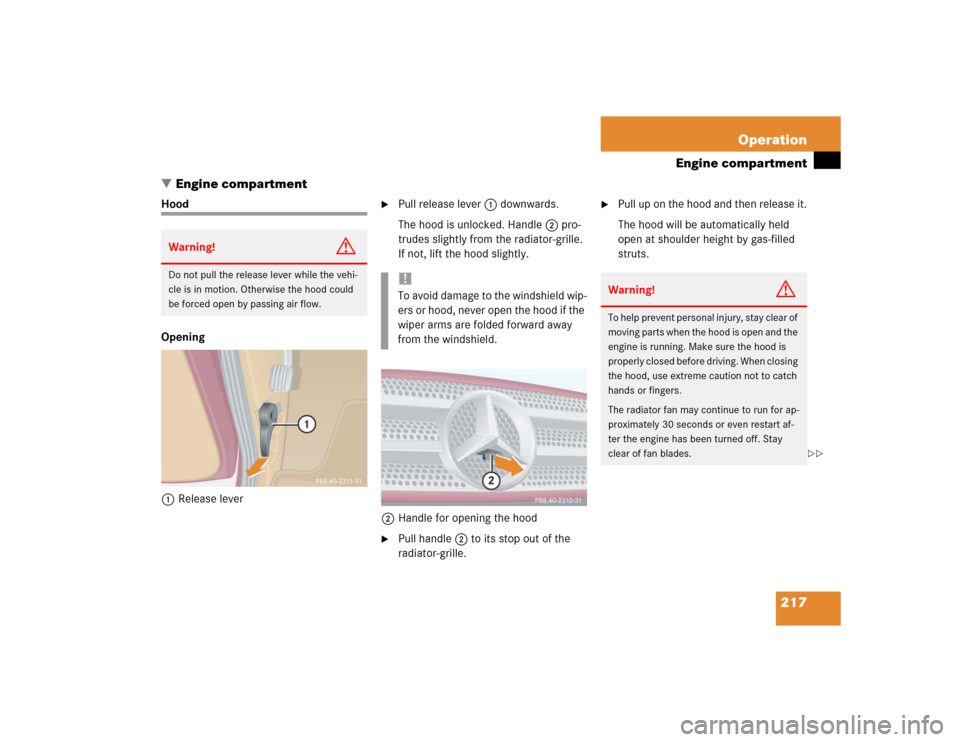
Hood
Opening
1Release lever
�
Pull release lever1 downwards.
The hood is unlocked. Handle2 pro-
trudes slightly from the radiator-grille.
If not, lift the hood slightly.
2Handle for opening the hood
�
Pull handle2 to its stop out of the
radiator-grille.
�
Pull up on the hood and then release it.
The hood will be automatically held
open at shoulder height by gas-filled
struts.
Warning!
G
Do not pull the release lever while the vehi-
cle is in motion. Otherwise the hood could
be forced open by passing air flow.
!To avoid damage to the windshield wip-
ers or hood, never open the hood if the
wiper arms are folded forward away
from the windshield.
Warning!
G
To help prevent personal injury, stay clear of
moving parts when the hood is open and the
engine is running. Make sure the hood is
properly closed before driving. When closing
the hood, use extreme caution not to catch
hands or fingers.
The radiator fan may continue to run for ap-
proximately 30 seconds or even restart af-
ter the engine has been turned off. Stay
clear of fan blades.
��
Page 254 of 344
254 Practical hintsWhat to do if …Problem
Possible cause
Suggested solution
#
The red charge indicator lamp
comes on when the engine is
running.
The battery is no longer charging.
Possible causes:�
alternator malfunctioning
�
broken poly-V-belt
�
Stop immediately and check the
poly-V-belt.
If it is broken
�
Do not continue to drive, before the
poly-V-belt is replaced.
Notify an authorized Mercedes-Benz
Light Truck Center.
2
The yellow brake indicator lamp
comes on during braking or after
starting the engine.
The brake pads are worn down.
�
Have the system checked at an autho-
rized Mercedes-Benz Light Truck
Center.
!Brake pad thickness must be visually
checked by a qualified technician at the
intervals specified in the Service book-
let.
Page 336 of 344

336 IndexSide windows 144
Automatic closing 145
Automatic opening 145
Cleaning 237
Closing 145
Closing fully (Express-close) 145
Opening 145
Opening and closing 144
Opening fully (Express-open) 145
Rear quarter window 146
Stopping 145
Synchronizing power windows 146
Simultaneous wiping and washing
Rear window wiper/washer 51
Windshield wipers 50
Single wipe 50
Sliding/pop-up roof* 148
Closing 148, 265
Opening 148, 265
Synchronizing 149
Snow chains 231
Spare fuses 287
Spare parts service 290Spare wheel 259
Mounting 274
Removing 259
Speed
Saving current 151
Speed settings
Cruise control 152
Speedometer 25
Speedometer display
Additional indicators 256
Split rear bench seat 99
SRS 66, 314
Indicator lamp 255
Standing lamps 107
Replacing bulbs 266, 267
Standing water
Driving instructions 200
StArt
Display messages 256
Starting difficulties 47
Starting position 33
Starting the engine 46Steep terrain
Driving 202
Steering column
Height adjustment 39
Length adjustment 39
Steering lock 23, 33
Positions 33
Steering wheel
Adjusting 39
Adjustment 39
Cleaning 238
Stolen vehicle
Tracking services 180
Stop watch 189
Stopping
Windows 145
Storage compartments
Glove box 164
Under front passenger seat* 164
Storing (Memory function*)
Positions into memory 106
Stranded vehicle 286