Page 266 of 344
266 Practical hintsReplacing bulbs
�Replacing bulbsSafe vehicle operation depends on proper
exterior lighting and signaling. It is there-
fore essential that all bulbs and lamp as-
semblies are in good working order at all
times.
Correct headlamp adjustment is extremely
important. Have headlamps checked and
readjusted at regular intervals and when a
bulb has been replaced. See your autho-
rized Mercedes-Benz Light Truck Center
for headlamp adjustment.
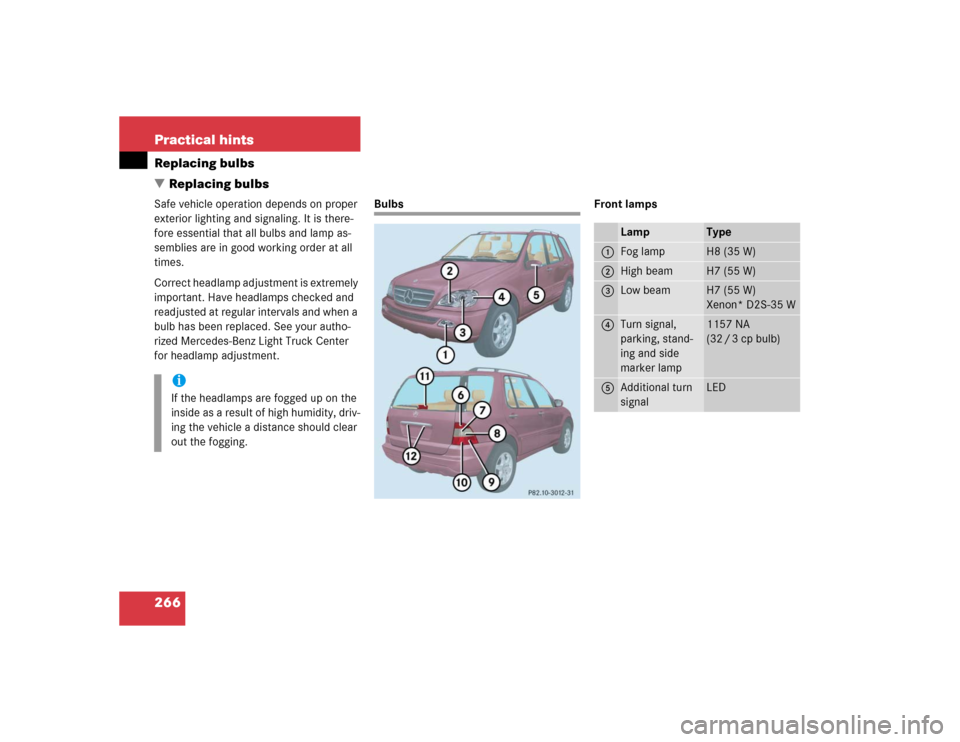
Bulbs Front lamps
iIf the headlamps are fogged up on the
inside as a result of high humidity, driv-
ing the vehicle a distance should clear
out the fogging.
Lamp
Type
1
Fog lamp
H8 (35 W)
2
High beam
H7 (55 W)
3
Low beam
H7 (55 W)
Xenon* D2S-35 W
4
Turn signal,
parking, stand-
ing and side
marker lamp
1157 NA
(32 / 3 cp bulb)
5
Additional turn
signal
LED
Page 268 of 344
268 Practical hintsReplacing bulbsReplacing bulbs for front lamps
Replacing low beam bulbs
1Low beam halogen or Bi-Xenon* head-
lamp cover with locking tab2Electrical connector
Bi-Xenon* headlampHalogen headlamp
�
Switch off the lights.
�
Open the hood (
�page 217).
�
Push down tab at top end of cover1
and remove.
�
Pull electrical connector2 off.
�
Unclip the retainer springs and take out
the bulb.
�
Insert the new bulb so that the base lo-
cates in the recess on the holder.
�
Clip the retainer springs.
�
Plug the connector2 onto the bulb.
�
Align headlamp cover and click into
place.
Warning!
G
Do not remove the cover
1
for the
Bi-Xenon headlamp. Because of high voltage
in xenon lamps, it is dangerous to replace
the bulb or repair the lamp and its compo-
nents. We recommend that you have such
work done by a qualified technician.
Page 272 of 344

272 Practical hintsReplacing bulbs�
Insert reflector from the left so that it
engages on the right.
�
Position tabs of cover in slots and rein-
stall cover until properly seated.
Adjusting headlamp aim
VVertical centerline
HHeadlamp mounting high, measured
from the centerCorrect headlamp adjustment is extremely
important. To check and readjust a head-
lamp, follow the steps described:
�
Park the vehicle on a level surface
25 feet (7.6 m) from a vertical test
screen or wall.
�
Switch the headlamps on
(�page 110).
If the beam does not show a beam pattern
as indicated in the figure left, then follow
the steps below:
�
Open hood (
�page 217).
2Headlamp vertical adjustment screw
3Headlamp vertical adjustment screw
�
Always turn adjustment screws2
and3 simultaneously for vertical ad-
justment until the headlamp is adjust-
ed as shown1. Turn clockwise for
upward movement and counterclock-
wise for downward movement.
Graduations:
screw2: 0.50° pitch
screw3: 0.67° pitch
The left and right headlamps must be ad-
justed individually.
iHigh beam adjustments simultaneous-
ly aim the low beam.
Vehicle should have a normal trunk
load.
iIf it is not possible to obtain a proper
headlamp adjustment, have the system
checked at your authorized
Mercedes-Benz Light Truck Center.
��
Page 311 of 344

Prevents the wheels from locking up
during braking so that the vehicle can
continue to be steered.
BabySmart
TM airbag deactivation
system
This sy")
311 Technical terms
ABS
(A
ntilock B
rake S
ystem)
Prevents the wheels from locking up
during braking so that the vehicle can
continue to be steered.
BabySmart
TM airbag deactivation
system
This system detects if a special system
compatible child restraint seat is in-
stalled on the front passenger seat. The
system will automatically deactivate
the passenger front airbag when such a
seat is properly installed (indicator
lamp7 in the instrument cluster
lights up). See your authorized
Mercedes-Benz Light Truck Center for
availability.
BabySmartTM compatible child seats
Special restraint system for children.
The sensor system for the passenger
seat prevents deployment of the pas-
senger front airbag if a BabySmart
TM
compatible child seat is installed.BAS
(B
rake A
ssist S
ystem)
System for potentially reducing braking
distances in emergency braking situa-
tions. The system is activated when it
senses an emergency based on how
fast the brake is applied.
Bi-Xenon headlamps*
Headlamps which use an electric arc as
the light source and produce a more in-
tense light than filament headlamps.
Bi-Xenon headlamps produce low
beam and high beam.
CAC
(C
ustomer A
ssistance C
enter)
Mercedes-Benz customer service cen-
ter, which can help you with any ques-
tions about your vehicle and provide
assistance in the event of a break-
down.CAN system
(C
ontroller A
rea N
etwork)
Data bus network serving to control ve-
hicle functions such as door locking or
windshield wiping.
Cockpit
All instruments, switches, buttons and
indicator / warning lamps in the pas-
senger compartment needed for vehi-
cle operation and monitoring.
Cruise control
Driving convenience system for auto-
matically maintaining the vehicle speed
set by the driver.
Engine number
The number set by the manufacturer
and placed on the cylinder block to
uniquely identify each engine pro-
duced.
Page 317 of 344

317 Index
A
ABS 25, 76, 311
ABS control 76
LOW RANGE mode 77
Malfunction indicator lamp 242
Warning lamp 242
Accelerator position, automatic
transmission 123
Accident
In case of 52
Activating
Air circulation mode 139
Air recirculation mode 139
Anti-theft alarm system 83
Automatic climate control 135
ESP 82
Exterior headlamps 48
Hazard warning flasher 112
Headlamps 48
High beams 110
Ignition 33Immobilizer 54, 83
Rear passenger compartment ventila-
tion and climate control 141
Rear window defroster 133
Rear window wiper 51
Residual heat 140
Seat heater* 98
Tow-away alarm 85
Warning indicators (Parktronic*) 155
Windshield wipers 50
Activating automatic central locking 93
Adding
Coolant 223
Engine oil 221
Additional turn signals 266
Adjustable steering column
Indicator lamp 253
Adjusting 34
Backrest tilt 36, 38
Exterior rear view mirror 40
Head restraint height 36, 38Head restraint tilt 37, 39
Headlamp aim 272
Instrument cluster illumination 116
Manual seat 35
Mirrors 40
Power seats* 37
Seat cushion tilt 38
Seat fore and aft 35
Seat fore and aft adjustment 37
Seat height 36, 38
Seats 34
Steering wheel 39
Adjusting air distribution
Automatic climate control 137
Adjusting air volume
Automatic climate control 137
Air conditioner (cooling)
Turning on 139
Air conditioning
Cooling 139
Page 320 of 344

320 IndexBulbs, replacing 266
Additional turn signals 266
Backup lamps 267
Brake lamps 267
Fog lamps 266
Front fog lamp 270
Front lamps 266
High beam 266
High mounted brake lamp 267, 271
License plate lamps 267, 271
Low beam 266
Parking lamps 266, 267, 269
Rear fog lamp 267
Rear fog lamps 270
Rear side marker lamp bulbs 270
Side marker lamps 266, 267, 269
Standing lamps 266, 267
Tail lamp assemblies 267, 270
Turn signal lamps 266, 267, 269C
CAC (Customer Assistance Center) 311
Calibrating compass 188
California
Important notice 11
Calling up
Service indicator 233
CAN system 311
Capacities
Fuels, coolants, lubricants, etc. 300
Cargo area cover blind* 161
Closing 161
Installing 162
Opening 161
Removing 161
Cargo area see Cargo compartment 89
Cargo compartment
Liftgate 89
Lighting 114
Tie-down rings 158Cargo floor plates 162
Installing 163
Removing 162
Storing 162
Cargo tie-down rings 158
Catalytic converter 212
CD-changer* 258
Center console 27
Lower part 28
Upper part 27
Central locking
Automatic 93
From inside 93
Switch 94
Unlocking from inside 93, 94
Central locking switch 94
Certification label 292
Charge indicator lamp 254
Charging
Vehicle battery 279
Page 329 of 344

329 Index
Lighting 107
Automatic headlamp mode 108
Cargo compartment 114
Combination switch 110
Daytime running lamp mode 109
Door entry lamps 113
Front fog lamps 111
High beam flasher 110
High beams 110
Instrument cluster illumination 116
Interior 112
Locator lighting 110
Night security illumination 109
Limiting the gear range 121
Limp Home Mode 124
Line of fall 313
Loading 157
Cargo area cover blind* 161
Cargo floor plates 162
Cargo tie-down rings 158
Hooks 159
Instructions 157, 158
Partition net* 159
Roof rack 163Split rear bench seat 99
Trailer 208
Locator lighting 110
Lock button 313
Locking 88
Automatic while driving 93
Centrally from inside 94
Fuel filler flap 214
Global 89
Vehicle in an emergency 262
Locking knobs 32
Loss of keys 90
Loss of Service and Warranty Information
Booklet 291
Low beam headlamps
Replacing bulbs 266, 268
Switching on 48
Low engine oil level
Indicator lamp 253
LOW RANGE - 4-ETS 80
LOW RANGE - ABS 77LOW RANGE - ESP 81
LOW RANGE mode 125
Low washer system fluid level
Indicator lamp 253
Lowering
Vehicle 276
M
Main dimensions 298
Maintenance 12
Display messages 256
Manual operations
Fuel filler flap 263
Interior lighting control 113
Locking the vehicle 262
Sliding/pop-up roof* 265
Unlocking the driver’s door 261
Unlocking transmission selector
lever 264
Page 334 of 344

334 IndexRemote door unlock
With Tele Aid* 179
Remote Vehicle Diagnostics 314
Removing
Vehicle battery 279
Wheel 276
Wiper blades 273
Removing spare wheel 259
Replacing
Backup lamp bulbs 270
Brake lamp bulbs 270
Bulbs 266
Front lamp bulbs 268
Front turn signal bulbs 268
Fuses 287
High beam bulbs 269
High mounted brake lamp 271
License plate lamp bulbs 271
Low beam bulbs 268
Rear fog lamp bulbs 270
Rear lamp bulbs 267, 270
Rear parking lamp bulbs 270
Rear side marker lamp bulbs 270
Rear standing lamp bulbs 270
Rear turn signal bulbs 270
Wiper blades 273Replacing front fog lamp bulb 270
Reporting
Safety defects 19
Resetting
Service indicator (FSS) 233
Trip odometer 118
Residual heat utilization 140, 314
Residual ventilation 140
REST (Residual engine heat
utilization) 314
Restraint system 314
Restraint system see Infant and child re-
straint systems 68, 71
Returning from off-road driving 205
Rims 295
Roadside assistance 12
Tele Aid* 175RON 215
RON (Research Octane Number) 314
Roof rack 163
Rotating wheels 228
Rubber parts
Cleaning 239
S
Safety
Occupant 58
Safety belts see Seat belts 42
Safety defects
Reporting 19
Safety systems
Driving 76
Saving current speed 151
Seat belt force limiter 67
Seat belt height adjustment 45