Page 23 of 344
23 At a glance
Cockpit
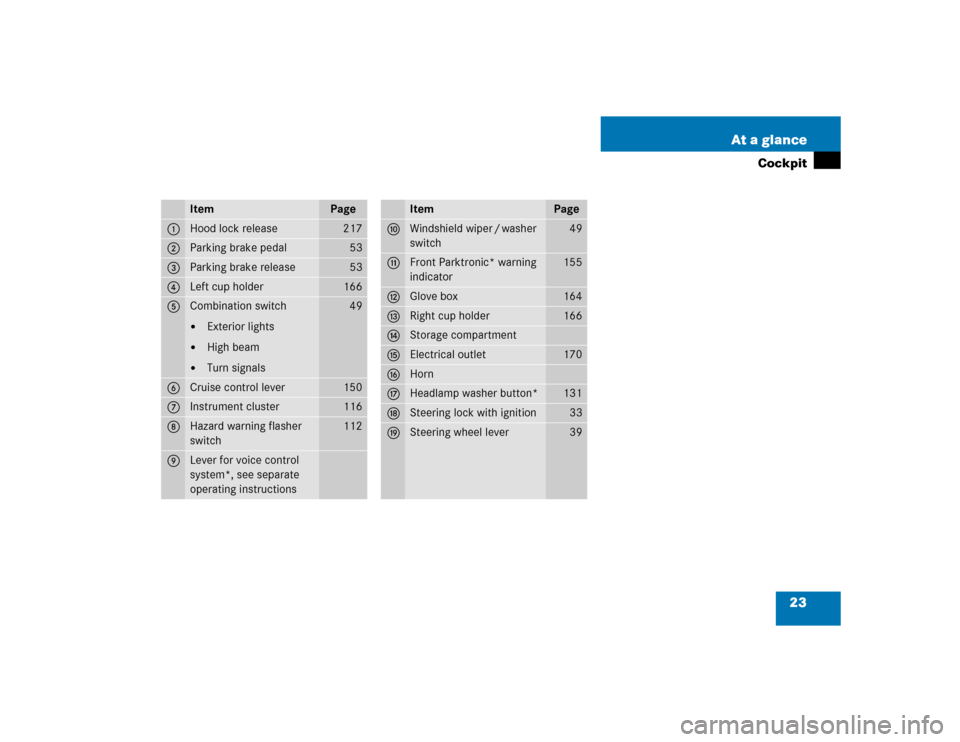
Item
Page
1
Hood lock release
217
2
Parking brake pedal
53
3
Parking brake release
53
4
Left cup holder
166
5
Combination switch�
Exterior lights
�
High beam
�
Turn signals
49
6
Cruise control lever
150
7
Instrument cluster
116
8
Hazard warning flasher
switch
112
9
Lever for voice control
system*, see separate
operating instructions
Item
Page
a
Windshield wiper / washer
switch
49
b
Front Parktronic* warning
indicator
155
c
Glove box
164
d
Right cup holder
166
e
Storage compartment
f
Electrical outlet
170
g
Horn
h
Headlamp washer button*
131
j
Steering lock with ignition
33
k
Steering wheel lever
39
Page 47 of 344

47 Getting started
Driving
Starting difficulties
If the engine does not start as described,
carry out the following steps:�
Turn key in starter to position0 and re-
peat starting procedure.
Remember that extended starting at-
tempts can drain the battery.
�
Get a jump start (
�page 281).
If the engine does not start after several
starting attempts, there could be a mal-
function in the engine electronics or in the
fuel supply system.
�
Notify an authorized Mercedes-Benz
Light Truck Center.Parking brake
1Parking brake pedal
2Release handle
�
Release the parking brake by pulling on
handle2.
The indicator lampÉ in the instru-
ment cluster goes out.
Driving
�
Depress the brake pedal.
�
Place the gear selector lever in
positionD orR.
�
Release the brake pedal.
�
Carefully depress the accelerator
pedal.
Warning!
G
When leaving the vehicle, always remove the
key from the steering lock and lock the vehi-
cle. Do not leave children unattended in the
vehicle, or with access to an unlocked vehi-
cle. Children could release the parking
brake, which could result in an accident
and / or serious personal injury.
iWait for the gear selection process to
complete before setting the vehicle in
motion.
Page 54 of 344
.
More information can be found in the
“Controls in detail” section (
�page 107).
Turning")
54 Getting startedParking and locking
Switching off headlamps�
Turn the combination switch to1
(�page 48).
More information can be found in the
“Controls in detail” section (
�page 107).
Turning off engine�
Place the gear selector lever in
positionP.
�
Turn the key in the steering lock
(�page 33) to position0 and remove
it.
The immobilizer is activated.
�
Move the steering wheel slightly to al-
low the locking mechanism to engage.
Warning!
G
When leaving the vehicle, always remove the
key from the steering lock and lock the vehi-
cle. Do not leave children unattended in the
vehicle, or with access to an unlocked vehi-
cle. Children could release the parking
brake and / or move the gear selector lever
from positionP, either of which could result
in an accident and / or serious personal
injury.
Warning!
G
Getting out of your vehicle with the gear
selector lever not fully engaged in positionP
is dangerous. Also, when parked on an in-
cline, positionP alone may not prevent your
vehicle from moving, possibly hitting people
or objects.
Always set the parking brake in addition to
shifting to positionP (
�page 53).
When parked on an incline, also turn front
wheel towards the road curb.
iAlways set the parking brake in addi-
tion to shifting to positionP.
On steep slopes, turn the front wheels
towards the road curb.iThe key can only be removed from the
steering lock with the gear selector le-
ver in positionP.
Page 76 of 344

�
BAS (B")
76 Safety and SecurityDriving and safety systems
�Driving and safety systemsIn this section you will find information on
the following driving safety systems:�
ABS (A
ntilock B
rake S
ystem)
�
BAS (B
rake A
ssist S
ystem)
�
4-ETS (E
lectronic T
raction S
ystem)
�
EBP (E
lectronic B
rake P
roportioning)
�
ESP (E
lectronic S
tability P
rogram)
ABS
The Antilock Brake System (ABS) regulates
the brake pressure so that the wheels do
not lock during braking. This allows you to
maintain the ability to steer your vehicle.
The ABS is functional above a speed of ap-
proximately 5 mph (8 km / h) independent
of road surface conditions.
On slippery road surfaces, the ABS will re-
spond even with light brake pressure.
The -indicator lamp in the instrument
cluster (
�page 25) comes on when you
turn the key to position2. It goes out when
the engine is running.
iIn winter operation, the maximum ef-
fectiveness of the ABS, the BAS, the
ESP, the EBP, and the 4-ETS is only
achieved with winter tires (M + S tires)
or snow chains as required.
Warning!
G
The following factors increase the risk of
accidents:�
Excessive speed, especially in turns
�
Wet and slippery road surfaces
�
Following another vehicle too closely
ABS, BAS, ESP and 4-ETS cannot reduce this
risk.
Always adjust your driving style to the pre-
vailing road and weather conditions.
Warning!
G
Do not pump the brake pedal. Use firm,
steady brake pedal pressure instead. Pump-
ing the brake pedal defeats the purpose of
the ABS and significantly reduces braking
effectiveness.
Page 77 of 344

77 Safety and Security
Driving and safety systems
Braking
At the instant one of the wheels is about to
lock up, a slight pulsation can be felt in the
brake pedal, indicating that the ABS is in
the regulating mode.�
Keep firm and steady pressure on the
brake pedal while experiencing the pul-
sation.
Continuous, steady brake pedal pressure
yields the advantages provided by the ABS,
namely braking power and the ability to
steer the vehicle.
The pulsating brake pedal can be an indica-
tion of hazardous road conditions and
functions as a reminder to take extra care
while driving.Emergency brake maneuver
�
Keep continuous full pressure on the
brake pedal.LOW RANGE– ABS
During off-road driving, a special low range
system for the ABS is operational with
transmission in LOW RANGE mode
(
�page 125).
When applying the service brakes at
speeds below approximately
18 mph (30 km / h), the front wheels are
locked cyclically to shorten the braking
distance (dig-in effect). This affects steer-
ing the vehicle.
iWith the ABS malfunctioning, the BAS,
the EBP, ESP, and the 4-ETS are also
switched off.
Normal driving and braking functions
are still available.
Page 154 of 344

154 Controls in detailDriving systemsMonitoring reach of sensors
The sensors must be free of dirt, ice and
snow or they will be unable to function
properly. Clean the sensors regularly with-
out scratching or damaging them.Front sensors
Rear sensorsMinimum distance
When an obstacle is located in this area, all
warning displays will light up and a warning
tone will sound. If the vehicle moves closer
than the minimum distance to an object,
the distance may no longer be displayed.
Center
approx. 39 in (100 cm)
Corners
approx. 24 in (60 cm)
Center
approx. 47 in (120 cm)
Corners
approx. 32 in (80 cm)
iDuring parking maneuvers, pay special
attention to objects located above or
below the height of the sensors (e.g.
planters or trailer hitches). The Parktro-
nic system will not detect such objects
at close range and damage to your ve-
hicle or the object may result.
Ultrasonic signals from outside sourc-
es (e.g. truck air brakes or jackham-
mers) may impair the operation of the
Parktronic system.
Center
approx. 8 in (20 cm)
Corners
approx. 6 in (15 cm)
Page 168 of 344

168 Controls in detailUseful featuresAshtrays and cigarette lighter Ashtray and cigarette lighter in the
front center console
1Ashtray
2Cigarette lighter
3Cover plate
Opening the ashtray
�
Briefly touch cover plate3.
The ashtray opens automatically.Removing ashtray insert
�
Secure vehicle from movement by set-
ting the parking brake. Move the gear
selector lever to positionN.
Now you have more room to take out
the insert.
�
Grip the insert on the sides and pull it
out upwards.
Reinstalling ashtray insert
�
Install ashtray insert.
�
Close the ashtray.
Warning!
G
Never touch the heating element or sides of
the cigarette lighter; they are extremely hot.
Hold the knob only.
When leaving the vehicle always remove the
key from the steering lock. Do not leave chil-
dren unattended in the vehicle, or with ac-
cess to an unlocked vehicle. Unsupervised
use of vehicle equipment may cause an ac-
cident and / or serious personal injury.iThe cigarette lighter socket can be
used to accommodate electrical acces-
sories up to a maximum of 50 W.
If the engine is off, the battery may be-
come discharged when used for long
periods of time.
Warning!
G
Remove ashtray only with vehicle standing
still. Set the parking brake to secure vehicle
from movement. Move gear selector lever to
positionN. With gear selector lever in
positionN, turn off the engine.
Page 193 of 344

193 Operation
Driving instructions
�Driving instructions
Drive sensibly – save fuel
Fuel consumption, to a great extent, de-
pends on driving habits and operating con-
ditions.
To save fuel you should:�
Keep tires at the recommended infla-
tion pressures
�
Remove unnecessary loads
�
Allow engine to warm up under low
load use
�
Avoid frequent acceleration and decel-
eration
�
Have all maintenance work performed
at the intervals specified in the Service
Booklet and as required by the FSS.
Contact your authorized
Mercedes-Benz Light Truck Center
Fuel consumption is also increased by driv-
ing in cold weather, in stop-and-go traffic,
on short trips and in hilly country.
Drinking and driving
PedalsPower assistance
Warning!
G
Drinking and driving and / or taking drugs
and driving are a very dangerous combina-
tion. Even a small amount of alcohol or
drugs can affect your reflexes, perceptions
and judgement.
The possibility of a serious or even fatal ac-
cident are greatly increased when you drink
or take drugs and drive.
Do not drink or take drugs and drive or allow
anyone to drive who has been drinking or
taking drugs.
Warning!
G
Keep driver’s foot area clear at all times. Ob-
jects stored in this area may impair pedal
movement.Warning!
G
With the engine is not running, there is no
power assistance for the brake and steering
systems. In this case, it is important to keep
in mind that a considerably higher degree of
effort is necessary to brake and steer the ve-
hicle.