Page 99 of 344

99 Controls in detail
Seats
Switching off rapid seat heating�
Press lower switch position2 again.
Both red indicator lamps on the switch
turn off.
Rear seats
The rear seats are divided asymmetrically.
To enlarge the cargo area you can adjust
the left and right part separately. The fol-
lowing changes are possible:�
moving the seat fore and aft
�
folding down the backrest
�
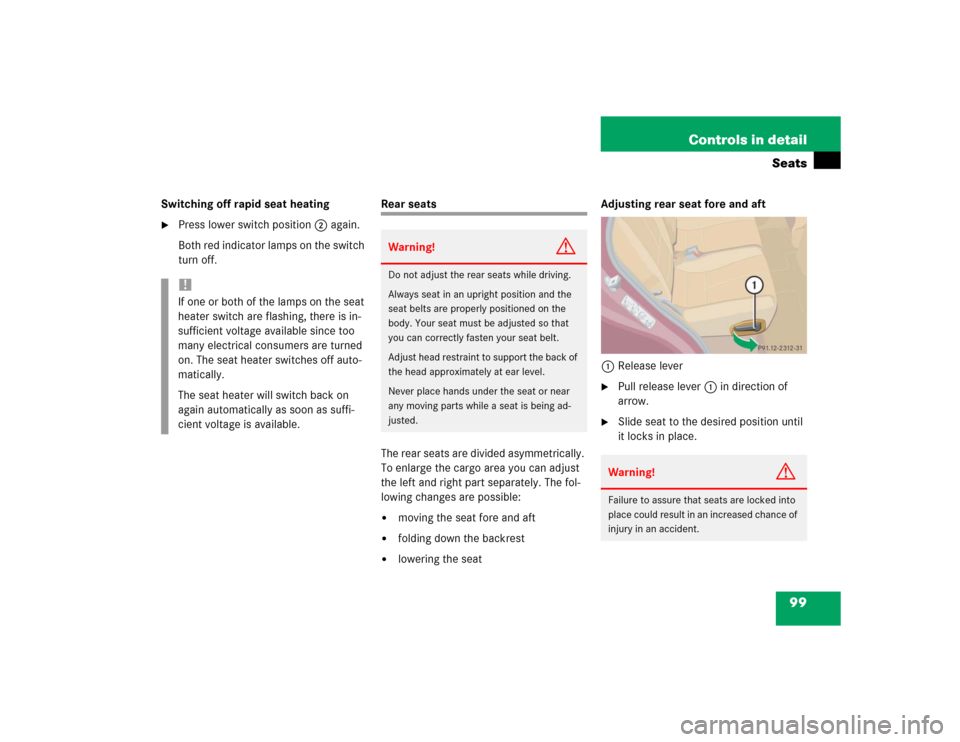
lowering the seatAdjusting rear seat fore and aft
1Release lever
�
Pull release lever1 in direction of
arrow.
�
Slide seat to the desired position until
it locks in place.
!If one or both of the lamps on the seat
heater switch are flashing, there is in-
sufficient voltage available since too
many electrical consumers are turned
on. The seat heater switches off auto-
matically.
The seat heater will switch back on
again automatically as soon as suffi-
cient voltage is available.
Warning!
G
Do not adjust the rear seats while driving.
Always seat in an upright position and the
seat belts are properly positioned on the
body. Your seat must be adjusted so that
you can correctly fasten your seat belt.
Adjust head restraint to support the back of
the head approximately at ear level.
Never place hands under the seat or near
any moving parts while a seat is being ad-
justed.
Warning!
G
Failure to assure that seats are locked into
place could result in an increased chance of
injury in an accident.
Page 102 of 344

102 Controls in detailSeatsResetting rear seat�
Pull down on seat bench until it locks
into place.
�
Pull lock button1 (
�page 100) up
and unfold backrest until it locks into
place.
�
Check for secure locking by pulling and
pushing on the backrest.
The red backrest lock indicator at lock
button1 (
�page 100) is not visible in
the locked position.
�
Move the rear and front seats in de-
sired position.
�
Pull up and adjust head restraint
(�page 36).
Third row seats*Folding down single seat
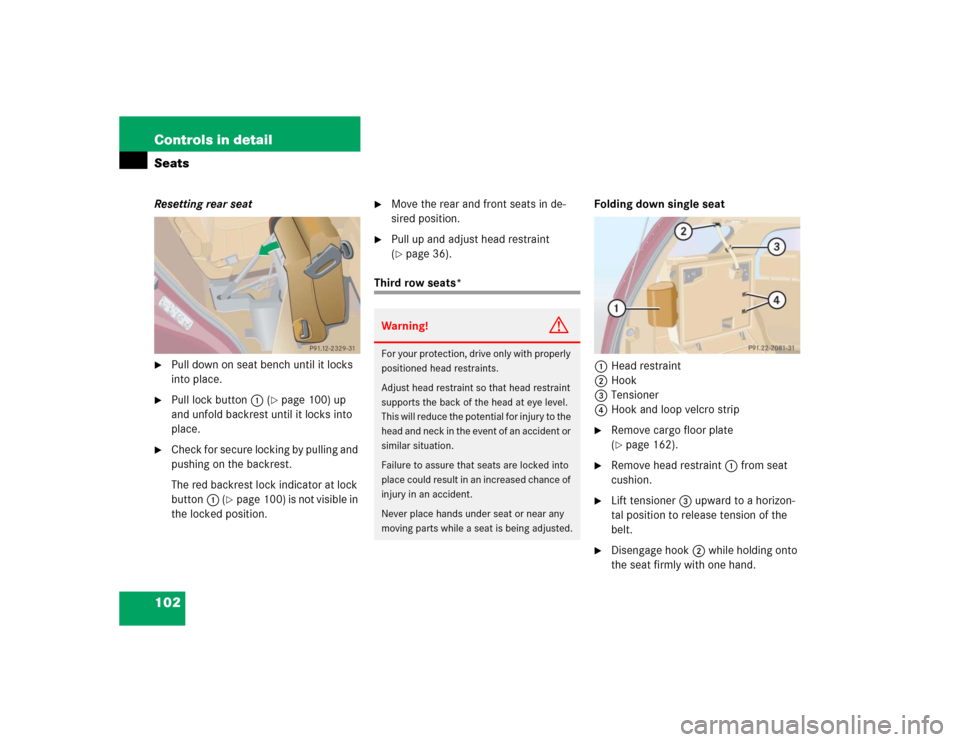
1Head restraint
2Hook
3Tensioner
4Hook and loop velcro strip
�
Remove cargo floor plate
(�page 162).
�
Remove head restraint1 from seat
cushion.
�
Lift tensioner3 upward to a horizon-
tal position to release tension of the
belt.
�
Disengage hook2 while holding onto
the seat firmly with one hand.
Warning!
G
For your protection, drive only with properly
positioned head restraints.
Adjust head restraint so that head restraint
supports the back of the head at eye level.
This will reduce the potential for injury to the
head and neck in the event of an accident or
similar situation.
Failure to assure that seats are locked into
place could result in an increased chance of
injury in an accident.
Never place hands under seat or near any
moving parts while a seat is being adjusted.
Page 103 of 344

103 Controls in detailSeats
�
Attach belt at hook and loop velcro
strip4 (
�page 102) on underside of
seat.
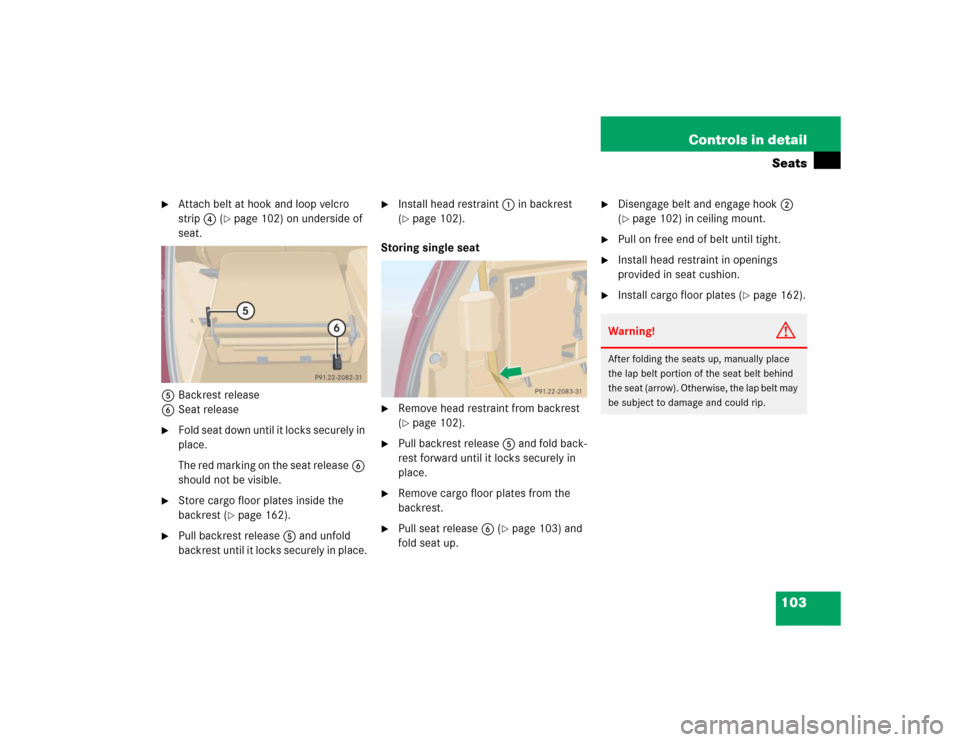
5Backrest release
6Seat release
�
Fold seat down until it locks securely in
place.
The red marking on the seat release6
should not be visible.
�
Store cargo floor plates inside the
backrest (
�page 162).
�
Pull backrest release5 and unfold
backrest until it locks securely in place.
�
Install head restraint1 in backrest
(�page 102).
Storing single seat
�
Remove head restraint from backrest
(�page 102).
�
Pull backrest release5 and fold back-
rest forward until it locks securely in
place.
�
Remove cargo floor plates from the
backrest.
�
Pull seat release6 (
�page 103) and
fold seat up.
�
Disengage belt and engage hook2
(�page 102) in ceiling mount.
�
Pull on free end of belt until tight.
�
Install head restraint in openings
provided in seat cushion.
�
Install cargo floor plates (
�page 162).
Warning!
G
After folding the seats up, manually place
the lap belt portion of the seat belt behind
the seat (arrow). Otherwise, the lap belt may
be subject to damage and could rip.
Page 104 of 344
104 Controls in detailSeatsRemoving single seat
1Hook
2Tensioner
3Hook and loop velcro strip
4Release lever
�
Lift tensioner2 upward to a horizon-
tal position to release tension of the
belt.
�
Disengage hook1 while holding onto
the seat firmly with one hand.
�
Attach belt at hook and loop strip3
on underside of seat.
�
Move release lever4 upward and re-
move seat.
Installing single seat
�
Place seat into the mounting clamps
and click the seat into place.
Page 105 of 344

105 Controls in detail
Memory function*
�Memory function*
With the memory button you can store up
to three different settings for the driver-
and passenger seat.
Together with the driver’s seat you can
store the exterior rear view mirrors.
For the front passenger seat you can store
the seat position.
Storing exterior rear view mirror parking position
For easier parking, you can adjust the pas-
senger-side exterior rear view mirror so
that you can see the right rear wheel as
soon as you engage reverse gearR.For information on activating the parking
position feature, see “Activating exterior
rear view mirror parking position”
(
�page 127).
1Position buttons
2Memory button
!Prior to operating the vehicle the driver
should check and adjust the seat
height, seat position fore and aft, and
seat backrest angle if necessary, to en-
sure adequate control, reach and com-
fort. The head restraint should also be
adjusted for proper height. See also the
section on airbags (
�page 59) for
proper seat positioning.
In addition, adjust the steering wheel to
ensure adequate control, reach, opera-
tion and comfort. Both the inside and
outside rear view mirrors should be ad-
justed for adequate rear vision.
Fasten seat belts. Infants and small
children should be seated in a properly
secured restraint system that complies
with U.S. Federal Motor Vehicle Safety
Standard 213 and 225 and Canadian
Motor Vehicle Safety Standard 213 and
210.2.
Warning!
G
Do not activate the memory function while
driving. Activating the memory function
while driving could cause the driver to lose
control of the vehicle.
Page 158 of 344
158 Controls in detailLoadingFor additional safety when transporting
cargo while the rear seats are unoccupied,
fasten the outer seat belts crosswise into
the opposite side buckles.Cargo tie-down rings
The cargo area is provided with four
tie-down rings. Additional two rings are lo-
cated at the rear of front seats.
Cargo tie-down ring
Carefully secure cargo by applying even
load on all rings with rope of sufficient
strength to hold down the cargo.
iThe cargo area is the preferred place to
carry objects. The enlarged cargo area
should only be used for items which do
not fit in the cargo area alone.
iWhile the partition net* (
�page 159)
will help protect you from smaller ob-
jects, it cannot prevent the movement
of large, heavier objects into the pas-
senger area in an accident. Such items
must be properly secured using the
cargo tie-down rings in the cargo area
floor.
Page 236 of 344

236 OperationVehicle careEngine cleaning
Prior to cleaning the engine compartment
make sure to protect electrical compo-
nents and connectors from the intrusion of
water and cleaning agents.
Corrosion protection, such as MB Anticor-
rosion Wax, should be applied to the en-
gine compartment after every engine
cleaning. Before applying, all control link-
age bushings and joints should be lubricat-
ed. The poly-V-belt and all pulleys should
be protected from any wax.
Vehicle washing
Do not use hot water or wash your vehicle
in direct sunlight. Use only a mild car wash
detergent, such as Mercedes-Benz
approved Car Shampoo.Thoroughly spray the vehicle with a dif-
fused jet of water. Direct only a very weak
spray towards the ventilation intake. Use
plenty of water and rinse the sponge and
chamois frequently.
Rinse with clear water and thoroughly dry
with a chamois. Do not allow cleaning
agents to dry on the finish.
Due to the width of the vehicle, fold in out-
side mirrors prior to running the vehicle
through an automatic car wash to prevent
damage to the mirrors.
In the winter, thoroughly remove all traces
of road salt as soon as possible.
When washing the underbody, do not for-
get to clean the inner sides of the wheels.Ornamental moldings
For regular cleaning and care of very dirty
chrome-plated parts, use a chrome clean-
er.
Headlamps, tail lamps, side markers,
turn signal lenses
Use a mild car wash detergent, such as
Mercedes-Benz approved Car Shampoo,
with plenty of water.
To prevent scratches, never apply strong
force and use only a soft, non-scratchy
cloth when cleaning the lenses. Do not at-
tempt to wipe dirty lenses with a dry cloth
or sponge.
Page 238 of 344

238 OperationVehicle careLight alloy wheels
Mercedes-Benz approved Wheel Care
should be used for regular cleaning of the
light alloy wheels.
If possible, clean wheels once a week with
Mercedes-Benz approved Wheel Care, us-
ing a soft bristle brush and a strong spray
of water.
Follow instructions on container.Instrument cluster
Use a gentle dishwashing detergent or
mild detergent for delicate fabrics as a
washing solution. Wipe with a cloth moist-
ened in lukewarm solution. Do not use
scouring agents.
Steering wheel and gear selector lever
Wipe with a damp cloth and dry thoroughly
or clean with Mercedes-Benz approved
Leather Care.
Cup holder
Use a gentle dishwashing detergent or
mild detergent for delicate fabrics as a
washing solution. Wipe with a cloth moist-
ened in lukewarm solution. Do not use
scouring agents.Hard plastic trim items
Pour Mercedes-Benz approved Interior
Care onto soft lint-free cloth and apply
with light pressure.
Headliner and rear window shelf
Clean with soft bristle brush, or use a
dry-shampoo cleaner in case of excessive
dirt.
Seat belts
The webbing must not be treated with
chemical cleaning agents. Use only clear,
lukewarm water and soap. Do not dry the
webbing at temperatures above 176°F
(80°C) or in direct sunlight.
!Fold the windshield wiper arms back
onto the windshield before turning the
key in the steering lock.
Hold on to the wiper when folding the
wiper arm back. If released, the force
of the impact from the tensioning
spring could crack the windshield.iOnly use acid-free cleaning materials.
Acid may cause corrosion or damage
the clear coat.
Warning!
G
Do not bleach or dye seat belts as this may
severely weaken them. In a crash they may
not be able to provide adequate protection.