Page 276 of 344

276 Practical hintsFlat tireRemoving the wheel�
Unscrew and remove all wheel bolts.
�
Remove the remaining bolts.
�
Grip the wheel from the sides and re-
move it.
Mounting the new wheel
�
Clean contact surfaces of wheel and
wheel hub.
�
Install spare wheel on wheel hub.
�
Insert wheel bolts and tighten them
slightly.Lowering the vehicle
�
Lower vehicle by turning crank coun-
terclockwise until vehicle is resting ful-
ly on its own weight.
�
Remove the jack.
!Do not place wheel bolts in sand or dirt.
This could result in damage to the bolt
and wheel hub threads.!To avoid paint damage, place wheel flat
against hub and hold it there while in-
stalling first wheel bolt.
Warning!
G
Always replace wheel bolts that are dam-
aged or rusted.
Never apply oil or grease to wheel bolts.
Damaged wheel hub threads should be re-
paired immediately. Do not continue to drive
under these circumstances! Contact an au-
thorized Mercedes-Benz Light Truck Center
or call Roadside Assistance.
Incorrect wheel bolts or improperly tight-
ened wheel bolts can cause the wheel to
come off. This could cause an accident.
Make sure to use the correct wheel bolts.
Warning!
G
Use only genuine equipment
Mercedes-Benz wheel bolts. Other wheel
bolts may come loose.
Do not tighten the wheel bolts when the ve-
hicle is raised. Otherwise the vehicle could
tip over.
Page 280 of 344
280 Practical hintsBattery
Batteries contain materials that can harm
the environment if disposed of improperly.
Large 12-volt storage batteries contain
lead. Recycling of batteries is the preferred
method of disposal. Many states require
sellers of batteries to accept old batteries
for recycling.
iThe following procedures must be car-
ried out following any interruption of
battery power (e.g. due to reconnec-
tion):�
Set the clock (
�page 118).
�
Set the date in trip computer
(�page 186).
�
Calibrate the compass
(�page 188).
�
Resynchronize the ESP
(�page 246).
�
Resynchronize side power windows
(�page 146).
�
Resynchronize sliding / pop-up
roof*(
�page 149).
Page 288 of 344
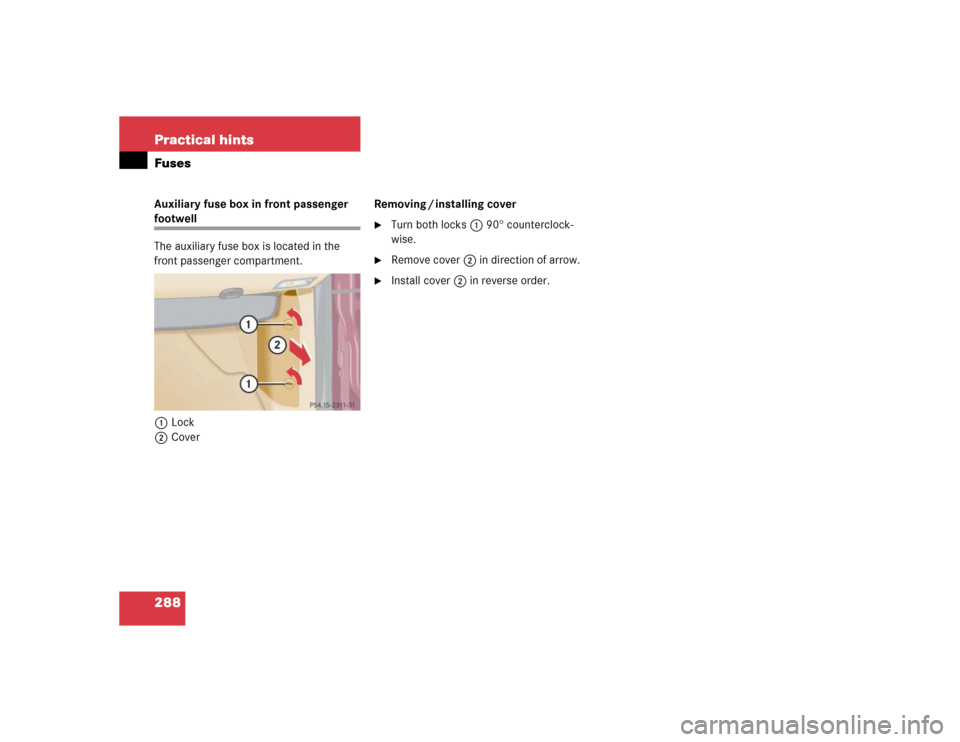
288 Practical hintsFusesAuxiliary fuse box in front passenger footwell
The auxiliary fuse box is located in the
front passenger compartment.
1Lock
2CoverRemoving / installing cover
�
Turn both locks1 90
° counterclock-
wise.
�
Remove cover2 in direction of arrow.
�
Install cover2 in reverse order.
Page 321 of 344

321 Index
Chart
Fuses 287
CHECK ENGINE malfunction indicator
lamp 248
Checking
Coolant level 215, 222
Oil level 218
Tire inflate pressure 216
Vehicle lighting 216
Checking weights
Trailer and vehicle 208
Checklist
Off-road driving 201
Returning from off-road driving 206
Child safety 67
Airbags 60
Infant and child restraint systems 64,
68
LATCH child seat mounts 72
Child safety switch see Blocking of rear
door window operation 73Cigarette lighter
Front center console 168
Cleaning
Cup holder 238
Gear selector lever 238
Hard plastic trim items 238
Headlamps 131
Headliner 238
Instrument cluster 238
Leather upholstery 239
Light alloy wheels 238
MB Tex upholstery 239
Plastic and rubber parts 239
Seat belts 238
Steering wheel 238
Windows 237
Windshield 50
Wiper blades 237
Clock 26, 118Closing
Glove box 164
Hood 218
Liftgate 92
Rear quarter windows* 147
Side windows 145
Sliding/pop-up roof* 148, 265
Closing sliding/pop-up roof*
In an emergency 265
Cockpit 22, 311
Combination switch
High beam flasher 49, 110
Turn signals 49
Windshield wipers 49
Compass 187
Calibrating 188
Setting compass zone 188
Compass zone 188
Consumer information 308
Control and operation of radio
transmitters 211
Page 335 of 344

335 Index
Seat belts 64
Cleaning 238
Fastening 42
Height adjustment 45
Proper use of 44, 66
Safety guidelines 62
Warning lamp 253
Seat heater*
Switching off 98
Switching on 98
Seats 95
Adjusting 34
Heater* 98
Manual 35
Power 37
Rapid seat heating* 98
Rear 99
Split rear bench seat 99
Securing cargo
Cargo tie-down rings 158
Selector lever 26
Lock 46
Position 26, 119Self-test
BabySmart
TM airbag deactivation
system 70
Tele Aid* 172
Service
Calling up the service indicator 233
Major service (Service B) 232
Minor service (Service A) 232
Overdue 233
Spare parts
Types 233
When due 232
Service and Warranty Booklet
Loss of 291
Service and warranty information 10
Service indicator 232
Calling up 233
Clearing 232, 233
Service indicator (FSS)
Display messages 256
Service life (tires) 227Service System see FSS
Setting
Cruise control 151
Higher speed in cruise control 152
Hours (clock) 118
Lower speed in cruise control 152
Minutes (clock) 118
Slower speed in cruise control 152
Speed in cruise control 152
Setting date
Trip computer* 186
Setting language
Trip computer* 190
Shift lock 314
Shifting
Gear selector lever positions 122
Into optimal gear range (automatic
transmission) 120
Side impact airbags 64
Side marker lamps
Replacing bulbs 266, 267, 269
Page:
< prev 1-8 9-16 17-24