Page 112 of 344
112 Controls in detailLightingHazard warning flasher
The hazard warning flasher can be activa-
ted with the ignition switched on or off. It
is activated automatically when an airbag
is deployed.
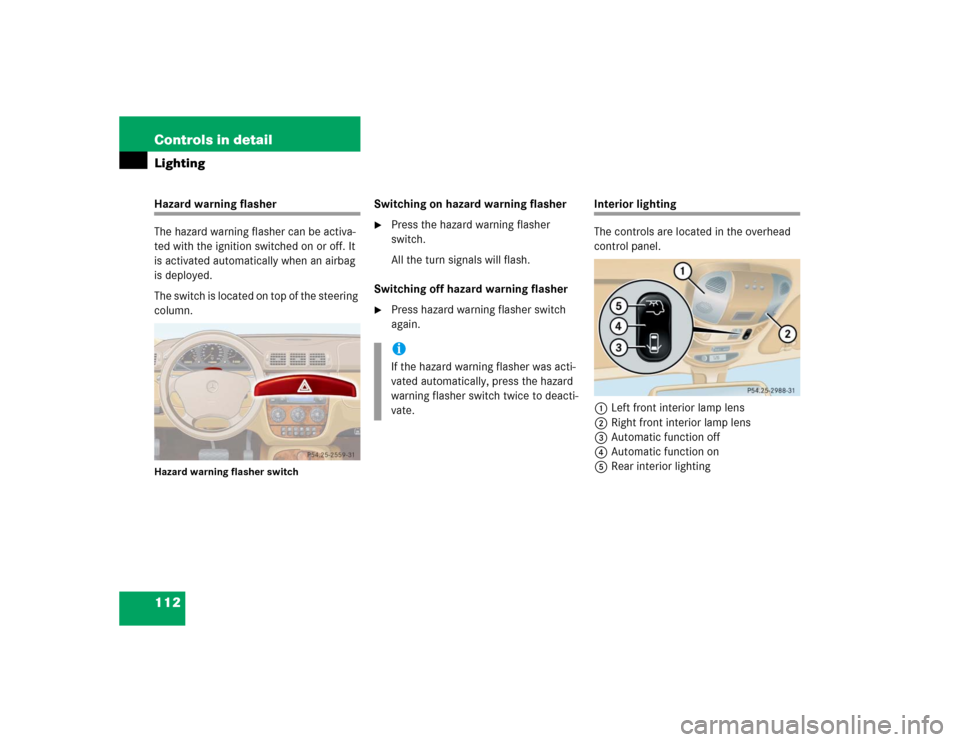
The switch is located on top of the steering
column.Hazard warning flasher switch
Switching on hazard warning flasher�
Press the hazard warning flasher
switch.
All the turn signals will flash.
Switching off hazard warning flasher
�
Press hazard warning flasher switch
again.
Interior lighting
The controls are located in the overhead
control panel.
1Left front interior lamp lens
2Right front interior lamp lens
3Automatic function off
4Automatic function on
5Rear interior lighting
iIf the hazard warning flasher was acti-
vated automatically, press the hazard
warning flasher switch twice to deacti-
vate.
Page 113 of 344
113 Controls in detail
Lighting
Automatic control
Activating automatic control�
Bring the rocker switch to center
position4.
Interior lamps (except cargo compart-
ment lamp) are switched on in dark-
ness, when you�
unlock the vehicle
�
open a door
�
remove the key from the steering
lock
In addition, the entry / exit lamps in the
door trays will come on when you open
a door.
When all doors are closed and no key is
inserted in the steering lock, the interi-
or lamps are switched off after a brief
delay.Deactivating automatic control
�
Press lower part3 of rocker switch.
The interior lighting and the entry / exit
lamps remain switched off in darkness,
even when you�
unlock the vehicle
�
open a door
�
remove the key from the steering
lockManual control
Switching on front interior lamps
�
Press on lamp lens1 or2.
The respective lamp switches on.
Switching off front interior lamps
�
Press on lamp lens1 or2 again.
The respective lamp switches off.
Operating rear interior lighting with
rocker switch
�
Press on upper part5 of rocker
switch.
The rear interior lighting goes on.
iIf the door remains open, the interior
lamps (except cargo compartment
lamp) switch off automatically after ap-
proximately 30 minutes.
iIf a lamp is switched on manually, it will
not go out automatically. This could
cause the battery to become dis-
charged.
��
Page 114 of 344
114 Controls in detailLighting�
Press on upper part5 of rocker
switch again.
The rear interior lighting goes off.
If the switch is pressed while the rear
interior lighting is on, the function is re-
versed.
Operating rear interior lighting with
lamp lens
Rear interior lighting�
Push on lamp lens (arrow) to switch
rear interior lighting on or off.Reading lamps in inside rear view
mirror
1Reading lamps
2Reading lamps on / off
Switching reading lamp on and off
�
Press button2.
The lamp switches on.
�
Press button2 again.
The lamp switches off.Cargo compartment lamp
1Switched off
2Switched on continuously
3Automatic control
Switching off cargo compartment lamp
�
Slide the switch to position1.
The cargo compartment lamp is
switched off, even when the liftgate is
opened.
��
Page 115 of 344
115 Controls in detail
Lighting
Switching on continuous cargo
compartment lamp�
Slide the switch to position2.
The cargo compartment lamp is
switched on continuously.Automatic control
�
Slide the switch to position3.
The cargo compartment lamp is
switched on and off by opening or clos-
ing the liftgate.
iTo prevent the vehicle battery from be-
ing discharged, make sure the switch is
not in position2 when leaving the ve-
hicle.
Page 209 of 344
209 Operation
Driving instructions
Towing a trailer
There are many different laws, including
speed limit restrictions, having to do with
trailer towing. Make sure your rig will be le-
gal, not only for where you reside, but also
for where you will be driving. A good
source for this information can be the po-
lice or local authorities.
Note the following points, when driving
with the trailer:�
In order to gain skill and an under-
standing of the vehicle’s behavior, you
should practice turning, stopping and
backing up in an area which is free from
traffic.
�
Before you start driving check the�
trailer hitch
�
break-away switch
�
safety chains
�
electrical connections
�
lighting and tiresAdjust the mirrors to permit unobstructed
view beyond rear of trailer.
�
If the trailer has electric brakes, start
your vehicle and trailer moving slowly,
and then apply only the trailer brake
controller by hand to be sure the
brakes are working properly.
�
Always secure items in the trailer to
prevent load shifts while driving.
�
When towing a trailer, check occasion-
ally to be sure that the load is secure,
and that lighting and trailer brakes (if
so equipped) are functioning properly.
�
Take into consideration that when tow-
ing a trailer, the handling characteris-
tics are different and less stable from
those when operating the vehicle with-
out a trailer.
It is important to avoid sudden maneu-
vers.
!Do not connect a trailer brake system
(if trailer is so equipped) directly to the
vehicle’s hydraulic brake system, as
your vehicle is equipped with antilock
brakes. If you do, neither the vehicle’s
brakes nor the trailer’s brakes will func-
tion properly.iThe provided vehicle electrical wiring
harness for trailer towing has a brake
signal wire (color orange) for hook-up
to a brake controller.
You should consider using a trailer
sway control system. For further infor-
mation see your authorized
Mercedes-Benz Light Truck Center.
Page 216 of 344
216 OperationAt the gas stationEngine oil level
More information on engine oil see “Engine
oil” (
�page 218).Vehicle lighting
Check function and cleanliness. More in-
formation on replacing light bulbs can be
found in the “Practical hints” section
(
�page 266).
Tire inflation pressure
More information on tire inflation pressure
can be found in the “Operation” section
(�page 227).
!If you find that the brake fluid in the
brake fluid reservoir has fallen to the
minimum mark or below, have the
brake system checked for brake pad
thickness and leaks immediately. Noti-
fy an authorized Mercedes-Benz Light
Truck Center immediately. Do not add
brake fluid as this will not solve the
problem. For more information, see
“Practical Hints” (
�page 245).
Page 266 of 344
266 Practical hintsReplacing bulbs
�Replacing bulbsSafe vehicle operation depends on proper
exterior lighting and signaling. It is there-
fore essential that all bulbs and lamp as-
semblies are in good working order at all
times.
Correct headlamp adjustment is extremely
important. Have headlamps checked and
readjusted at regular intervals and when a
bulb has been replaced. See your autho-
rized Mercedes-Benz Light Truck Center
for headlamp adjustment.
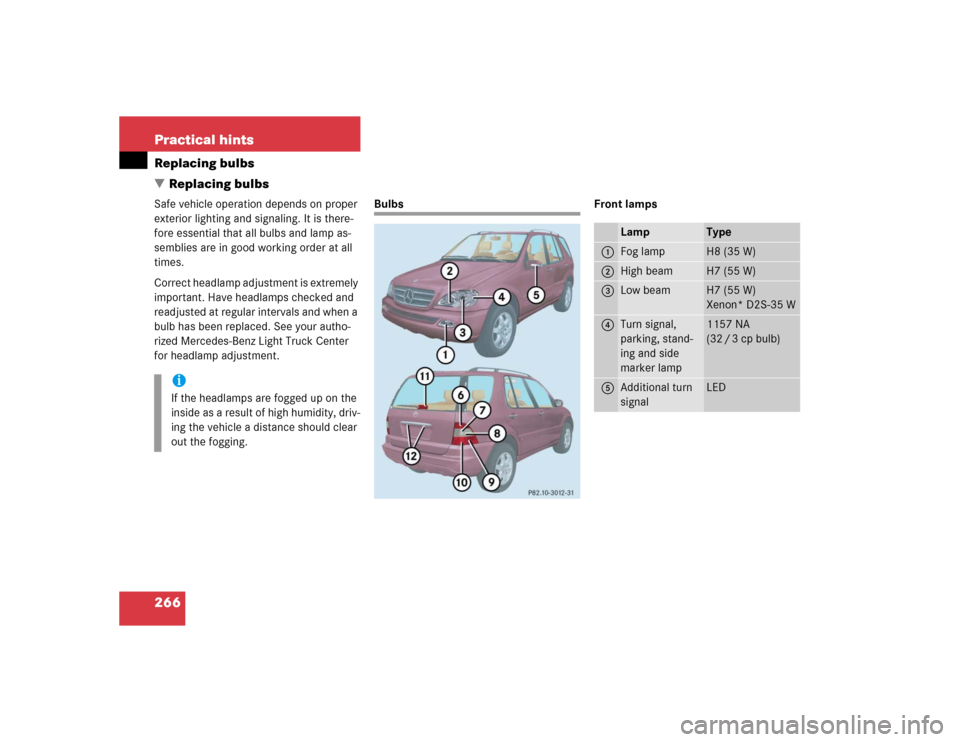
Bulbs Front lamps
iIf the headlamps are fogged up on the
inside as a result of high humidity, driv-
ing the vehicle a distance should clear
out the fogging.
Lamp
Type
1
Fog lamp
H8 (35 W)
2
High beam
H7 (55 W)
3
Low beam
H7 (55 W)
Xenon* D2S-35 W
4
Turn signal,
parking, stand-
ing and side
marker lamp
1157 NA
(32 / 3 cp bulb)
5
Additional turn
signal
LED
Page 319 of 344
319 Index
Rear passenger compartment 141
Rear window defroster 133
Residual heat utilization 140
Residual ventilation 140
Switching off 137
Switching on 137
Automatic headlamp mode 108
Automatic interior lighting control
Activating 113
Deactivating 113
Automatic locking when driving 93
Automatic transmission 119
Accelerator position 123
Emergency operation (Limp Home
Mode) 124
Gear ranges 121
Gear selector lever position 122
Gear shifting malfunctions 124
Kickdown 123
Manual shifting 120
One-touch gearshifting 120Selector lever position 119
Towing a trailer 124
Transmission fluid 222
B
BabySmart
TM
Airbag deactivation system 70
Compatible child seats 70, 311
Self-test 70
BabySmart
TM airbag deactivation
system 311
Backrest tilt 35
Backup lamps 267, 270
Bulbs 267
BAS 78, 311
Malfunction indicator lamp 245, 246,
247
Warning lamp 245, 246, 247
Batteries, remote control
Changing 262
Batteries, vehicle 223
Battery discharged
Jump starting 281Battery indicator lamp
Indicator lamp 254
Battery, vehicle 223, 278
Charging 279
Disconnecting 279
Reconnecting 279
Reinstalling 279
Removing 279
Bi-Xenon headlamps* 311
Blocking
Rear door window operation 73
Brake assist system (BAS) 311
Brake fluid 302
Brake lamp bulbs 267
Brake lamp, high mounted 267
Brake pad wear
Indicator lamp 254
Brakes 194
Warning lamp 244
Break-in period 192