Page 199 of 344
199 Operation
Driving instructions
Road salts and chemicals can adversely af-
fect braking efficiency. Increased pedal
force may become necessary to produce
the normal brake effect.
Depressing the brake pedal periodically
when traveling at length on salt-strewn
roads can bring road-salt-impaired braking
efficiency back to normal.If the vehicle is parked after being driven
on salt-treated roads, the braking efficien-
cy should be tested as soon as possible af-
ter driving is resumed.
For more information, see "Winter driving"
(
�page 230).
Warning!
G
On slippery road surfaces, never downshift
in order to obtain braking action. This could
result in drive wheel slip and reduced vehi-
cle control. Your vehicle’s ABS will not pre-
vent this type of control loss.
Do not engage the transfer case in position
LOW when driving on ice or packed snow. At
speeds below 18 mph (30 km / h) vehicle
steering is adversely affected by the LOW
RANGE - ABS (
�page 77).
Warning!
G
Make sure not to endanger any other road
users when carrying out these braking ma-
neuvers.Warning!
G
If the vehicle becomes stuck in snow, make
sure that snow is kept clear of the exhaust
pipe and from around the vehicle with the
engine running. Otherwise, deadly carbon
monoxide (CO) gases may enter vehicle in-
terior resulting in unconsciousness and
death.
To assure sufficient fresh air ventilation,
open a window slightly on the side of the ve-
hicle not facing the wind.
Warning!
G
The outside temperature indicator is not de-
signed to serve as an ice-warning device and
is therefore unsuitable for that purpose. In-
dicated temperatures just above the freez-
ing point do not guarantee that the road
surface is free of ice.
Page 201 of 344

201 Operation
Driving instructions
Special driving features for off-road
driving
The following driving features are available
for specific kind of operation:�
LOW RANGE mode (
�page 125)
�
LOW RANGE – ABS (
�page 77)
�
LOW RANGE – 4-ETS (
�page 80)
�
LOW RANGE – ESP (
�page 81)
Off-road driving rules
Engage the LOW RANGE mode before driv-
ing under off-road conditions
(
�page 125).
Fasten items being carried as securely as
possible (
�page 157).Checklist before off-road driving
Tires
�
Check the tread depth and maintain
specified tire pressure (see tire pres-
sure label inside the fuel filler flap).
�
Check tires for possible damage and
remove foreign objects.
�
Replace missing valve caps.
iWe recommend keeping doors, liftgate,
windows, and sliding / pop-up roof*
closed whenever driving in off-road
mode.
!Observe the following during off-road
driving:�
Adjust vehicle speed to condition of
terrain. The more uneven, rutty and
steeper the terrain, the lower the
speed should be
�
Watch out for obstacles, such as
rocks, holes, tree stumps and ruts.
�
Be especially careful when driving
in unknown territory. It may be nec-
essary to get out of the vehicle and
scout the path you intend to take.
�
Before driving through water, deter-
mine is depth.
�
Do not stop vehicle while immersed
in water, and do not shut off the
engine.
�
In sandy soil, please drive at a
steady speed as allowed by condi-
tions. This helps overcome the vehi-
cle rolling resistance and reduces
the likelihood of the vehicle sinking
into the ground.
�
Do not initiate jumps with the vehi-
cle. It interrupts the forward mo-
mentum of the vehicle.
�
Always drive onto slopes with the
the engine running and the vehicle
in gear.
Page 203 of 344
203 Operation
Driving instructions
The 4-ETS recognizes the situation and
limits the torque for the front wheels by
braking them. Simultaneously the
torque for the rear wheels is increased.
Driving across a hilltop
�
Decelerate just ahead of a hilltop (do
not select gear rangeN), to prevent the
vehicle from speeding up too much af-
ter climbing a hill.
Use the momentum of the vehicle to
drive across the hilltop.
Driving in this manner prevents the ve-
hicle from jumping across the hilltop
and thus loosing its forward momen-
tum.Driving downhill
�
Select gear range1 on the automatic
transmission (
�page 121).
�
Drive downhill observing the same
rules as driving uphill (
�page 202).
�
The special LOW RANGE – ABS setting
allows for precise and brief (cyclical)
blocking of the front wheels, permitting
them to dig into loose ground.
Remember that the front wheels when
stopped, slide across a surface, thus
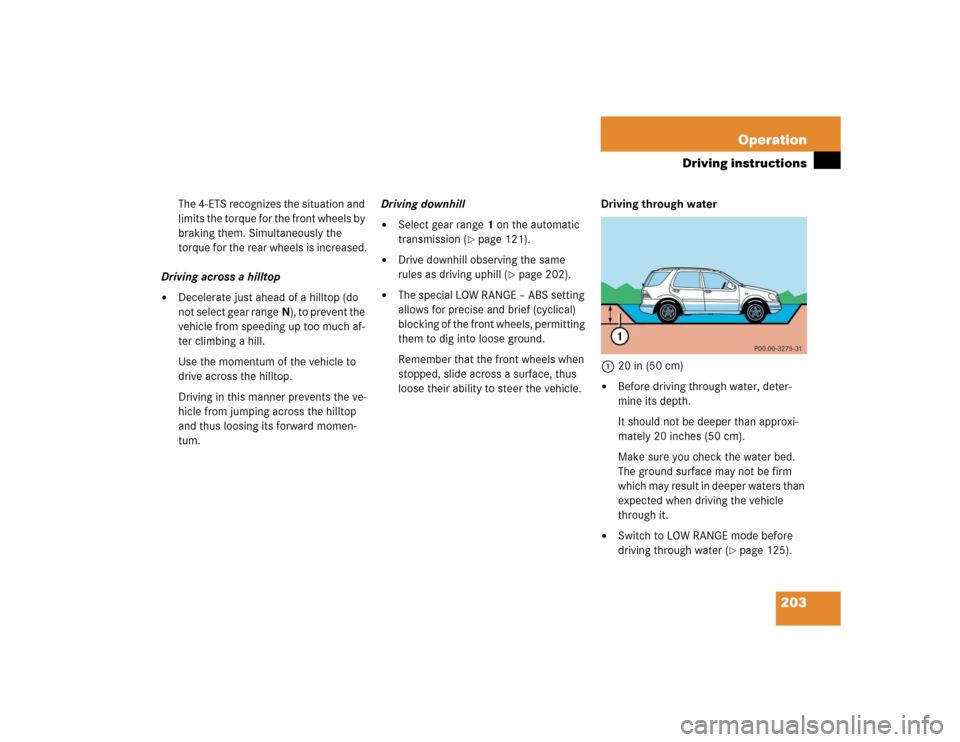
loose their ability to steer the vehicle.Driving through water
120 in (50 cm)
�
Before driving through water, deter-
mine its depth.
It should not be deeper than approxi-
mately 20 inches (50 cm).
Make sure you check the water bed.
The ground surface may not be firm
which may result in deeper waters than
expected when driving the vehicle
through it.
�
Switch to LOW RANGE mode before
driving through water (
�page 125).
Page 230 of 344
230 OperationWinter driving
�Winter drivingBefore the onset of winter, have your vehi-
cle winterized at an authorized
Mercedes-Benz Light Truck Center. This
service includes:�
Check of anticorrosion and antifreeze
concentration.
�
Addition of cleaning concentrate to the
water of the windshield and headlamp
cleaning system. Add MB Concentrate
“S” to a premixed windshield washer
solvent / antifreeze which is formulated
for temperatures below freezing point
(�page 307).
�
Battery test. Battery capacity drops
with decreasing ambient temperature.
A well charged battery helps to ensure
that the engine can be started even at
low ambient temperatures.
�
Tire change. Mercedes-Benz recom-
mends M+S rated radial-ply tires with a
minimum tread depth of approximately 1/6in (4 mm) on all four wheels for the
winter season.
Winter tires
Always use winter tires at temperatures
below 45°F (7°C) and whenever wintry
road conditions prevail. Use of winter tires
is the only way to achieve the maximum ef-
fectiveness of the ABS, ESP, 4-ETS, and
EBP in winter operation.
For safe handling, ensure that all winter
tires mounted are of the same make and
have the same tread design.Always observe the speed rating of the
winter tires installed on your vehicle. If the
maximum speed for which your tires are
rated is below the speed rating of your ve-
hicle, you must place a notice to this effect
where it will be seen by the driver. Such no-
tices are available at your tire dealer or any
authorized Mercedes-Benz Light Truck
Center.Warning!
G
Winter tires with a tread depth under
1/6in
(4 mm) must be replaced. They are no long-
er suitable for winter operation.
Warning!
G
If you use your spare tire when winter tires
are fitted on the other wheels, be aware that
the difference in tire characteristics may
very well impair turning stability and that
overall driving stability may be reduced.
Adapt your driving style accordingly.
Have the spare tire replaced with a winter
tire at the nearest authorized
Mercedes-Benz Light Truck Center.
Page 242 of 344
242 Practical hintsWhat to do if …
�What to do if …Lamps in instrument clusterGeneral information:
If a bulb in the instrument cluster fails to
light up during the bulb self-check when turning the key in steering lock to
position2, have it checked and replaced if
necessary.Problem
Possible cause
Suggested solution
-
The yellow ABS warning lamp
comes on while driving.
ABS has detected a malfunction and has
switched off. The BAS, ESP, 4-ETS and EBP
are also switched off.
The brake system is still functioning normally
but without ABS available.
�
Continue driving with added caution.
Wheels may lock during hard braking
reducing steering capability.
�
Have the system checked at an autho-
rized Mercedes-Benz Light Truck Cen-
ter as soon as possible.
Failure to follow these instructions in-
creases the risk of an accident.
The charging voltage has fallen below
10 volts. The ABS has switched off.
When the voltage is above this value
again, the ABS is operational again.�
If necessary, have the generator
(alternator) and the battery checked.
Page 245 of 344
245 Practical hints
What to do if …
Problem
Possible cause
Suggested solution
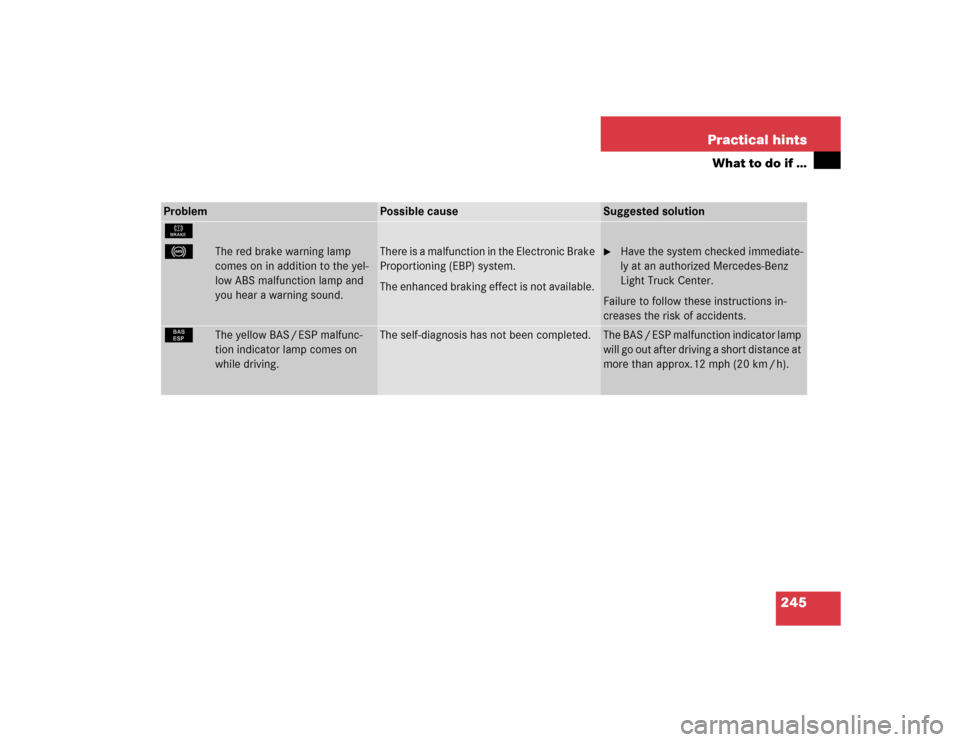
É
-
The red brake warning lamp
comes on in addition to the yel-
low ABS malfunction lamp and
you hear a warning sound.
There is a malfunction in the Electronic Brake
Proportioning (EBP) system.
The enhanced braking effect is not available.
�
Have the system checked immediate-
ly at an authorized Mercedes-Benz
Light Truck Center.
Failure to follow these instructions in-
creases the risk of accidents.
¿
The yellow BAS / ESP malfunc-
tion indicator lamp comes on
while driving.
The self-diagnosis has not been completed.
The BAS / ESP malfunction indicator lamp
will go out after driving a short distance at
more than approx.12 mph (20 km / h).
Page 270 of 344
270 Practical hintsReplacing bulbs�
Align headlamp cover and click into
place.
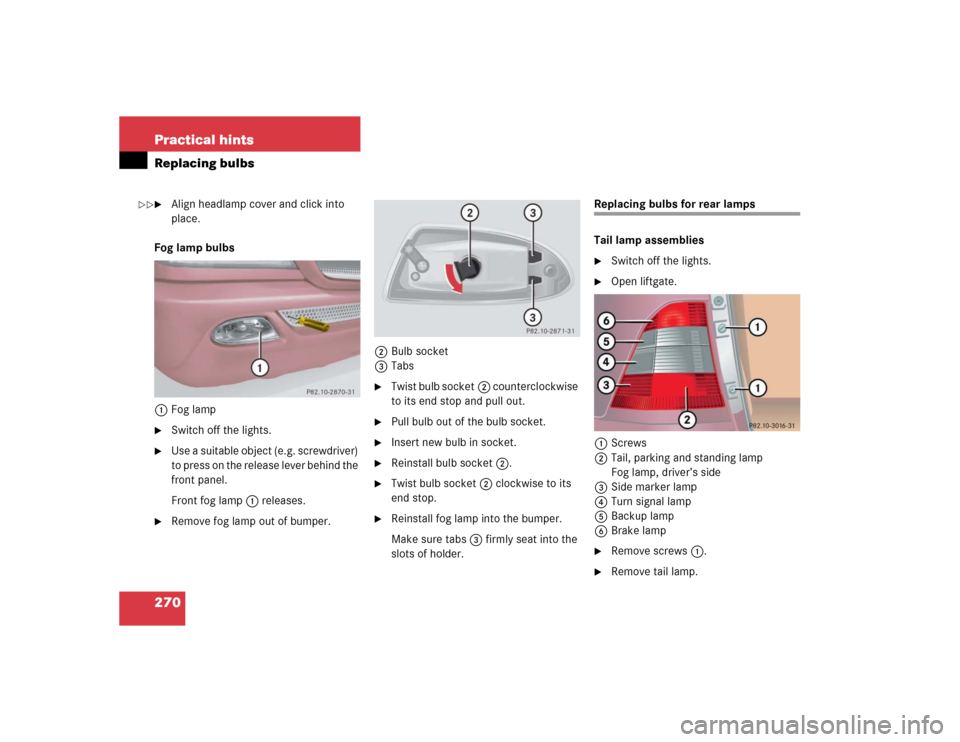
Fog lamp bulbs
1Fog lamp
�
Switch off the lights.
�
Use a suitable object (e.g. screwdriver)
to press on the release lever behind the
front panel.
Front fog lamp1 releases.
�
Remove fog lamp out of bumper.2Bulb socket
3Tabs
�
Twist bulb socket2 counterclockwise
to its end stop and pull out.
�
Pull bulb out of the bulb socket.
�
Insert new bulb in socket.
�
Reinstall bulb socket2.
�
Twist bulb socket2 clockwise to its
end stop.
�
Reinstall fog lamp into the bumper.
Make sure tabs3 firmly seat into the
slots of holder.
Replacing bulbs for rear lamps
Tail lamp assemblies�
Switch off the lights.
�
Open liftgate.
1Screws
2Tail, parking and standing lamp
Fog lamp, driver’s side
3Side marker lamp
4Turn signal lamp
5Backup lamp
6Brake lamp
�
Remove screws1.
�
Remove tail lamp.
��
Page 271 of 344
271 Practical hints
Replacing bulbs
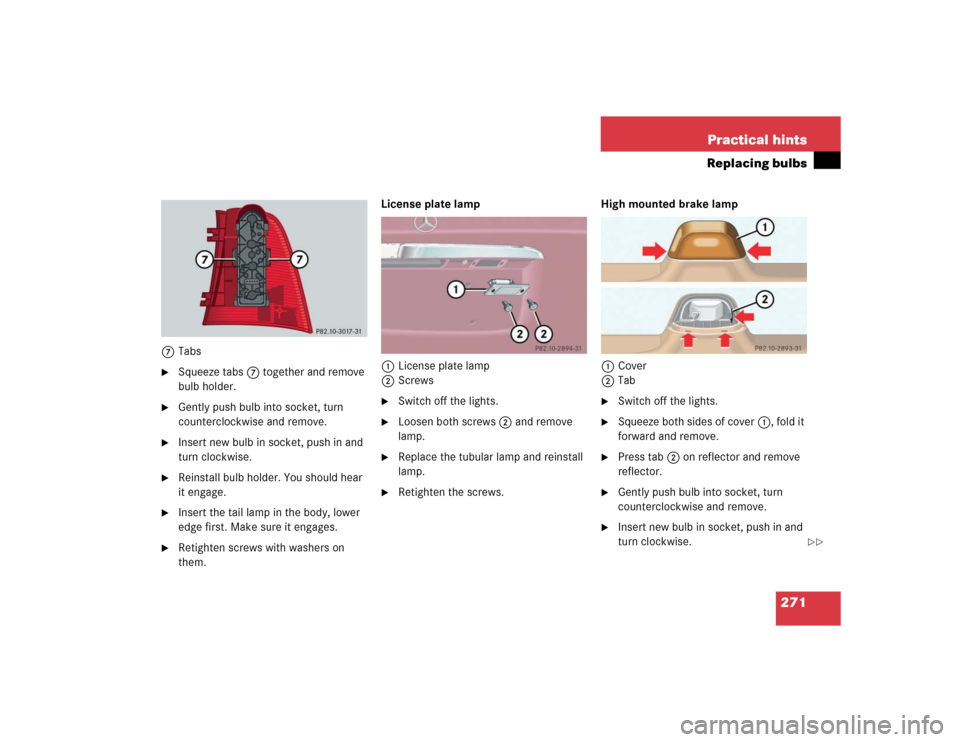
7Tabs�
Squeeze tabs7 together and remove
bulb holder.
�
Gently push bulb into socket, turn
counterclockwise and remove.
�
Insert new bulb in socket, push in and
turn clockwise.
�
Reinstall bulb holder. You should hear
it engage.
�
Insert the tail lamp in the body, lower
edge first. Make sure it engages.
�
Retighten screws with washers on
them.License plate lamp
1License plate lamp
2Screws
�
Switch off the lights.
�
Loosen both screws2 and remove
lamp.
�
Replace the tubular lamp and reinstall
lamp.
�
Retighten the screws.High mounted brake lamp
1Cover
2Tab
�
Switch off the lights.
�
Squeeze both sides of cover1, fold it
forward and remove.
�
Press tab2 on reflector and remove
reflector.
�
Gently push bulb into socket, turn
counterclockwise and remove.
�
Insert new bulb in socket, push in and
turn clockwise.
��