Page 244 of 376
244 OperationVehicle care
�Vehicle careCleaning and care of the vehicle
While in operation, even while parked, your
vehicle is subjected to varying external in-
fluences which, if gone unchecked, can at-
tack the paintwork as well as the
underbody and cause lasting damage.Such damage is caused not only by ex-
treme and varying climatic conditions, but
also by:
�
Air pollution
�
Road salt
�
Tar
�
Gravel and stone chipping
To avoid paint damage, you should imme-
diately remove:
�
Grease and oil
�
Fuel
�
Coolant
�
Brake fluid
�
Bird droppings
�
Insects
�
Tree resins, etc.
Frequent washing reduces and/or elimi-
nates the aggressiveness and potency of
the above adverse influences.More frequent washings are necessary to
deal with unfavorable conditions:
�
Near the ocean
�
In industrial areas (smoke, exhaust
emissions)
�
During winter operation
You should check your vehicle from time to
time for stone chipping or other damage.
A n y d a m a g e s h o u l d b e r e p a i r e d a s s o o n a s
possible to prevent corrosion.
In doing so, do not neglect the underbody
of the vehicle. A prerequisite for a thor-
ough check is a washing of the underbody
followed by a thorough inspection. Dam-
aged areas need to be re-undercoated.
Your vehicle has been treated at the facto-
ry with a wax-base rustproofing in the body
cavities which will last for the lifetime of
the vehicle. Post-production treatment is
neither necessary nor recommended by
Mercedes-Benz because of the possibility
of incompatibility between materials used
in the production process and others ap-
plied later.
Warning!
G
Many cleaning products can be hazardous.
Some are poisonous, others are flammable.
Always follow the instructions on the partic-
ular container. Always open your vehicle’s
doors or windows when cleaning the inside.
Never use fluids or solvents that are not de-
signed for cleaning your vehicle.
Page 249 of 376

249 Operation
Vehicle care
Upholstery
Using aftermarket seat covers or wearing
clothing that have the tendency to give off
coloring (e.g. when wet, etc.) may cause
the upholstery to become permanently dis-
colored. By lining the seats with a proper
intermediate cover, contact-discoloration
will be prevented.
Leather upholstery
Wipe leather upholstery with a damp cloth
and dry thoroughly or clean with
Mercedes-Benz approved Leather Care.
E x e r c i s e p a r t i c u l a r c a r e w h e n c l e a n i n g p e r -
forated leather as its underside should not
become wet.Cloth upholstery
Clean with soft bristle brush, or use a
dry-shampoo cleaner in case of excessive
dirt.
MB Tex upholstery
Pour Mercedes-Benz approved Interior
Care onto soft lint-free cloth and apply
with light pressure.
Plastic and rubber parts
Do not use oil or wax on these parts.Illuminated door sill panels
Use a gentle dishwashing detergent or
mild detergent for delicate fabrics as a
washing solution. Wipe with a cloth moist-
ened in lukewarm solution. Do not use
scouring agents.
Wood trims
Dampen cloth using water and use damp
cloth to clean wood trims in your vehicle.
Do not use solvents like tar remover or
wheel cleaner nor polishes or waxes as
these may be abrasive.
Page 271 of 376
271 Practical hints
What to do if …
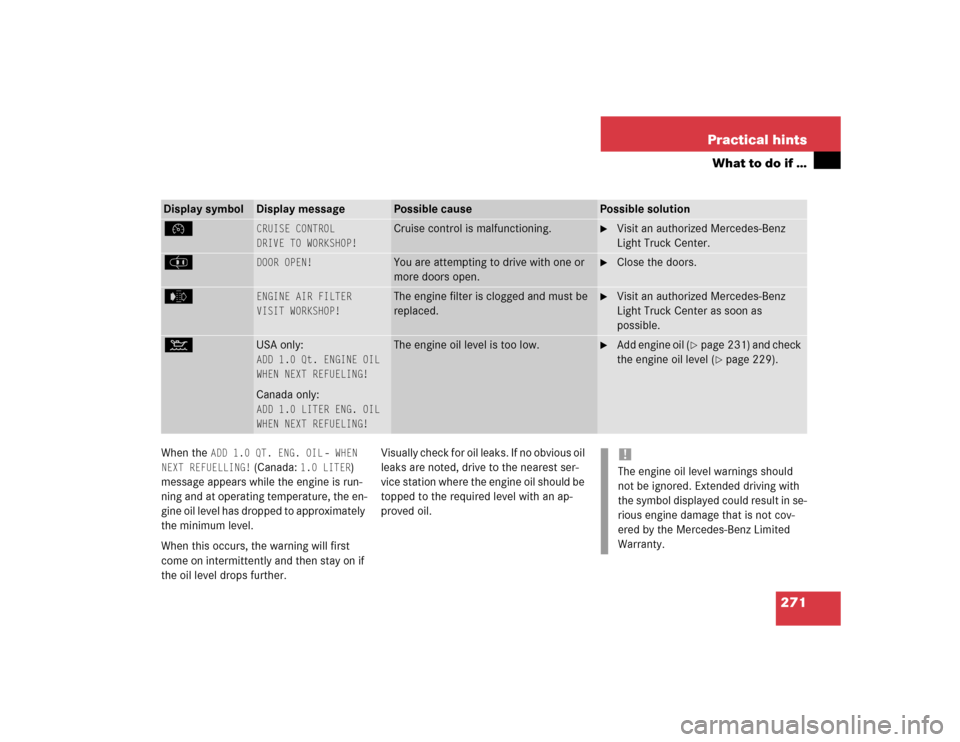
When the
ADD 1.0 QT. ENG. OIL
-
WHEN
NEXT REFUELLING!
(Canada:
1.0 LITER
)
message appears while the engine is run-
ning and at operating temperature, the en-
gine oil level has dropped to approximately
the minimum level.
When this occurs, the warning will first
come on intermittently and then stay on if
the oil level drops further.Visually check for oil leaks. If no obvious oil
leaks are noted, drive to the nearest ser-
vice station where the engine oil should be
topped to the required level with an ap-
proved oil.
Display symbol
Display message
Possible cause
Possible solution
Ñ
CRUISE CONTROL
DRIVE TO WORKSHOP!
Cruise control is malfunctioning.
�
Visit an authorized Mercedes-Benz
Light Truck Center.
J
DOOR OPEN!
You are attempting to drive with one or
more doors open.
�
Close the doors.
e
ENGINE AIR FILTER
VISIT WORKSHOP!
The engine filter is clogged and must be
replaced.
�
Visit an authorized Mercedes-Benz
Light Truck Center as soon as
possible.
:
USA only:ADD 1.0 Qt. ENGINE OIL
WHEN NEXT REFUELING!Canada only:ADD 1.0 LITER ENG. OIL
WHEN NEXT REFUELING!
The engine oil level is too low.
�
Add engine oil (
�page 231) and check
the engine oil level (
�page 229).
!The engine oil level warnings should
not be ignored. Extended driving with
the symbol displayed could result in se-
rious engine damage that is not cov-
ered by the Mercedes-Benz Limited
Warranty.
Page 272 of 376
272 Practical hintsWhat to do if …Display symbol
Display message
Possible cause
Possible solution
:
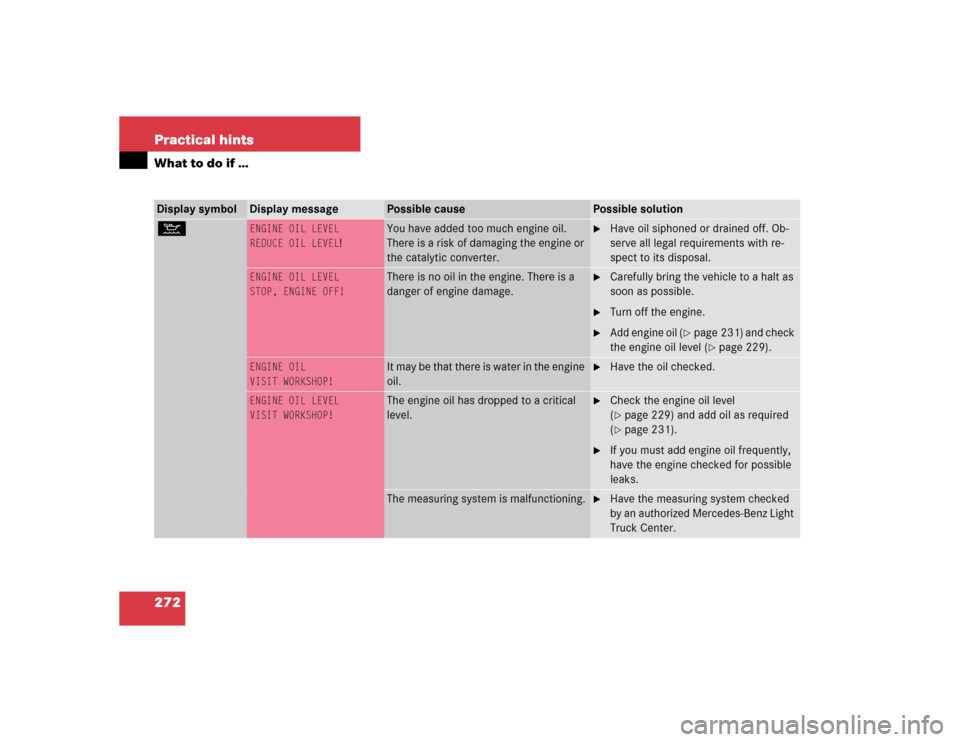
ENGINE OIL LEVEL
REDUCE OIL LEVEL
!
You have added too much engine oil.
There is a risk of damaging the engine or
the catalytic converter.
�
Have oil siphoned or drained off. Ob-
serve all legal requirements with re-
spect to its disposal.
ENGINE OIL LEVEL
STOP, ENGINE OFF!
There is no oil in the engine. There is a
danger of engine damage.
�
Carefully bring the vehicle to a halt as
soon as possible.
�
Turn off the engine.
�
Add engine oil (
�page 231) and check
the engine oil level (
�page 229).
ENGINE OIL
VISIT WORKSHOP!
It may be that there is water in the engine
oil.
�
Have the oil checked.
ENGINE OIL LEVEL
VISIT WORKSHOP!
The engine oil has dropped to a critical
level.
�
Check the engine oil level
(�page 229) and add oil as required
(�page 231).
�
If you must add engine oil frequently,
have the engine checked for possible
leaks.
The measuring system is malfunctioning.
�
Have the measuring system checked
by an authorized Mercedes-Benz Light
Truck Center.
Page 296 of 376
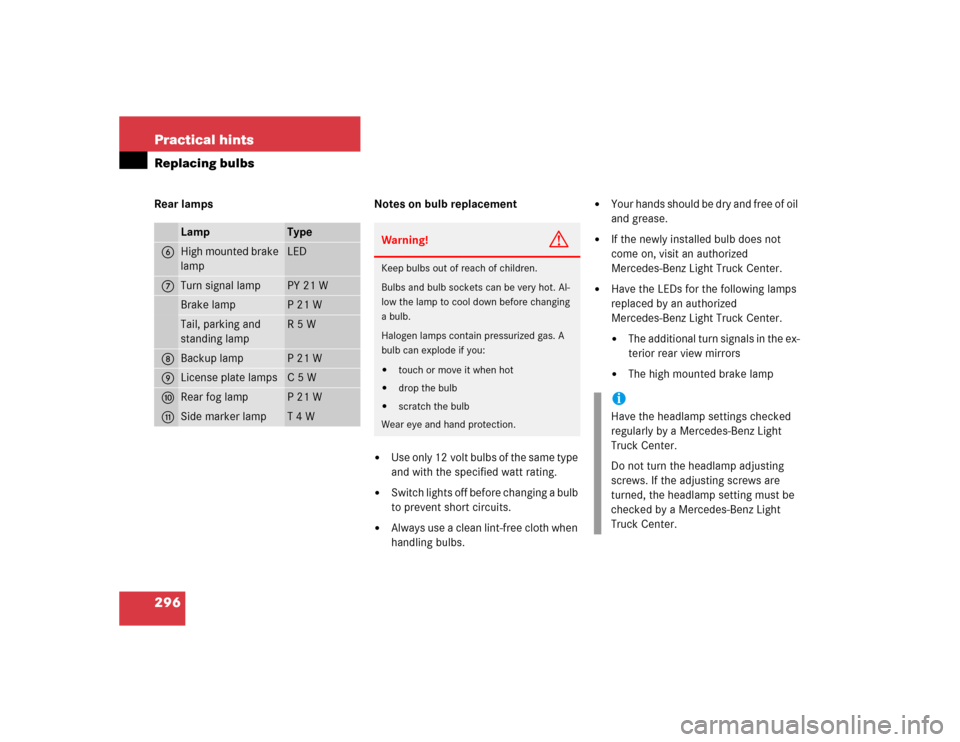
296 Practical hintsReplacing bulbsRear lamps Notes on bulb replacement
�
Use only 12 volt bulbs of the same type
and with the specified watt rating.
�
Switch lights off before changing a bulb
to prevent short circuits.
�
Always use a clean lint-free cloth when
handling bulbs.
�
Your hands should be dry and free of oil
and grease.
�
If the newly installed bulb does not
come on, visit an authorized
Mercedes-Benz Light Truck Center.
�
Have the LEDs for the following lamps
replaced by an authorized
Mercedes-Benz Light Truck Center.�
The additional turn signals in the ex-
terior rear view mirrors
�
The high mounted brake lamp
Lamp
Type
6
High mounted brake
lamp
LED
7
Turn signal lamp
PY 21 W
Brake lamp
P 21 W
Tail, parking and
standing lamp
R 5 W
8
Backup lamp
P 21 W
9
License plate lamps
C 5 W
a
Rear fog lamp
P 21 W
b
Side marker lamp
T 4 W
Warning!
G
Keep bulbs out of reach of children.
Bulbs and bulb sockets can be very hot. Al-
low the lamp to cool down before changing
a bulb.
Halogen lamps contain pressurized gas. A
bulb can explode if you:�
touch or move it when hot
�
drop the bulb
�
scratch the bulb
Wear eye and hand protection.
iHave the headlamp settings checked
regularly by a Mercedes-Benz Light
Truck Center.
Do not turn the headlamp adjusting
screws. If the adjusting screws are
turned, the headlamp setting must be
checked by a Mercedes-Benz Light
Truck Center.
Page 304 of 376
304 Practical hintsReplacing wiper blades
�Replacing wiper blades
Removing wiper blades�
Fold the wiper arm forward.
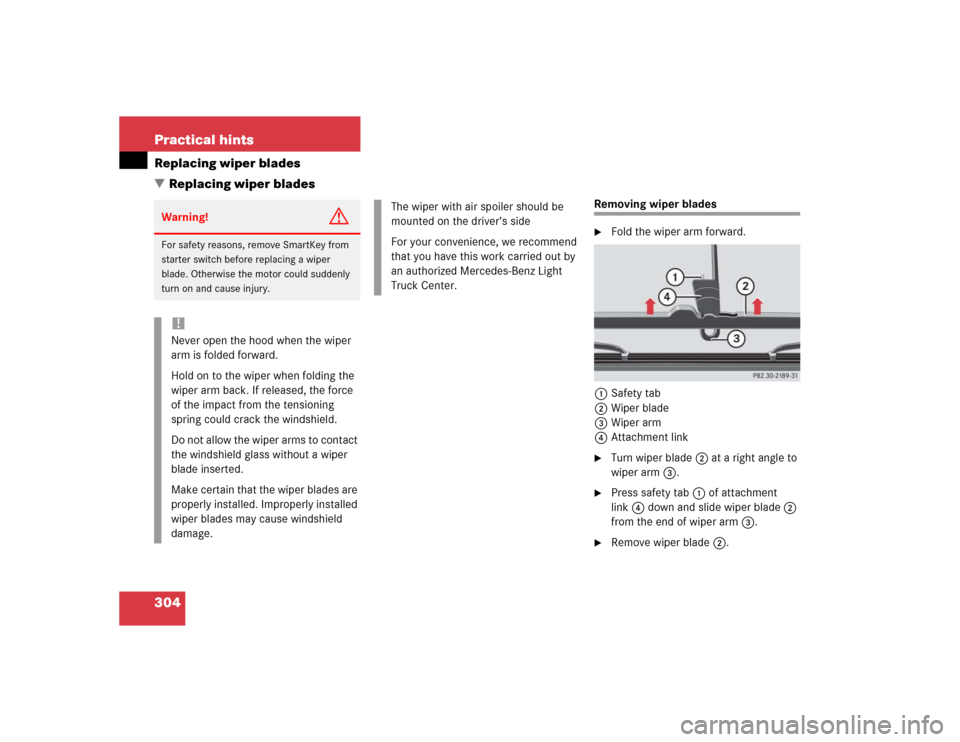
1Safety tab
2Wiper blade
3Wiper arm
4Attachment link
�
Turn wiper blade2 at a right angle to
wiper arm3.
�
Press safety tab1 of attachment
link4 down and slide wiper blade2
from the end of wiper arm3.
�
Remove wiper blade2.
Warning!
G
For safety reasons, remove SmartKey from
starter switch before replacing a wiper
blade. Otherwise the motor could suddenly
turn on and cause injury.!Never open the hood when the wiper
arm is folded forward.
Hold on to the wiper when folding the
wiper arm back. If released, the force
of the impact from the tensioning
spring could crack the windshield.
Do not allow the wiper arms to contact
the windshield glass without a wiper
blade inserted.
Make certain that the wiper blades are
properly installed. Improperly installed
wiper blades may cause windshield
damage.
The wiper with air spoiler should be
mounted on the driver’s side
For your convenience, we recommend
that you have this work carried out by
an authorized Mercedes-Benz Light
Truck Center.
Page 309 of 376
309 Practical hints
Flat tire
Removing the wheel�
Remove the wheel bolts.
�
Remove the wheel.Mounting the new wheel
�
Clean contact surfaces of wheel and
wheel hub.
�
Push the wheel onto the wheel hub and
press firmly.
�
Insert wheel bolts and tighten them
slightly.
!Do not place wheel bolts in sand or dirt.
This could result in damage to the bolt
and wheel hub threads.Warning!
G
Make sure no one is injured when removing
the wheel.
Grip wheel from the sides.
Keep hands from beneath the wheel.
Warning!
G
Always replace wheel bolts that are dam-
aged or rusted.
Never apply oil or grease to wheel bolts.
Damaged wheel hub threads should be re-
paired immediately. Do not continue to drive
under these circumstances! Contact an au-
thorized Mercedes-Benz Light Truck Center
or call Roadside Assistance.
Incorrect wheel bolts or improperly tight-
ened wheel bolts can cause the wheel to
come off. This could cause an accident.
Make sure to use the correct wheel bolts.
Warning!
G
Use only genuine equipment
Mercedes-Benz wheel bolts. Other wheel
bolts may come loose.
Do not tighten the wheel bolts when the ve-
hicle is raised. Otherwise the vehicle could
tip over.
Page 333 of 376
333 Technical data
Fuels, coolants, lubricants, etc.
�Fuels, coolants, lubricants, etc.
Capacities
Vehicle components and their respective
lubricants must match.Therefore use only brands tested and ap-
proved by Mercedes-Benz.Please refer to the Factory Approved Ser-
vice Products pamphlet, or inquire at your
Mercedes-Benz Light Truck Center.
Model
Capacity
Fuels, coolants, lubricants, etc.
Engine with oil filter
G500
G55AMG
8.5 US qt (8.0 l)
8.0 US qt (7.5 l)
Approved engine oils
Automatic transmission
9.0 US qt (8.5 l)
MB Automatic Transmission Oil
Transfer case
2.96 US qt (2.8 l)
MB part no. A 001 989 28 03 10
Differential lock mechanism
0.47 - 0.63 US qt
(0.45 - 0.6 l)
Brake fluid DOT 3+4, SAE J1703
Front axle
1.5 US qt (1.4 l)
Hypoid gear oil SAE 90, 85 W 90
Rear axle
1.9 US qt (1.8 l)
Hypoid gear oil SAE 90, 85 W 90
Power steering
approx. 1.06 US qt (1.0 l)
MB Power Steering Fluid, or
approved Dexron III ATF
Front wheel hubs
approx. 1.5 oz (43 g) each
High temperature roller bearing grease
Fuel tank
including a reserve of
25.4 US gal (96.0 l)
5.3 US gal (20.0 l)
Premium unleaded gasoline:
Posted Octane 91
(average of 96 RON / 86 MON)