Page 6 of 376

ContentsAt the gas station............................... 224
Refueling ...................................... 224
Check regularly and before
a long trip ..................................... 225
Engine compartment.......................... 227
Hood ............................................ 227
Engine oil...................................... 228
Transmission fluid level ................ 232
Coolant level ................................ 232
Windshield/rear window washer
system and headlamp cleaning
system.......................................... 234
Battery ............................................... 235
Tires and wheels ................................ 236
Important guidelines .................... 236
Life of tire ..................................... 237
Direction of rotation ..................... 237
Checking tire inflation pressure ... 237
Rotating wheels............................ 238
Winter driving..................................... 240
Winter tires................................... 240
Block heater (Canada only) .......... 240
Snow chains ................................. 241Maintenance ...................................... 242
Clearing the service indicator ...... 242
Service term exceeded ................ 242
Calling up the service indicator .... 243
Resetting the service indicator..... 243
Vehicle care ....................................... 244
Cleaning and care of the vehicle .. 244
Practical hints.................................. 251
What to do if … .................................. 252
Lamps in instrument cluster ........ 252
Lamp in center console ................ 259
Messages in the multifunction
display.......................................... 260
Where will I find ...? ........................... 283
First aid kit ................................... 283
Vehicle tool kit ............................. 283
Vehicle jack.................................. 284
CD changer .................................. 284
Spare wheel ................................. 285Unlocking/locking in an emergency .. 287
Unlocking the vehicle................... 287
Locking the vehicle ...................... 288
Changing batteries in
the SmartKey ............................... 288
Fuel filler flap ............................... 290
Manually unlocking the
transmission gear selector lever .. 290
Opening/closing in an emergency .... 292
Sliding/pop-up roof ..................... 292
Brush guard* ..................................... 293
Lowering and raising brush guard 294
Replacing bulbs ................................. 295
Bulbs ............................................ 295
Replacing bulbs for front lamps ... 297
Replacing bulbs for rear lamps .... 301
Replacing wiper blades ...................... 304
Removing wiper blades ................ 304
Installing wiper blades ................. 305
Flat tire .............................................. 306
Preparing the vehicle ................... 306
Mounting the spare wheel ........... 307
Page 48 of 376

48 Getting startedDriving
Single wipe�
Press switch briefly in the direction of
arrow1.
The windshield wipers wipe one time
without washer fluid.
Wiping with windshield washer fluid
�
Push switch in the direction of
arrow1 past the resistance point.
The windshield wipers operate with
washer fluid until the switch is re-
leased.
For information on filling up the washer
reservoir, see “Windshield/rear window
washer system and headlamp cleaning
system” (
�page 234).
!Do not leave windshield wipers in inter-
mittent setting when vehicle is taken to
an automatic car wash or during wind-
shield cleaning. Wipers will operate in
the presence of water sprayed on the
windshield, and wipers may be dam-
aged as a result.
The switch should not be left in inter-
mittent setting as the wipers will wipe
the windshield once every time the en-
gine is started. Dust that accumulates
on the windshield might scratch the
glass and / or damage the wiper blades
when wiping occurs on a dry wind-
shield.
!If anything blocks the windshield wip-
ers (leaves, snow, etc.), switch them off
immediately.�
For safety reasons, withdraw
SmartKey from starter switch be-
fore attempting to remove any
blockage.
�
Remove blockage.
�
Turn the windshield wipers on
again.
If windshield wipers fail to function at
all in switch positionI,
�
set the combination switch to the
next highest wiper speed
�
have the windshield wipers
checked at the nearest authorized
Mercedes-Benz Light Truck Center
Page 227 of 376

227 Operation
Engine compartment
�Engine compartment
Hood
Opening
The pull release lever is under the driver’s
side of the instrument panel.
1Release lever
�
Pull release lever1 upward.
The hood is unlocked.
2Safety hook
�
Lift hood up slightly.
�
Pull safety hook2 in direction of ar-
row and open hood.
Warning!
G
Do not pull the release lever while the vehi-
cle is in motion. Otherwise the hood could
be forced open by passing air flow.
!To avoid damage to the windshield wip-
ers or hood, open the hood only with
wipers in parked position.
Warning!
G
To help prevent personal injury, stay clear of
moving parts when the hood is open and the
engine is running. Make sure the hood is
properly closed before driving. When closing
the hood, use extreme caution not to catch
hands or fingers.
The radiator fan may continue to run for ap-
proximately 30 seconds or even restart af-
ter the engine has been turned off. Stay
clear of fan blades.Warning!
G
If you see flames or smoke coming from the
engine compartment, or if the coolant tem-
perature display indicates that the engine is
overheated, do not open the hood. Move
away from vehicle and do not open the hood
until the engine has cooled down. If neces-
sary, call the fire department.
Page 247 of 376

247 Operation
Vehicle care
Cleaning the Rear Parking Assist
sensors*
1Sensor�
Use a mild car wash detergent, such as
Mercedes-Benz approved Car Sham-
poo, with plenty of water to clean
sensor1.
To prevent scratches, never apply strong
force and use only a soft, non-scratchy
cloth when cleaning the sensor. Do not at-
tempt to wipe dirty sensors with a dry cloth
or sponge.Wiper blades
�
Fold wiper arms forward.
�
Clean the wiper blade inserts with a
clean cloth and detergent solution.Window cleaning
�
Fold wiper arms forward.
�
Use a window cleaning solution on all
glass surfaces.
An automotive glass cleaner is recom-
mended.
Warning!
G
For safety reasons, switch off wipers and re-
move SmartKey from starter switch before
cleaning the wiper blades, otherwise the
wiper motor can suddenly turn on and cause
injury.!Fold the windshield wiper arms back
onto the windshield before turning the
SmartKey in the starter switch.
Hold on to the wiper when folding the
wiper arm back. If released, the force
of the impact from the tensioning
spring could crack the windshield.
Warning!
G
For safety reasons, switch off wipers and re-
move SmartKey from starter switch before
cleaning the windshield, otherwise the wiper
motor can suddenly turn on and cause inju-
ry.!Fold the windshield wiper arms back
onto the windshield before turning the
SmartKey in the starter switch.
Hold on to the wiper when folding the
wiper arm back. If released, the force
of the impact from the tensioning
spring could crack the windshield.
Page 251 of 376
251 Practical hints
What to do if …
Where will I find ...?
Unlocking/locking in an emergency
Opening/closing in an emergency
Brush guard*
Replacing bulbs
Replacing wiper blades
Flat tire
Battery
Jump starting
Towing the vehicle
Fuses
Page 304 of 376

304 Practical hintsReplacing wiper blades
�Replacing wiper blades
Removing wiper blades�
Fold the wiper arm forward.
1Safety tab
2Wiper blade
3Wiper arm
4Attachment link
�
Turn wiper blade2 at a right angle to
wiper arm3.
�
Press safety tab1 of attachment
link4 down and slide wiper blade2
from the end of wiper arm3.
�
Remove wiper blade2.
Warning!
G
For safety reasons, remove SmartKey from
starter switch before replacing a wiper
blade. Otherwise the motor could suddenly
turn on and cause injury.!Never open the hood when the wiper
arm is folded forward.
Hold on to the wiper when folding the
wiper arm back. If released, the force
of the impact from the tensioning
spring could crack the windshield.
Do not allow the wiper arms to contact
the windshield glass without a wiper
blade inserted.
Make certain that the wiper blades are
properly installed. Improperly installed
wiper blades may cause windshield
damage.
The wiper with air spoiler should be
mounted on the driver’s side
For your convenience, we recommend
that you have this work carried out by
an authorized Mercedes-Benz Light
Truck Center.
Page 305 of 376
305 Practical hints
Replacing wiper blades
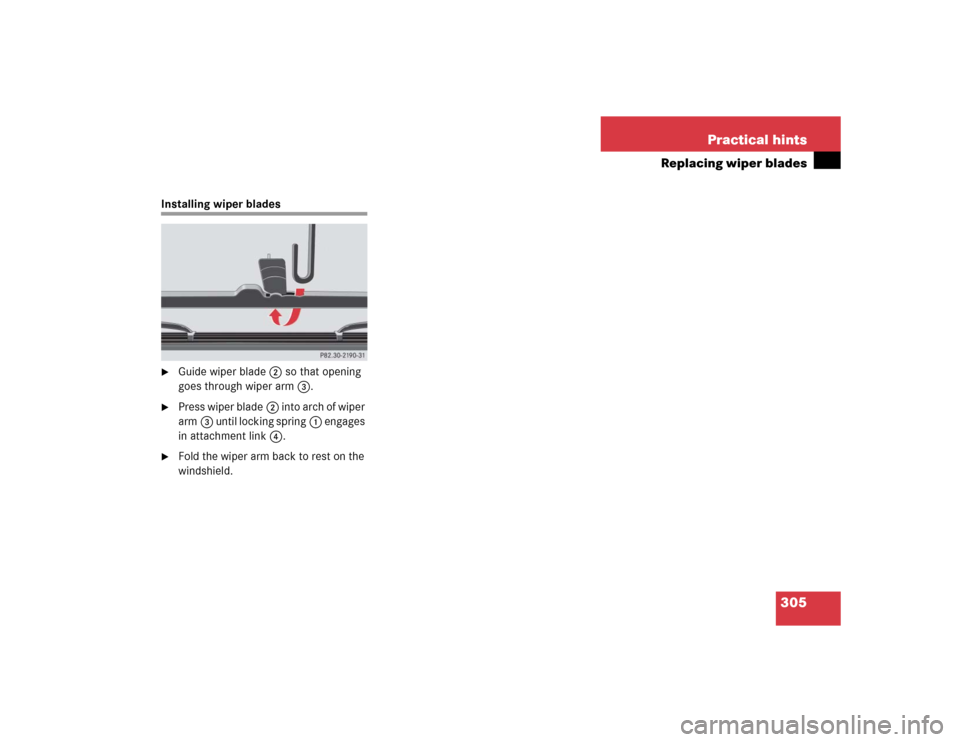
Installing wiper blades�
Guide wiper blade2 so that opening
goes through wiper arm3.
�
Press wiper blade2 into arch of wiper
arm3 until locking spring1 engages
in attachment link4.
�
Fold the wiper arm back to rest on the
windshield.
Page 352 of 376

352 IndexCargo compartment
Tailgate 89, 90
Tie-down rings 182
Cargo compartment cover 175
Installing 176
Removing 176
Cargo tie-down rings 182
Catalytic converter 222
CD changer 284
CD player
Operating 121
Center console 27
AIRBAG OFF indicator lamp 259
Lower part 28
Upper part 27
Centigrade
Setting temperature units 127
Central locking
From inside 92
Switch 92Switching on/off (control
system) 133
Unlocking from inside 92
Certification label 326
Changing
Batteries (SmartKey) 288
Key setting 133
Charging
Vehicle battery 311
CHECK ENGINE malfunction indicator
lamp 256
Checking
Coolant level 225, 232
Oil level 226, 228
Checklist
Off-road driving 215
Child safety 65
Infant and child restraint systems 56,
62, 66
LATCH child seat anchors 70Child safety switch see Blocking of rear
door window operation
Cigarette lighter 188
Cleaning
Cup holders 248
Gear selector lever 248
Hard plastic trim items 248
Headlamps 153
Headliner 248
Illuminated door sill panels 249
Instrument cluster 248
Leather upholstery 249
Light alloy wheels 248
MB Tex upholstery 249
Plastic and rubber parts 249
Rear Parking Assist sensors* 247
Seat belts 248
Steering wheel 248
Windows 247
Windshield 48
Wiper blades 247
Wood trims 249