Page 111 of 376
111 Controls in detail
Lighting
2Cargo compartment lamps
Switching on and off with the tailgate
open
If the tailgate should remain open for a
longer period of time, the cargo compart-
ment lamps may be switched off separate-
ly.1Door lock
2Lock cylinder
Switching off
�
Open the tailgate.
�
Press door lock1 down until it engag-
es (arrow).Switching on
�
Press lock cylinder2 to activate the
cargo compartment lamps again.
The cargo compartment lamps will
switch on.
!Do not close the tailgate if the lock is
engaged in down position. The lock
could otherwise be damaged.
When locking the tailgate, it is impor-
tant that the door lock be in the same
position as shown in the illustration.
Warning!
G
To prevent possible personal injury, always
keep hands and fingers away from the tail-
gate opening when closing the tailgate. Be
especially careful when small children are
around.
Only drive with the tailgate closed as other-
wise exhaust fumes may enter the vehicle
interior.
Page 112 of 376
.
1Reset button")
112 Controls in detailInstrument cluster
�Instrument clusterA full view illustration of the instrument
cluster can be found in the “At a glance”
section of this manual (
�page 24).
1Reset button
The instrument cluster is activated when
you:
�
open a door
�
turn on the ignition
�
press reset button1
�
switch on the exterior lamps
You can change the instrument cluster set-
tings in the Instrument cluster submenu of
the control system (
�page 127).
Instrument cluster illumination
Use the reset button to adjust the illumina-
tion brightness for the instrument cluster.
To brighten illumination�
Turn reset button1 in the instrument
cluster clockwise.
The instrument cluster illumination will
brighten.To dim illumination
�
Turn reset button1 in the instrument
cluster counterclockwise.
The instrument cluster illumination will
dim.
Coolant temperature display
iThe instrument cluster illumination is
dimmed or brightened automatically to
suit ambient light conditions.
The instrument cluster illumination will
also be adjusted automatically when
you switch on the vehicle’s exterior
lamps.
Warning!
G
�
Driving when your engine is badly over-
heated can cause some fluids which
may have leaked into the engine com-
partment to catch fire. You could be se-
riously burned.
�
Steam from an overheated engine can
cause serious burns and can occur just
by opening the hood. Stay away from
the engine if you see or hear steam com-
ing from it.
Turn off the engine, get out of the vehicle
and do not stand near the vehicle until the
engine has cooled down.
Page 122 of 376

122 Controls in detailControl systemNAVI menu
The
NAVI
menu contains the functions
needed to operate your navigation system.
�
Press buttonè orÿ repeatedly
until you see the message
NAVI
in the
display.
�
If the navigation system is off, the mes-
sage
NAVI OFF
is shown in the display.
�
If the navigation system is on, the mes-
sage
NAVI ACTIVE
is shown in the dis-
play.
Please refer to the COMAND manual for in-
structions on how to activate the route
guidance system*.
Malfunction memory menu
Use the malfunction memory menu to scan
malfunction and warning messages that
may be stored in the system. The informa-
tion shown in the display depends on
whether malfunctions have actually oc-
curred.
�
Press buttonè orÿ repeatedly
until you see the malfunction message
memory in the display.
No malfunction messages
If no malfunctions have occurred, the mes-
sage in the display is:
NO MALFUNCTIONMalfunctions have occurred
If malfunctions have occurred, you will see
the number of malfunctions in the display:
1Number of malfunctions�
Press buttonk orj.
The stored messages will now be dis-
played in order. See the “Practical
hints” section for malfunction and
warning messages (
�page 260).
Warning!
G
Malfunction and warning messages are only
indicated for certain systems and are inten-
tionally not very detailed. The malfunction
and warning messages are simply a remind-
er with respect to the operation of certain
systems and do not replace the owner’s
and/or driver’s responsibility to maintain
the vehicle’s operating safety by having all
required maintenance and safety checks
performed on the vehicle and by bringing
the vehicle to an authorized Mercedes-Benz
Light Truck Center to address the malfunc-
tion and warning messages (
�page 260).
Page 144 of 376

144 Controls in detailAutomatic transmission
Accelerator position
Your driving style influences the transmis-
sion’s shifting behavior:
Less throttle Earlier upshifting
More throttle Later upshifting
Kickdown
Use kickdown when you want maximum
acceleration.�
Press the accelerator past the point of
resistance.
The transmission shifts into a lower
gear.
�
Ease on the accelerator when you have
reached the desired speed.
The transmission shifts up again.Emergency operation (Limp Home
Mode)
If vehicle acceleration worsens or the
transmission no longer shifts, the trans-
mission is most likely operating in limp
home (emergency operation) mode. In this
mode, only 2nd gear and reverse gear can
be activated.�
Stop the vehicle.
�
Move gear selector lever toP.
�
Turn off the engine.
�
Wait at least ten seconds before re-
starting.
�
Restart the engine.
�
Move gear selector lever to positionD
(for second gear) orR.
�
Have the transmission checked at an
authorized Mercedes-Benz Light Truck
Center as soon as possible.
Warning!
G
When leaving the vehicle, always remove the
SmartKey from the starter switch, and lock
the vehicle. Do not leave children unattend-
ed in the vehicle, or with access to an un-
locked vehicle. Children could move the
gear selector lever from positionP, which
could result in an accident and/or serious
personal injury.
Page 152 of 376
 and for
setting the exterior rear view mirrors, see
“Exterior r")
152 Controls in detailGood visibility
�Good visibilityFor information on windshield wipers, see
“Windshield wipers” (
�page 47) and for
setting the exterior rear view mirrors, see
“Exterior rear view mirror” (
�page 38).
Rear view mirror
Automatic antiglare rear view mirrors
The reflection brightness of the exterior
rear view mirrors and the interior rear view
mirror will respond automatically to glare
when �
the ignition is switched on, and
�
incoming light from headlamps falls on
the sensor in the interior rear view mir-
ror
The interior rear view mirror will not react if
�
reverse gear is engaged
�
the interior lighting is turned on
Warning!
G
The automatic antiglare function does not
react if incoming light is not aimed directly
at sensors in the interior rear view mirror.
The interior rear view mirror and the exterior
rear view mirrors do not react, for example,
if the cargo compartment is fully loaded.
Glare can endanger you and others.Warning!
G
Exercise care when using the passen-
ger-side exterior rear view mirror. The mirror
surface is convex (outwardly curved surface
for a wider field of view). Objects in mirror
are closer than they appear. Check your in-
side rear view mirror or glance over your
shoulder before changing lanes.
Warning!
G
In the case of an accident, liquid electrolyte
may escape from the mirror housing if the
mirror glass breaks.
Electrolyte has an irritating effect. Do not al-
low the liquid to come into contact with
eyes, skin, clothing, or the respiratory sys-
tem. In case it does, immediately flush af-
fected area with water, and seek medical
help if necessary.
Page 154 of 376
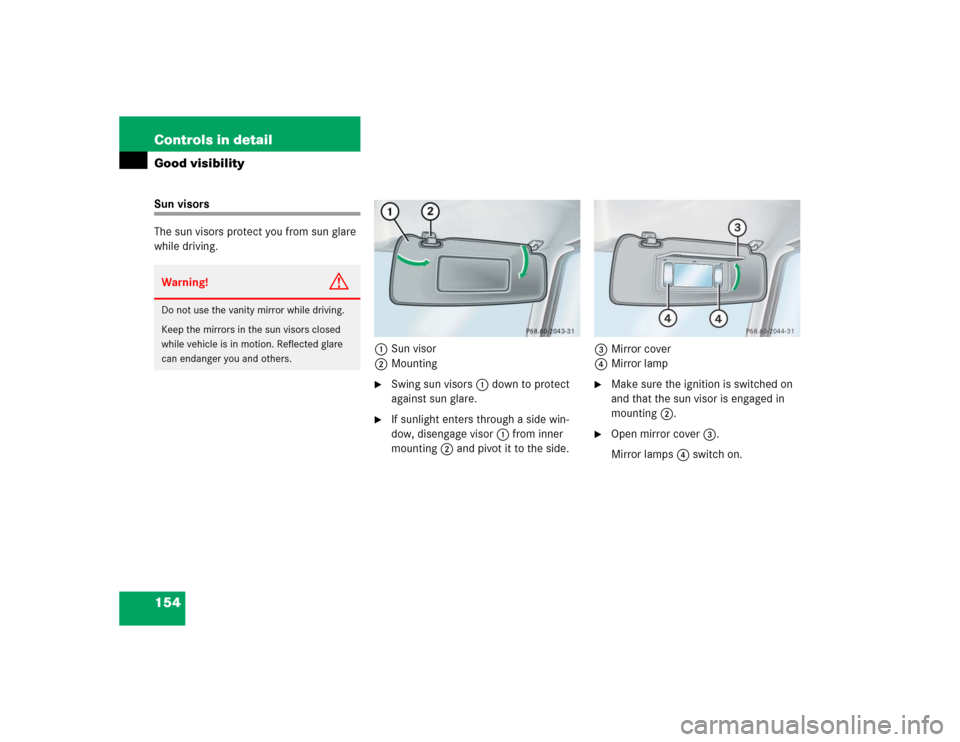
154 Controls in detailGood visibilitySun visors
The sun visors protect you from sun glare
while driving.
1Sun visor
2Mounting
�
Swing sun visors1 down to protect
against sun glare.
�
If sunlight enters through a side win-
dow, disengage visor1 from inner
mounting2 and pivot it to the side.3Mirror cover
4Mirror lamp
�
Make sure the ignition is switched on
and that the sun visor is engaged in
mounting2.
�
Open mirror cover3.
Mirror lamps4 switch on.
Warning!
G
Do not use the vanity mirror while driving.
Keep the mirrors in the sun visors closed
while vehicle is in motion. Reflected glare
can endanger you and others.
Page 167 of 376

167 Controls in detail
Sliding/pop-up roof
Opening and closing the sliding/pop-up
roof�
To open, close, raise or lower the slid-
ing/pop-up roof, move the switch to
the resistance point in the required
direction1to4.
Release the switch when the roof has
reached the required position.Fully opening (Express-open)
�
To open the sliding/pop-up roof, move
the switch past the resistance point in
direction4 and release.
The sliding/pop up roof opens com-
pletely.
Stopping the sliding / pop-up roof
�
Move the switch in any direction.Opening and closing the sliding/pop-up
roof with the SmartKey
The power windows (
�page 164) will also
be opened or closed when you operate the
sliding/pop-up roof with the SmartKey.
�
Aim transmitter eye at the driver’s door
handle.
iIf the movement of the sliding/pop-up
roof is blocked during the closing pro-
cedure, the roof will stop and reopen
slightly.
Warning!
G
Never operate the windows or slid-
ing/pop-up roof if there is the possibility of
anyone being harmed by the opening or
closing procedure.
In case the procedure causes potential dan-
ger, the procedure can be immediately halt-
ed by releasing the button on the SmartKey.
To reverse direction of movement,
pressŒ for opening or ‹ for closing.
Page 174 of 376

174 Controls in detailDriving systemsWarning indicator
Visual signals indicate to the driver the rel-
ative distance between the sensors and an
obstacle. The warning indicator is located
next to the tailgate.Warning indicatorAs your vehicle approaches an object, one
or more segments will come on, depending
on the distance. When the sixth segment
lights, you have reached the minimum dis-
tance.An intermittent acoustic warning will
sound when the first yellow segment
comes on. This signal quickens with each
additional segment lit. When all segments
illuminate, the acoustic warning becomes
a constant signal. The signal is canceled
when the gear selector lever is placed in
position D or P.
Rear Parking Assist malfunction
There is a malfunction in the Rear Parking
Assist system if:
�
a low warning tone sounds while the
vehicle is reversing
The Rear Parking Assist sensors are
dirty or malfunctioning.�
Clean the Rear Parking Assist sys-
tem sensors (
�page 247).
�
Switch on the ignition again.
�
no segments come on and no warning
sounds
The Rear Parking Assist is malfunction-
ing.�
Have the Rear Parking Assist sys-
tem checked by an authorized
Mercedes-Benz Light Truck Center
as soon as possible.
Malfunction may also be caused by inter-
ference from other radio or ultrasonic sig-
nals.
�
Check the Rear Parking Assist opera-
tion at another location to rule out in-
terference from outside radio or
ultrasonic signals.