Page 213 of 376

213 Operation
Driving instructions
Standing water
Passenger compartment
Off-road driving
!Do not drive through flooded areas or
water of unknown depth. Before driving
through water, determine its depth.
Never accelerate before driving into
water. The bow wave could force water
into the engine and auxiliary equip-
ment, thus damaging them.
If you must drive through standing wa-
ter, drive slowly to prevent water from
entering the passenger compartment
or the engine compartment. Water in
these areas could cause damage to
electrical components or wiring of the
engine or transmission, or could result
in water being ingested by the engine
through the air intake, causing severe
internal engine damage. Any such dam-
age is not covered by the
Mercedes-Benz Limited Warranty.
Warning!
G
Always fasten items being carried as secure-
ly as possible.
In an accident, during hard braking or sud-
den maneuvers, loose items will be thrown
around inside the vehicle, and cause injury
to vehicle occupants unless the items are
securely fastened in the vehicle.
The rear cargo compartment is the preferred
place to carry objects. Always use partition
net when transporting cargo. Partition net
cannot secure hard or heavy objects. Al-
ways fasten items being carried as securely
as possible using the cargo tie-down rings in
the cargo compartment floor and fastening
material.
Do not load items on the roof. It may cause
instability during some maneuvers which
could result in an accident. This vehicle is
not intended to carry items on its roof. Thus
roof rails and roof mounted ski or bike hold-
ers must not be used.Warning!
G
Do not load items on the roof. It may cause
instability during some maneuvers which
could result in an accident.
Page 284 of 376
.
�
Open cover1.
�
Open ta")
284 Practical hintsWhere will I find ...?Vehicle jack
The vehicle jack is under the rear bench
seat.
1Cover
2Tab
3Vehicle jack�
Fold the rear bench seat forward
(�page 177).
�
Open cover1.
�
Open tab2 and remove vehicle
jack3.
Please also observe the safety guidelines
in the “Flat tire” section (
�page 306)
when using the jack.
CD changer
The CD changer is located on the left side
of the cargo compartment.CD changer
Warning!
G
The jack is designed exclusively for jacking
up the vehicle under the axle housing. To
help avoid personal injury, use the jack only
to lift the vehicle during a wheel change.
Never get beneath the vehicle while it is sup-
ported by the jack. Keep hands and feet
away from the area under the lifted vehicle.
Always firmly set parking brake and block
wheels before raising vehicle with jack.
Do not disengage parking brake while the
vehicle is raised. Be certain that the jack is
always vertical (plumb line) when in use, es-
pecially on hills. Always try to use the jack
on level surface. Make sure the jack is posi-
tioned correctly under the axle housing. Al-
ways lower the vehicle onto sufficient
capacity jackstands before working under
the vehicle.
iFor CD changer instructions, see sepa-
rate COMAND operator’s manual.
Page 290 of 376
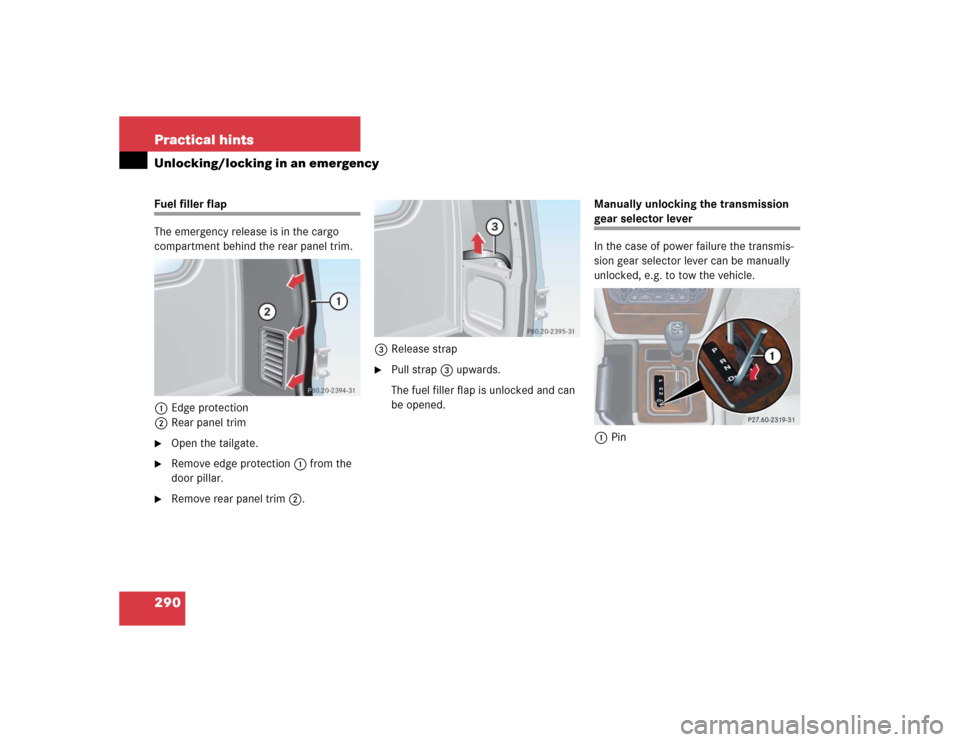
290 Practical hintsUnlocking/locking in an emergencyFuel filler flap
The emergency release is in the cargo
compartment behind the rear panel trim.
1Edge protection
2Rear panel trim�
Open the tailgate.
�
Remove edge protection1 from the
door pillar.
�
Remove rear panel trim2.3Release strap
�
Pull strap 3 upwards.
The fuel filler flap is unlocked and can
be opened. Manually unlocking the transmission
gear selector lever
In the case of power failure the transmis-
sion gear selector lever can be manually
unlocked, e.g. to tow the vehicle.
1Pin
Page 292 of 376
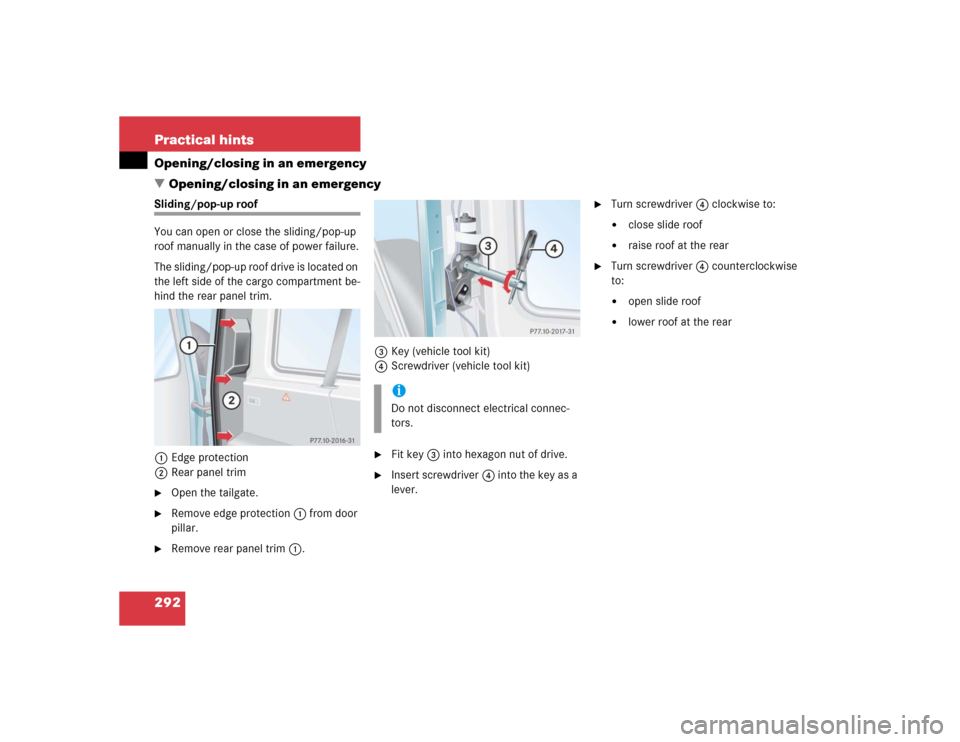
292 Practical hintsOpening/closing in an emergency
�Opening/closing in an emergencySliding/pop-up roof
You can open or close the sliding/pop-up
roof manually in the case of power failure.
The sliding/pop-up roof drive is located on
the left side of the cargo compartment be-
hind the rear panel trim.
1Edge protection
2Rear panel trim�
Open the tailgate.
�
Remove edge protection1 from door
pillar.
�
Remove rear panel trim1.3Key (vehicle tool kit)
4Screwdriver (vehicle tool kit)
�
Fit key3 into hexagon nut of drive.
�
Insert screwdriver4 into the key as a
lever.
�
Turn screwdriver4 clockwise to:�
close slide roof
�
raise roof at the rear
�
Turn screwdriver4 counterclockwise
to:�
open slide roof
�
lower roof at the rear
iDo not disconnect electrical connec-
tors.
Page 332 of 376

332 Technical dataMain dimensions, vehicle weights and ratings
�Main dimensions, vehicle weights and ratingsMain dimensionsVehicle weights and ratings
G500
G55AMG
Overall vehicle length
(inc. spare wheel)
185.6 in (4715 mm)
185.6 in (4715 mm)
Overall vehicle width
71.3 in (1811 mm)
73.4 in (1864 mm)
Overall vehicle height
77.8 in (1977 mm)
77.8 in (1977 mm)
Wheel base
112.2 in (2850 mm)
112.2 in (2850 mm)
Ground clearance
8.3 in (211 mm)
8.3 in (211 mm)
Turning radius
523.6 in (13.3 m)
523.6 in (13.3 m)
Track, front and rear
59.6 in (1515 mm)
59.1 in (1501 mm)
G500
G55AMG
Gross Vehicle Weight Rating
1
1GVWR is the maximum permissible vehicle weight. Gross Vehicle Weight (GVW) comprises weight of vehicle including fuel, tools, spare wheel, installed accessories,
passengers, cargo and trailer tongue. It must never exceed the GVWR.
6615 lbs (3000 kg)
6615 lbs (3000 kg)
Gross Axle Weight Rating, front
2
2GAWR is the maximum permissible axle weight.
3110 lbs (1410 kg)
3110 lbs (1410 kg)
Gross Axle Weight Rating, rear
2
3965 lbs (1800 kg)
3965 lbs (1800 kg)
Page 344 of 376

344 Technical termsDifferential locks
On slippery surfaces, differential locks
prevent one wheel of an axle from spin-
ning while the other wheel stands still,
resulting in driving force no longer be-
ing transferred.
Cruise control
Driving convenience system for auto-
matically maintaining the vehicle speed
set by the driver.
Engine number
The number set by the manufacturer
and placed on the cylinder block to
uniquely identify each engine pro-
duced.
Engine oil viscosity
Measurement for the inner friction (vis-
cosity) of the oil at different tempera-
tures. The higher the temperature an
oil can tolerate without becoming thin,
or the lower the temperature it can tol-
erate without becoming viscous, the
better the viscosity.ESP
(E
lectronic S
tability Pr
ogram)
Improves vehicle handling and direc-
tional stability.
ETD
(E
mergency T
ensioning D
evice)
Device which deploys in certain frontal
and rear collisions exceeding the sys-
tem's threshold to tighten the seat
belts.
->SRS
FSS
(F
lexible S
ervice S
ystem)
Service indicator in the speedometer
display that informs the driver when
the next vehicle maintenance service is
due.
GAWR
(G
ross A
xle W
eight R
ating)
The GAWR is the maximum permissible
axle weight. The gross vehicle weight
on each axle must never exceed the
GAWR for the front and rear axle indi-
cated on the certification label located
on the driver’s door pillar.GVW
(G
ross V
ehicle W
eight)
The GVW comprises the weight of the
vehicle including fuel, tools, spare
wheel, installed accessories, passen-
gers and cargo. The GWV must never
exceed the GVWR indicated on the cer-
tification label located on the driver’s
door pillar.
GVWR
(G
ross V
ehicle W
eight R
ating)
This is the maximum permissible vehi-
cle weight. It is indicated on certifica-
tion label located on the driver’s door
pillar.
Gear range
Number of gears which are available to
the automatic transmission for shifting.
The automatic gear shifting process
can be adapted to specific operating
conditions using the gear selector le-
ver.
Page 351 of 376

351 Index
Backup lamps 296
Bulbs 296
Replacing bulbs 302
BAS 74, 76, 343
Messages in display 261
Batteries, SmartKey
Changing 288
Check lamp 87
Checking 88
Battery box
Fuse box in 319
Battery discharged
Jump starting 313
Battery, vehicle 235, 311
Charging 311
Disconnecting 312
Messages in display 265, 266
Reconnecting 312
Block heater 240
Blocking rear door window operation 71B-pillar 326
Brake assist system (BAS) 343
Brake fluid 225, 335
Brake lamp bulbs, left and right 296
Brake lamp, high mounted 296
Brake pads
Message in display 266
Brakes 208
Warning lamp 254, 255
Break-in period 206
Brush guard* 293
Lowering 294
Raising and securing 294
Bulbs, replacing
Additional turn signals 295
Backup lamps 296, 302
Brake lamps 296, 302
Front fog lamps 295, 299
Front lamps 295
Front turn signal lamps 295, 300High and low beam 297
High beam lamps 295
High mounted brake lamp 296
License plate lamps 296, 303
Low beam lamps 295
Parking lamps 295, 296, 297
Rear fog lamp 296, 302
Rear turn signal lamps 296
Side marker lamps 295, 300
Standing lamps 295, 296, 297
Tail lamp assemblies 296, 301
C
CAC (Customer Assistance Center) 343
Calling up
Range (distance to empty) 137
Service indicator 243
CAN system 343
Capacities
Fuels, coolants, lubricants, etc. 333
Cargo area see Cargo compartment
Page 352 of 376

352 IndexCargo compartment
Tailgate 89, 90
Tie-down rings 182
Cargo compartment cover 175
Installing 176
Removing 176
Cargo tie-down rings 182
Catalytic converter 222
CD changer 284
CD player
Operating 121
Center console 27
AIRBAG OFF indicator lamp 259
Lower part 28
Upper part 27
Centigrade
Setting temperature units 127
Central locking
From inside 92
Switch 92Switching on/off (control
system) 133
Unlocking from inside 92
Certification label 326
Changing
Batteries (SmartKey) 288
Key setting 133
Charging
Vehicle battery 311
CHECK ENGINE malfunction indicator
lamp 256
Checking
Coolant level 225, 232
Oil level 226, 228
Checklist
Off-road driving 215
Child safety 65
Infant and child restraint systems 56,
62, 66
LATCH child seat anchors 70Child safety switch see Blocking of rear
door window operation
Cigarette lighter 188
Cleaning
Cup holders 248
Gear selector lever 248
Hard plastic trim items 248
Headlamps 153
Headliner 248
Illuminated door sill panels 249
Instrument cluster 248
Leather upholstery 249
Light alloy wheels 248
MB Tex upholstery 249
Plastic and rubber parts 249
Rear Parking Assist sensors* 247
Seat belts 248
Steering wheel 248
Windows 247
Windshield 48
Wiper blades 247
Wood trims 249