Page 300 of 376
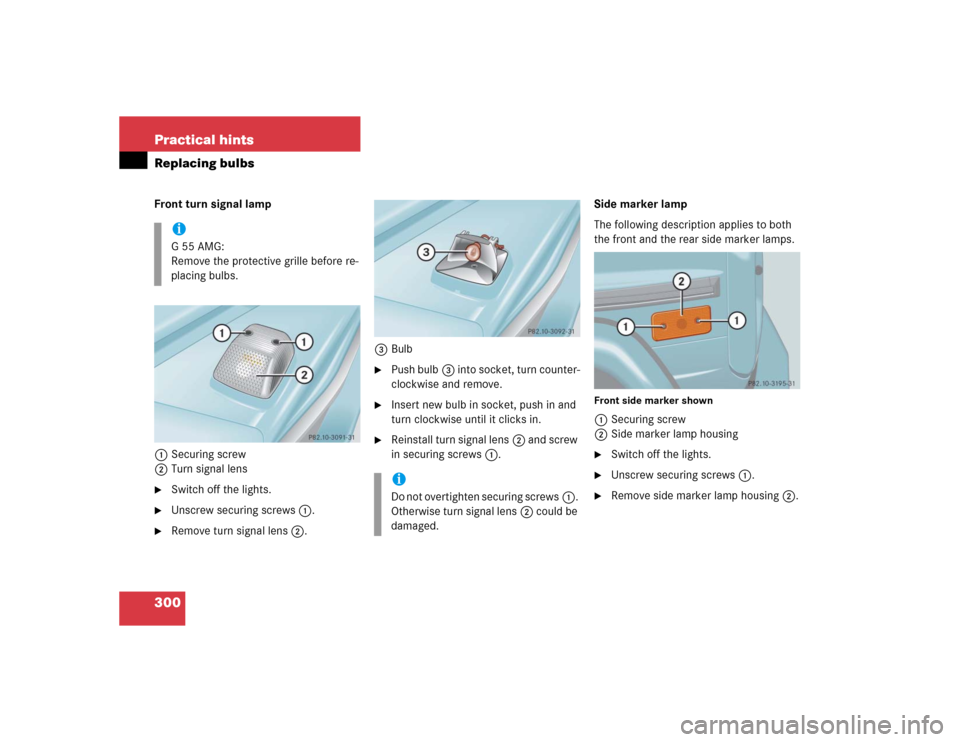
300 Practical hintsReplacing bulbsFront turn signal lamp
1Securing screw
2Turn signal lens�
Switch off the lights.
�
Unscrew securing screws1.
�
Remove turn signal lens2.3Bulb
�
Push bulb3 into socket, turn counter-
clockwise and remove.
�
Insert new bulb in socket, push in and
turn clockwise until it clicks in.
�
Reinstall turn signal lens2 and screw
in securing screws1.Side marker lamp
The following description applies to both
the front and the rear side marker lamps.
Front side marker shown1Securing screw
2Side marker lamp housing�
Switch off the lights.
�
Unscrew securing screws1.
�
Remove side marker lamp housing2.
iG55AMG:
Remove the protective grille before re-
placing bulbs.
iDo not overtighten securing screws1.
Otherwise turn signal lens2 could be
damaged.
Page 301 of 376
301 Practical hints
Replacing bulbs
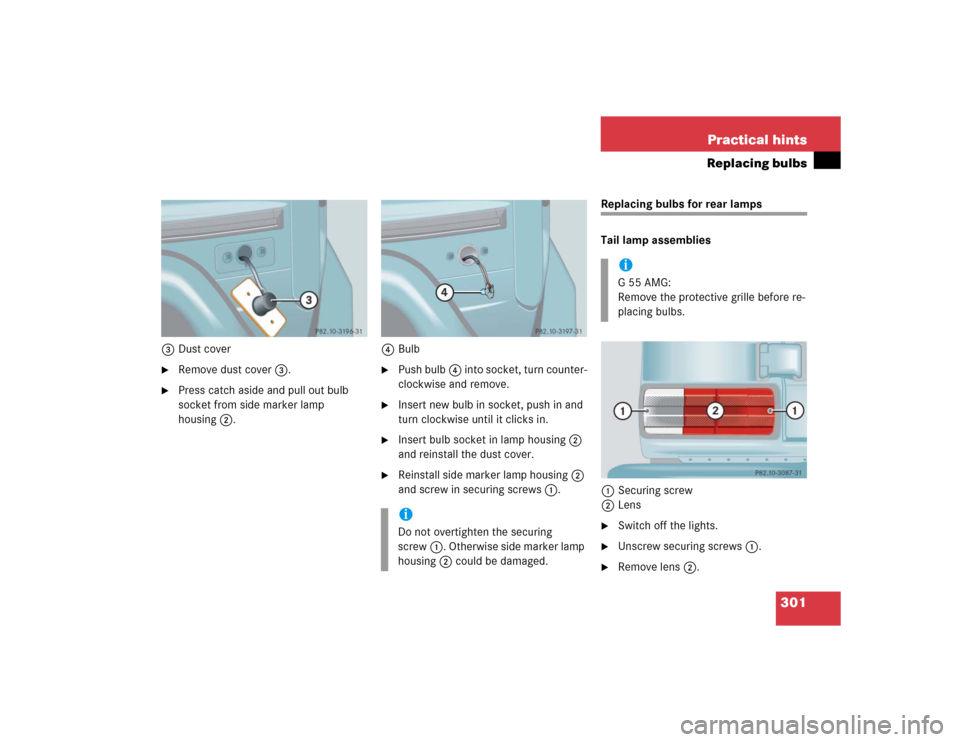
3Dust cover�
Remove dust cover3.
�
Press catch aside and pull out bulb
socket from side marker lamp
housing2.4Bulb
�
Push bulb4 into socket, turn counter-
clockwise and remove.
�
Insert new bulb in socket, push in and
turn clockwise until it clicks in.
�
Insert bulb socket in lamp housing2
and reinstall the dust cover.
�
Reinstall side marker lamp housing2
and screw in securing screws1.
Replacing bulbs for rear lamps
Tail lamp assemblies
1Securing screw
2Lens�
Switch off the lights.
�
Unscrew securing screws1.
�
Remove lens2.
iDo not overtighten the securing
screw1. Otherwise side marker lamp
housing2 could be damaged.
iG55AMG:
Remove the protective grille before re-
placing bulbs.
Page 302 of 376
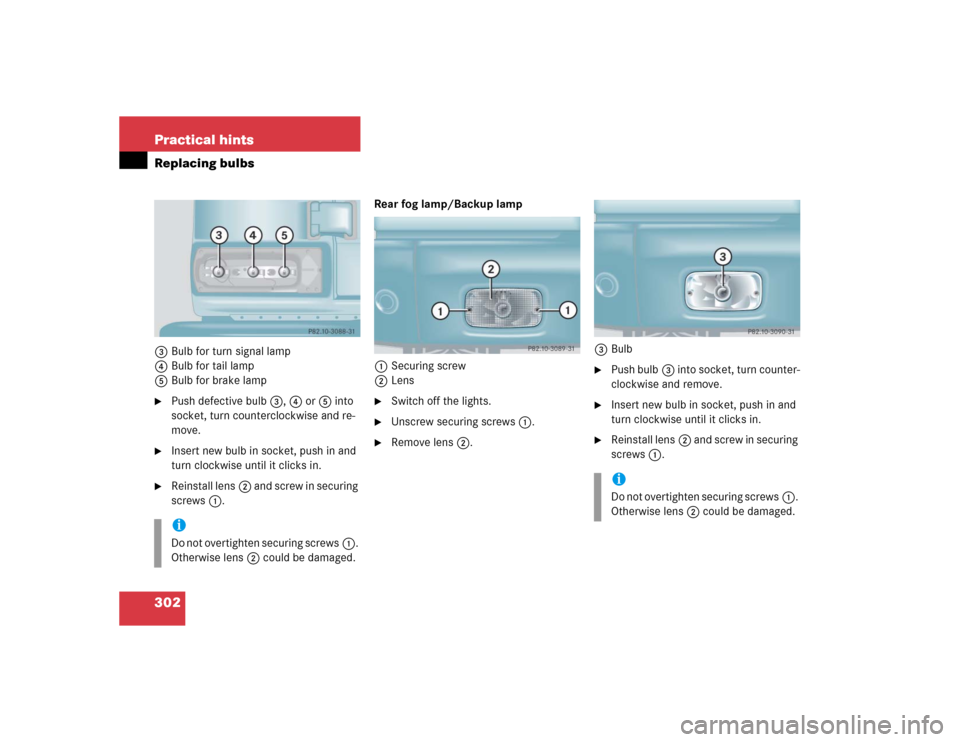
302 Practical hintsReplacing bulbs3Bulb for turn signal lamp
4Bulb for tail lamp
5Bulb for brake lamp�
Push defective bulb3, 4 or5 into
socket, turn counterclockwise and re-
move.
�
Insert new bulb in socket, push in and
turn clockwise until it clicks in.
�
Reinstall lens2 and screw in securing
screws1.Rear fog lamp/Backup lamp
1Securing screw
2Lens
�
Switch off the lights.
�
Unscrew securing screws1.
�
Remove lens2.3Bulb
�
Push bulb3 into socket, turn counter-
clockwise and remove.
�
Insert new bulb in socket, push in and
turn clockwise until it clicks in.
�
Reinstall lens2 and screw in securing
screws1.
iDo not overtighten securing screws1.
Otherwise lens2 could be damaged.
iDo not overtighten securing screws1.
Otherwise lens2 could be damaged.
Page 303 of 376
303 Practical hints
Replacing bulbs
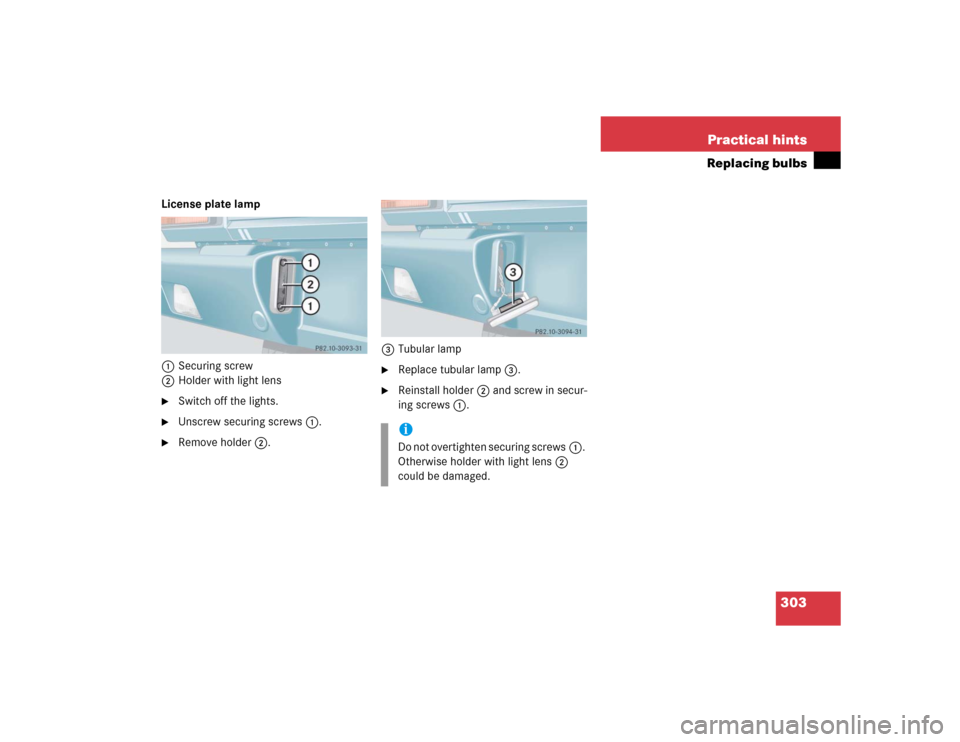
License plate lamp
1Securing screw
2Holder with light lens�
Switch off the lights.
�
Unscrew securing screws1.
�
Remove holder2.3Tubular lamp
�
Replace tubular lamp3.
�
Reinstall holder2 and screw in secur-
ing screws1.iDo not overtighten securing screws1.
Otherwise holder with light lens2
could be damaged.
Page 304 of 376

304 Practical hintsReplacing wiper blades
�Replacing wiper blades
Removing wiper blades�
Fold the wiper arm forward.
1Safety tab
2Wiper blade
3Wiper arm
4Attachment link
�
Turn wiper blade2 at a right angle to
wiper arm3.
�
Press safety tab1 of attachment
link4 down and slide wiper blade2
from the end of wiper arm3.
�
Remove wiper blade2.
Warning!
G
For safety reasons, remove SmartKey from
starter switch before replacing a wiper
blade. Otherwise the motor could suddenly
turn on and cause injury.!Never open the hood when the wiper
arm is folded forward.
Hold on to the wiper when folding the
wiper arm back. If released, the force
of the impact from the tensioning
spring could crack the windshield.
Do not allow the wiper arms to contact
the windshield glass without a wiper
blade inserted.
Make certain that the wiper blades are
properly installed. Improperly installed
wiper blades may cause windshield
damage.
The wiper with air spoiler should be
mounted on the driver’s side
For your convenience, we recommend
that you have this work carried out by
an authorized Mercedes-Benz Light
Truck Center.
Page 306 of 376

306 Practical hintsFlat tire
�Flat tirePreparing the vehicle�
Park the vehicle as far as possible from
moving traffic on a hard surface.
�
Turn on the hazard warning flashers.
�
Engage the steering wheel lock in the
straight ahead position and set the
parking brake.
�
Move the gear selector lever toP.
�
Have any passenger exit the vehicle at
a safe distance from the roadway.
�
Remove the vehicle tool kit
(�page 283) and the jack
(�page 284).
�
Remove the spare wheel from the
spare wheel mounting bracket
(�page 285).Information on spare wheel
When you replace the vehicle’s tires, you
can use the spare wheel as a regular wheel
if:
�
it is not more than six years old
�
rim and tire are the same model as the
regular wheels
Warning!
G
For your safety, remove spare wheel from
the spare wheel mounting bracket before
undertaking any further steps.
Warning!
G
If the spare tire is more than six years old or
is not the same model as the regular tires,
have the spare tire replaced with a new tire
at the nearest Mercedes-Benz Light Truck
Center.
Never operate the vehicle with more than
one spare tire.
Warning!
G
G 55 AMG only
Vehicles with different tire dimensions on
the front and rear axle: rim and tire size of
spare wheel and normal wheel differ. Han-
dling will be adversely affected when the
spare wheel is used.
Do not exceed the maximum speed of
50 mph (80 km/h).
Page 309 of 376

309 Practical hints
Flat tire
Removing the wheel�
Remove the wheel bolts.
�
Remove the wheel.Mounting the new wheel
�
Clean contact surfaces of wheel and
wheel hub.
�
Push the wheel onto the wheel hub and
press firmly.
�
Insert wheel bolts and tighten them
slightly.
!Do not place wheel bolts in sand or dirt.
This could result in damage to the bolt
and wheel hub threads.Warning!
G
Make sure no one is injured when removing
the wheel.
Grip wheel from the sides.
Keep hands from beneath the wheel.
Warning!
G
Always replace wheel bolts that are dam-
aged or rusted.
Never apply oil or grease to wheel bolts.
Damaged wheel hub threads should be re-
paired immediately. Do not continue to drive
under these circumstances! Contact an au-
thorized Mercedes-Benz Light Truck Center
or call Roadside Assistance.
Incorrect wheel bolts or improperly tight-
ened wheel bolts can cause the wheel to
come off. This could cause an accident.
Make sure to use the correct wheel bolts.
Warning!
G
Use only genuine equipment
Mercedes-Benz wheel bolts. Other wheel
bolts may come loose.
Do not tighten the wheel bolts when the ve-
hicle is raised. Otherwise the vehicle could
tip over.
Page 311 of 376

311 Practical hints
Battery
�Battery
The battery is located in front of the rear
seat bench and below the cup holder
Batteries contain materials that can harm
the environment if disposed of improperly.
Large 12 volt storage batteries contain
lead.
Recycling of batteries is the preferred
method of disposal. Many states require
sellers of batteries to accept old batteries
for recycling.
Charging the battery
Have the battery removed at a
Mercedes-Benz Light Truck Center.
If you charge the battery yourself, make
sure to comply with the operating instruc-
tions for your battery charger.
Warning!
G
Failure to follow these instructions can re-
sult in severe injury or death.
Observe all safety instructions and precau-
tions when handling automotive batteries
(�page 235).
Never lean over batteries while connecting,
you might get injured.
Battery fluid contains sulfuric acid. Do not
allow this fluid to come in contact with eyes,
skin or clothing. In case it does, immediately
flush affected area with water and seek
medical help if necessary.
A battery will also produce hydrogen gas,
which is flammable and explosive. Keep
flames or sparks away from battery, avoid
improper connection of jumper cables,
smoking, etc.
Warning!
G
Do not place metal objects on the battery as
this could result in a short circuit.
Use leak-proof battery only to avoid the risk
of acid burns in the event of an accident.
Warning!
G
Never charge a battery while still installed in
the vehicle. Gases may escape during charg-
ing and cause explosions that may result in
paint damage, corrosion or personal injury.!Have the battery checked regularly by
an authorized Mercedes-Benz Light
Truck Center.
Refer to Service Booklet for mainte-
nance intervals or contact your autho-
rized Mercedes-Benz Light Truck
Center for further information.