Page 58 of 442

58 Safety and SecurityOccupant safety�
Adjust the driver seat as far as possible
rearward, still permitting proper opera-
tion of vehicle controls. The distance
from the center of the driver’s breast-
bone to the center of the airbag cover on
the steering wheel must be at least 10 in
(25 cm) or more. You should be able to
accomplish this by a combination of ad-
justments to the seat and steering
wheel. If you have any problems, please
see your authorized Mercedes-Benz
Center.
�
Do not lean with your head or chest
close to the steering wheel or dash-
board.
�
Keep hands on the outside of steering
wheel rim. Placing hands and arms in-
side the rim can increase the risk and
potential severity of hand/arm injury
when driver front airbag inflates.
�
Adjust the front passenger seat as far as
possible rearward from the dashboard
when the seat is occupied.
�
Occupants, especially children, should
never lean their heads in the area of the
door where the side airbag inflates. This
could result in serious injuries or death
should the airbag be triggered. Always
sit upright, properly use the seat belts
and appropriate size infant or child re-
straint system.
�
Children 12 years old and under must
never ride in the front seat, except in a
Mercedes-Benz authorized
BabySmart
TM compatible child seat,
which operates with the BabySmart
TM
system installed in the vehicle to deacti-
vate the passenger front airbag when it
is properly installed. Otherwise they will
be struck by the airbag when it inflates
in a crash. If this happens, serious or fa-
tal injury will result.
Failure to follow these instructions can re-
sult in severe injuries to you or other occu-
pants.
If you sell your vehicle you are responsible
to make the buyer aware of these points. Be
sure to give the buyer this Operator’s Manu-
al.
Warning!
G
Accident research shows that the safest
place for children in an automobile is in the
rear seat. Should you choose to place a child
12 years old or under in the passenger front
seat of your vehicle, you must properly use
a BabySmart
TM child restraint which will
turn off the passenger front airbag.
BabySmart
TM will not, however, turn off any
side impact airbag.
It should be noted that with respect to both
front and rear side impact airbags there is a
possibility for a side airbag related injury if
occupants, especially children, are not prop-
erly seated or restrained when next to a side
airbag which needs to deploy rapidly in a
side impact in order to do its job.
��
Page 119 of 442
119 Controls in detail
Lighting
�Lighting
For notes on how to switch on the head-
lamps and use the turn signals, see the
“Getting started” section (
�page 47).
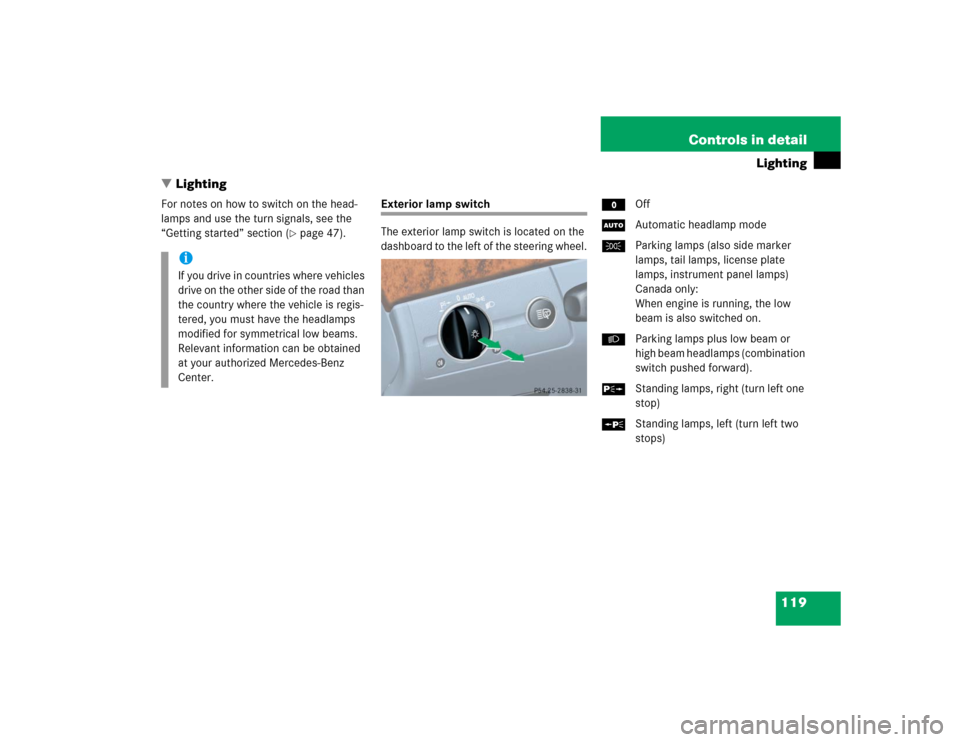
Exterior lamp switch
The exterior lamp switch is located on the
dashboard to the left of the steering wheel.MOff
UAutomatic headlamp mode
CParking lamps (also side marker
lamps, tail lamps, license plate
lamps, instrument panel lamps)
Canada only:
When engine is running, the low
beam is also switched on.
BParking lamps plus low beam or
high beam headlamps (combination
switch pushed forward).
ˆStanding lamps, right (turn left one
stop)
‚Standing lamps, left (turn left two
stops)
iIf you drive in countries where vehicles
drive on the other side of the road than
the country where the vehicle is regis-
tered, you must have the headlamps
modified for symmetrical low beams.
Relevant information can be obtained
at your authorized Mercedes-Benz
Center.
Page 170 of 442

170 Controls in detailGood visibility
Headlamp cleaning system*
The button is located on the left side of the
dashboard.
1Headlamp washer button�
Switch on ignition.
�
Press button1.
The headlamps are cleaned with a
high-pressure water jet.
Information on filling up the washer reser-
voir can be found in the “Operation” sec-
tion (�page 288).
Sun visors
The sun visors protect you from sun glare
while driving.�
Swing sun visors down when you expe-
rience glare.
!Do not leave windshield wipers in inter-
mittent setting when the vehicle is tak-
en to an automatic car wash or during
windshield cleaning. Wipers will oper-
ate in the presence of water sprayed on
the windshield, and wipers may be
damaged as a result.
The switch should not be left in inter-
mittent setting as the wipers will wipe
the windshield once every time the en-
gine is started. Dust that accumulates
on the windshield might scratch the
glass and / or damage the wiper blades
when wiping occurs on a dry wind-
shield.
Warning!
G
Do not use the vanity mirror while driving.
Keep the mirrors in the sun visors closed
while vehicle is in motion. Reflected glare
can endanger you and others.
Page 231 of 442

231 Controls in detail
Driving systems
Warning indicators
Visual signals indicate to the driver the rel-
ative distance between the sensors and an
obstacle. The warning indicator for the
front area is located above the center air
vents in the dashboard. The warning indi-
cator for the rear area is integrated in the
rear trim.Front area warning indicator1Left side of the vehicle
2Right side of the vehicleEach warning indicator is divided into six
yellow and two red segments for either
side of the vehicle. The Parktronic system
is ready when the border around the indi-
cator is illuminated.
The position of the gear selector lever de-
termines which warning indicators will be
activated.
As your vehicle approaches an object, one
or more segments will come on, depending
on the distance. When the eighth segment
comes on, you have reached the minimum
distance.
�
Front area: An intermittent acoustic
warning will sound as the first red seg-
ment comes on and a constant acous-
tic warning lasting a maximum of
three seconds will sound for the sec-
ond red segment. The signal is can-
celed when the selector lever is placed
in positionP and the parking brake is
activated.
�
Rear area: An intermittent acoustic
warning will sound as the first red seg-
ment comes on and a constant acous-
tic warning lasting a maximum of
three seconds will sound for the sec-
ond red segment. The signal is can-
celed when the selector lever is placed
in position D orP and the parking
brake is activated.
Selector lever po-
sition
Warning indicator
D
Front area activated
R or N
Front and rear area
activated
P
Neither activated
Page 244 of 442
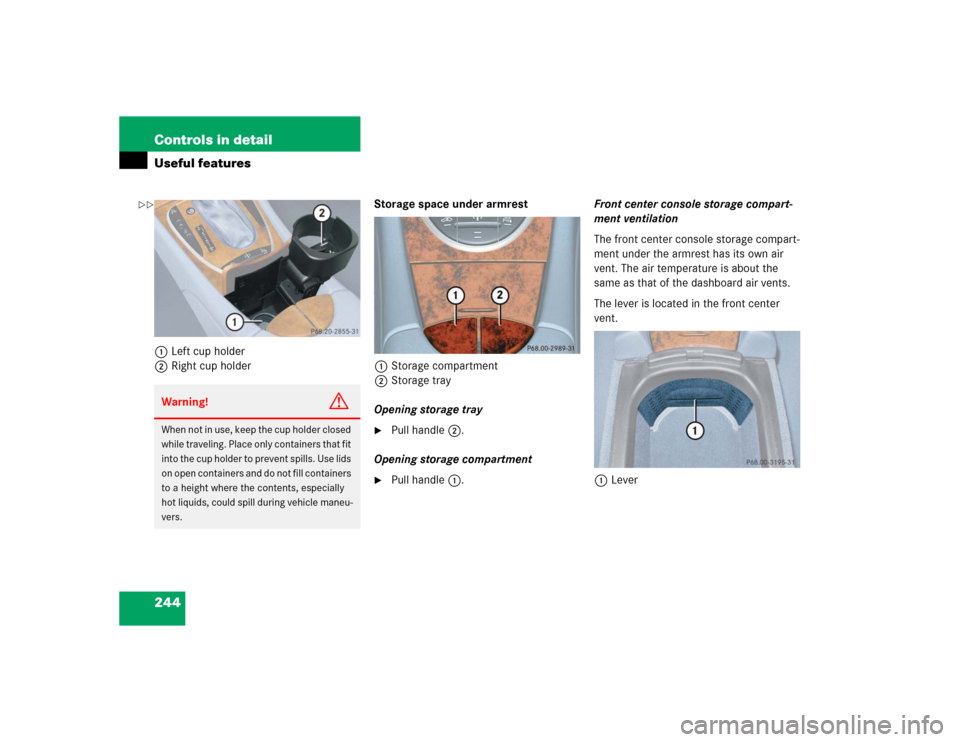
244 Controls in detailUseful features1Left cup holder
2Right cup holderStorage space under armrest
1Storage compartment
2Storage tray
Opening storage tray
�
Pull handle2.
Opening storage compartment
�
Pull handle1.Front center console storage compart-
ment ventilation
The front center console storage compart-
ment under the armrest has its own air
vent. The air temperature is about the
same as that of the dashboard air vents.
The lever is located in the front center
vent.
1Lever
Warning!
G
When not in use, keep the cup holder closed
while traveling. Place only containers that fit
into the cup holder to prevent spills. Use lids
on open containers and do not fill containers
to a height where the contents, especially
hot liquids, could spill during vehicle maneu-
vers.
��