Page 140 of 442

140 Controls in detailControl systemThe table below shows what settings can
be changed within the various menus. De-
tailed instructions on making individual
settings can be found on the following pag-
es.INSTRUMENT CLUSTER
TIME/DATE
LIGHTING
VEHICLE
CONVENIENCE
DYNAMIC SEAT*
Select temperature dis-
play mode
Synchronizing the
time
Set daytime running
lamp mode
(USA only)
Set automatic lock-
ing
Activate
easy-entry / exit
feature
Set level for dynam-
ic seat, driver
Select speedometer dis-
play mode
Set time (hours)
Set locator lighting
Set SmartKey-de-
pendency
Set level for dynam-
ic seat, passenger
Select language
Set time (minutes)
Ambient lighting
Set parking position
for exterior rear
view mirror
Select display (speed dis-
play or outside tempera-
ture) for status line
Set date (month)
Exterior lamps de-
layed shut-off
Select display (speed dis-
play or outside tempera-
ture) for basic display
Set date (day)
Interior lighting de-
layed shut-off
Tire pressure unit dis-
play*
Set date (year)
Page 143 of 442
 for basic display�
Move the selection marker with
theæ orç button to the
Instr.
cluster
submenu.")
143 Controls in detail
Control system
Selecting display (speed display or out-
side temperature) for basic display�
Move the selection marker with
theæ orç button to the
Instr.
cluster
submenu.
�
Press buttonj ork repeatedly
until you see this message in the dis-
play:
Basic display
.
The selection marker is on the current
setting.
�
Pressæ orç to select the dis-
play permanently shown in the multi-
function display.Tire pressure display*
Use this function to set the unit for the tire
pressure display.
�
Move the selection marker with the
æ or ç button to the
Instr,
cluster
submenu.
�
Press button j or k repeatedly
until you see this message in the dis-
play:
Display unit Tire pressure
.
The selection marker is on the current
setting.
�
Press æ or ç to select the de-
sired tire pressure unit.Time / Date submenu
Access the
Time/Date
submenu via the
Settings
menu. Use the
Time/Date
sub-
menu to change the time and date display
settings. The following functions are avail-
able:
Function
Page
Synchronizing the time
144
Set time (hours)
144
Set time (minutes)
144
Set date (month)
145
Set date (day)
145
Set date (year)
145
iInformation on setting the time, refer to
separate COMAND instructions.
Page 144 of 442

144 Controls in detailControl systemSynchronizing the time
This function can only be seen on vehicles
with COMAND and navigation module*.�
Move the selection marker with
theæ orç button to the Time/Date
submenu.
�
Press buttonj ork repeatedly
until you see this message in the dis-
play:
Time sync. with head unit
.
The selection marker is on the current
setting.
�
Pressæ orç to select the de-
sired setting.Set time (hours)
This function can only be seen when syn-
chronization is switched off.
�
Move the selection marker with
theæ orç button to the Time/Date
submenu.
�
Press buttonj ork repeatedly
until you see this message in the dis-
play:
Clock, hours
.
The selection marker is on the hour set-
ting.
�
Pressæ orç to set the hour.
�
Confirm by pressing reset button.Set time (minutes)
This function can only be seen when syn-
chronization is switched off.
�
Move the selection marker with
theæ orç button to the Time/Date
submenu.
�
Press buttonj ork repeatedly
until you see this message in the dis-
play:
Clock, minutes
.
The selection marker is on the minute
setting.
�
Pressæ orç to set the minutes.
�
Confirm by pressing reset button.
Page 145 of 442
145 Controls in detail
Control system
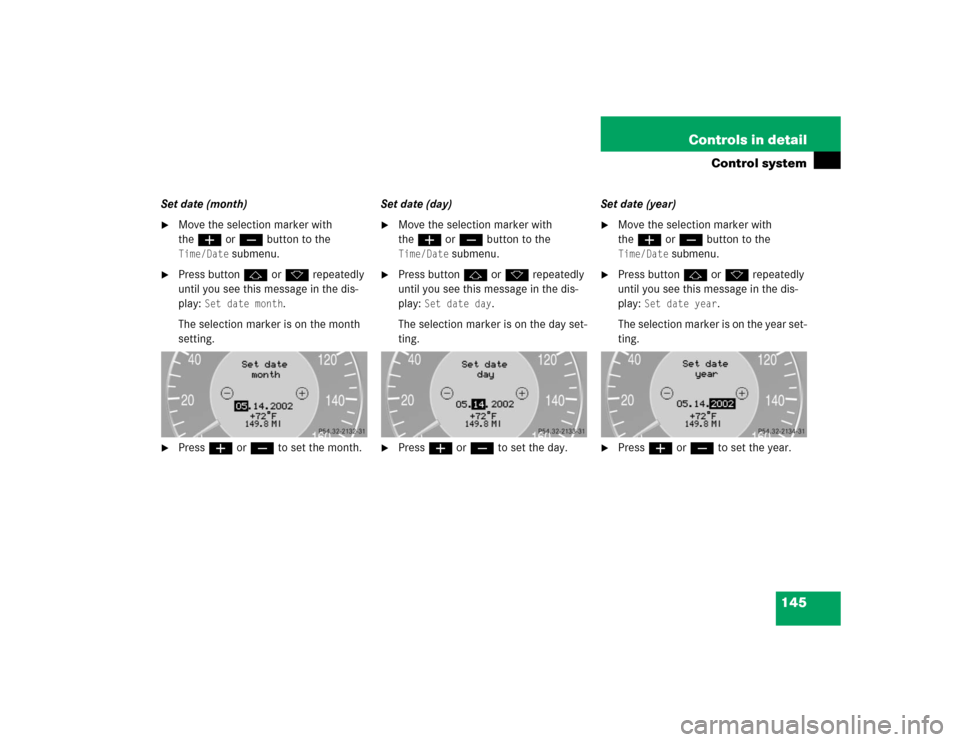
Set date (month)�
Move the selection marker with
theæ orç button to the Time/Date
submenu.
�
Press buttonj ork repeatedly
until you see this message in the dis-
play:
Set date month
.
The selection marker is on the month
setting.
�
Pressæ orç to set the month.Set date (day)
�
Move the selection marker with
theæ orç button to the Time/Date
submenu.
�
Press buttonj ork repeatedly
until you see this message in the dis-
play:
Set date day
.
The selection marker is on the day set-
ting.
�
Pressæ orç to set the day.Set date (year)
�
Move the selection marker with
theæ orç button to the Time/Date
submenu.
�
Press buttonj ork repeatedly
until you see this message in the dis-
play:
Set date year
.
The selection marker is on the year set-
ting.
�
Pressæ orç to set the year.
Page 146 of 442

146 Controls in detailControl systemLighting submenu
Access the
Lighting
submenu via the
Set-
tings
menu. Use the
Lighting
submenu
to change the lamp and lighting settings on
your vehicle. The following functions are
available:Setting daytime running lamp mode
(USA only)
�
Move the selection marker with
theæ orç button to the Lighting
submenu.
�
Press buttonj ork repeatedly
until you see this message in the dis-
play:
Lamp circuit headlamp
.
The selection marker is on the current
setting.
�
Pressæ orç to select
manual
or
daytime running lamp (
constant
)
mode. This function is not available in
countries where daytime running
lamps are mandatory.With daytime running lamp mode se-
lected and the exterior lamp switch at
position 0, the following lamps will
come on automatically when the en-
gine is turned on:
�
Parking lamps and low beam head-
lamps
�
License plate lamps (in low ambient
light conditions)
Function
Page
Set daytime running lamp mode
(USA only)
146
Set locator lighting
147
Ambient light level
147
Exterior lamps delayed shut-off
148
Interior lighting delayed shut-off
149
iIf you turn the exterior lamp switch to
another position, the corresponding
lamp(s) will switch on.
For safety reasons, resetting the Lighting
submenu to factory settings
(
�page 138) while driving will not re-
set the daytime running lamp mode.
In the display you will then see the mes-
sage:
Lighting
Page 149 of 442

149 Controls in detail
Control system
Interior lighting delayed shut-off
Use this function to set whether and for
how long you would like the interior light-
ing to remain lit during darkness after the
SmartKey is removed from the starter
switch.�
Move the selection marker with
theæ orç button to the
Light-
ing
submenu.
�
Press buttonj ork repeatedly
until you see this message in the dis-
play:
Interior lamp delayed
shut-off
.
The selection marker is on the current
setting.
�
Pressæ orç to select the de-
sired lamp-on time period. You can se-
lect:�
0 s
, the delayed shut-off feature is
deactivated.
�
5 s,
10 s
, 15 s
or
20 s
, the delayed
shut-off feature is activated.Vehicle submenu
Access the
Vehicle
submenu via the
Set-
tings
menu. Use the
Vehicle
submenu to
make general vehicle settings. The follow-
ing functions are available:
Setting automatic locking
Use this function to activate or deactivate
the automatic central locking. With the au-
tomatic central locking system activated,
the vehicle is centrally locked at vehicle
speeds of approximately 9 mph
(15 km / h).
Function
Page
Set automatic locking
149
Limiting opening height of trunk
lid*
150
Page 153 of 442

153 Controls in detail
Control system
Adjusting the dynamic seat
The function dynamic seat adjustment lets
you determine the way the seat adjusts
while driving.�
Move the selection marker with
theæ orç button to the Dynamic Seat
submenu.
�
Press buttonj ork repeatedly
until you see this message in the dis-
play:
Dyn. Multi-cont. Seat, driver
for the driver seat or Dyn. Multi-cont. Seat, fr. pass.
for the passenger seat.
The selection marker is on the current
setting.
�
Pressæ orç to switch function Level 1
or
Level 2
.
Trip computer menu
Use the trip computer menu to call up sta-
tistical data on your vehicle. The following
information is available:Fuel consumption statistics after start
�
Press buttonÿ orè repeatedly
until you see the first function of the
Trip computer menu.
�
Press buttonj ork repeatedly
until you see this message in the left
display:
After start
.
1Distance driven since start
2Time elapsed since start
3Average speed since start
4Average fuel consumption since start
Function
Page
Fuel consumption statistics after
start
153
Fuel consumption statistics
since last reset
154
Call up range (distance to empty)
154
Page 154 of 442

154 Controls in detailControl systemFuel consumption since last reset�
Press buttonÿ orè repeatedly
until you see the first function of the
Trip computer menu.
�
Press buttonj ork repeatedly
until you see this message in the dis-
play:
After reset
.
1Distance driven since last reset
2Time elapsed since last reset
3Average speed since last reset
4Average fuel consumption since last re-
setResetting fuel consumption statistics
�
Press buttonÿ orè repeatedly
until you see the first function of the
Trip computer menu.
�
Press buttonj ork repeatedly
until you see the reading that you want
to reset in the display.
�
Press and hold the reset button in the
instrument cluster (
�page 22) until
the value is reset to 0.Call up range (distance to empty)
�
Press buttonÿ orè repeatedly
until you see the first function of the
Trip computer menu.
�
Press buttonj ork repeatedly
until you see this message in the dis-
play:
Range:
In the display you will see the calculat-
ed range based on the current fuel tank
level.
iAll statistics stored since the last en-
gine start will be reset approximately
four hours after the SmartKey in the
starter switch is turned to position0 or
removed from the starter switch.
Resetting will not occur if you turn the
SmartKey back to position1 or2 with-
in this time period.