Page 82 of 442
 with the ESP
Models with all-wheel-drive only.
The 4MATIC improves vehicle’s ability to
use available trac")
82 Safety and SecurityDriving safety systemsFour wheel electronic traction system (4MATIC) with the ESP
Models with all-wheel-drive only.
The 4MATIC improves vehicle’s ability to
use available traction, e.g. during winter
operation in mountains under snowy
conditions, by applying power to all four
wheels.
Warning!
G
If you see the ESP warning lampv flash-
ing in the speedometer, proceed as follows:�
While driving off, apply as little throttle
as possible
�
While driving, ease up on the accelera-
tor
�
Adapt your speed and driving style to
the prevailing road conditions
Failure to observe these guidelines could
cause the vehicle to skid.
The ESP cannot prevent accidents resulting
from excessive speed.!Do not tow with one axle raised.
Otherwise the transfer case can be
damaged, which is not covered by the
Mercedes-Benz Limited Warranty.
!Performance testing must only be con-
ducted on a two-axle dynamometer.
Otherwise the transfer case can be
damaged, which is not covered by the
Mercedes-Benz Limited Warranty.!Because of the ESP’s automatic opera-
tion, the engine and ignition must be
shut off (SmartKey in starter switch
position0 or1 or KEYLESS-GO
start/stop button* in position0 or1)
when the parking brake is being tested
on a brake test dynamometer.
Active braking action through ESP may
otherwise seriously damage the front
or rear axle brake system.
Operational tests with the engine
running can only be conducted on a
two-axle dynamometer.
Page 100 of 442

100 Controls in detailLocking and unlocking�
Pull remote trunk lid switch1 until the
trunk begins to open.
The trunk lid opens automatically. The
indicator lamp in the switch comes on
and remains lit until the trunk is closed.The trunk can also be opened using the
SmartKey (
�page 90) or from its inside in
an emergency, see “Trunk lid emergency
release” (
�page 104).
Limiting opening height of trunk lid
The trunk lid opening height can be limited
when transporting goods on a roof rack
(e.g. presence of an MB sport luggage con-
tainer). When activated, the trunk lid opens
to approximately the height of the roof
edge.
You can activate the limiting opening
height of trunk lid using the control system
(
�page 150). Closing from the inside
�
Press the remote trunk lid switch
(�page 99) until the indicator lamp in
the switch goes out and the trunk lid is
closed.
To interrupt the closing procedure:
�
Release the remote trunk lid switch.
If the trunk lid comes into contact with an
object while closing (e.g. luggage that has
been piled too high), the closing procedure
is stopped and the trunk re-opens slightly.
!The trunk lid swings open upwards au-
tomatically. Always make sure there is
sufficient overhead clearance. To stop
the opening procedure, press or pull
the remote trunk lid switch.iIf the trunk lid does not open, it is still
locked separately (if applicable)
(�page 105).
If the vehicle was previously centrally
locked, the trunk lid will lock automati-
cally when closed (
�page 99). The
turn signals will flash three times to
confirm locking.
Warning!
G
Maintain sight of trunk area while operating
the door mounted switch. Monitor the clos-
ing procedure carefully to ensure that no
one is in danger of being injured.
To interrupt the closing procedure, release
the door mounted remote trunk lid switch.
Page 160 of 442
")
160 Controls in detailAutomatic transmissionGear ranges
With the gear selector lever in positionD,
you can limit the transmission’s gear range
by pressing the gear selector lever to the
left (D-), and reverse the gear range limit
by pressing the gear selector lever to the
right (D+).
The selected gear range appears in the
multifunction display. If you press on the
accelerator when the engine has reached
its rpm limit, the transmission will upshift
beyond any gear range limit selected.
Effect
ï
The transmission shifts through
sixth gear only (applies only to
vehicles with 7-speed automatic
transmission).
î
The transmission shifts through
fifth gear only (applies only to
vehicles with 7-speed automatic
transmission).
é
The transmission shifts through
fourth gear only.
è
The transmission shifts through
third gear only.
With this selection you can use
the braking effect of the engine.
Effect
ç
The transmission shifts through
second gear only.
Allows the use of engine’s
braking power when driving:�
on steep downgrades
�
in mountainous regions
�
under extreme operating
conditions
æ
The transmission operates in
first gear only.
For maximum use of engine’s
braking effect on very steep or
lengthy downgrades.
Page 171 of 442
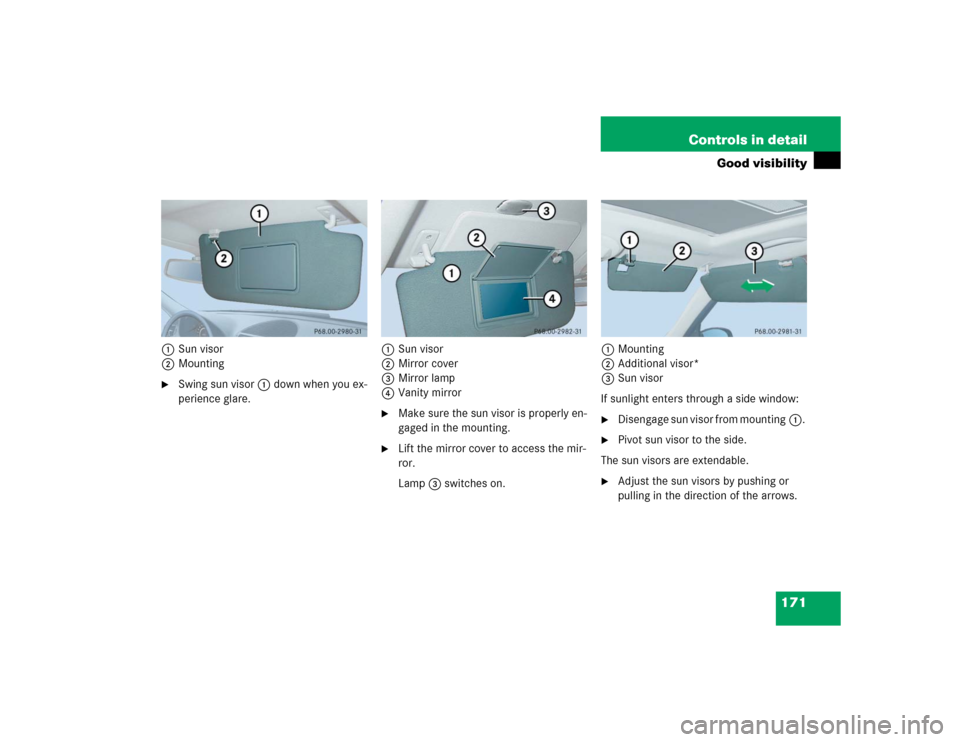
171 Controls in detail
Good visibility
1Sun visor
2Mounting�
Swing sun visor1 down when you ex-
perience glare. 1Sun visor
2Mirror cover
3Mirror lamp
4Vanity mirror
�
Make sure the sun visor is properly en-
gaged in the mounting.
�
Lift the mirror cover to access the mir-
ror.
Lamp3 switches on.1Mounting
2Additional visor*
3Sun visor
If sunlight enters through a side window:
�
Disengage sun visor from mounting1.
�
Pivot sun visor to the side.
The sun visors are extendable.
�
Adjust the sun visors by pushing or
pulling in the direction of the arrows.
Page 172 of 442

172 Controls in detailGood visibilityRear window sunshade*
The switch is located in the center console.�
Turn the SmartKey to starter switch po-
sition 1 or 2. Vehicles with KEY-
LESS-GO*: press the start / stop
button once or twice.
�
Press the switch briefly at 1 to raise
the sunshade.
�
Press the switch briefly at 1 to lower
the sunshade.
Always raise the sunshade fully for its sup-
port against the window frame.
Roller sunblind* in the rear doors�
Pull the roller sunblind out using the
hooks.
�
Attach the hooks at the top.
iIf sunlight enters through a side win-
dow, disengage sun visor from
mounting1 and pivot to the side.
Mirror lamp3 will switch off.
Warning!
G
When operating the rear window sunshade,
be sure that there is no danger of anyone be-
ing harmed by the raising or lowering proce-
dure.
The raising or lowering procedure can be im-
mediately halted by briefly pressing
switch1. To reverse direction of move-
ment, press switch1 again.
Warning!
G
When leaving the vehicle, always remove the
SmartKey from starter switch, and lock your
vehicle. Do not leave children unattended in
the vehicle, or with access to an unlocked
vehicle. Unsupervised use of vehicle equip-
ment can cause an accident and / or serious
personal injury.
Page 173 of 442

173 Controls in detail
Good visibility
Rear window defroster
The rear window defroster uses a large
amount of power. To keep the battery
drain to a minimum, switch off the defrost-
er as soon as the rear window is clear. The
defroster is automatically deactivated af-
ter approximately 6 to 17 minutes of oper-
ation depending on the outside
temperature.
Activating�
Press buttonFon the climate con-
trol panel (
�page 173) or the automat-
ic climate control panel (
�page 176).
The indicator lamp on the button
comes on.Deactivating
�
Press buttonF again.
The indicator lamp on the button goes
out.
!Always guide the sunblind by hand. Do
not let it snap back, as the retractor
could be damaged.
Warning!
G
Any accumulation of snow and ice should be
removed from the rear window before driv-
ing. Visibility could otherwise be impaired,
endangering you and others.!If the rear window defroster switches
off too soon and the indicator lamp
starts flashing, this means that too
many electrical consumers are operat-
ing simultaneously and there is insuffi-
cient voltage in the battery. The system
responds automatically by deactivating
the rear window defroster.
As soon as the battery has sufficient
voltage, the rear window defroster au-
tomatically turns itself back on.
Page 228 of 442

228 Controls in detailDriving systemsThe following vehicle level settings can be
selected when the vehicle is stationary and
the engine is running:
The button is located in the lower section
of the center console.
1Vehicle level control button
2Indicator lamp
�
Briefly press button1 to change from
“Normal” level to “Raised” level. When
vehicle is at “Raised” level, pressing
the switch will return the vehicle to
“Normal” level.
Vehicle level when
stationary
Use for
Ride height increase
over normal
Automatic lowering
Indicator lamp (
�page 228)
Normal
Normal operation
None
Max. approx. 0.6 in
(15 mm)
Lamp off
Raised
Driving with snow
chains or very rough
road surface conditions
Approximately 0.8 in
(20 mm)
Max. approx. 1.4 in
(35 mm)
Lamp on
iAt a speed of approximately above
75 mph (120 km / h) or if the speed
amounts to between 50 mph
(80 km / h) and 75 mph (120 km / h)
for approximately five minutes, the set-
ting “Raised” is canceled. The message Level selec. canceled
appears in the
multifunction display.
If you do not drive in this speed range,
the “Raised” level remains stored even
if the SmartKey is removed from the
starter switch.
Page 267 of 442

267 Operation
Driving instructions
�Driving instructions
Drive sensibly – save fuel
Fuel consumption, to a great extent, de-
pends on driving habits and operating con-
ditions.
To save fuel you should:�
Keep tires at the recommended infla-
tion pressures.
�
Remove unnecessary loads.
�
Remove roof rack when not in use.
�
Allow engine to warm up under low
load use.
�
Avoid frequent acceleration and decel-
eration.
�
Have all maintenance work performed
at the intervals specified in the Service
Booklet and as required by the FSS.
Contact your authorized
Mercedes-Benz Center.
Fuel consumption is also increased by driv-
ing in cold weather, in stop-and-go traffic,
on short trips and in hilly country.
Drinking and driving
Pedals
Warning!
G
Drinking and driving and / or taking drugs
and driving are very dangerous combina-
tions. Even a small amount of alcohol or
drugs can affect your reflexes, perceptions
and judgement.
The possibility of a serious or even fatal ac-
cident are greatly increased when you drink
or take drugs and drive.
Do not drink or take drugs and drive or allow
anyone to drive who has been drinking or
taking drugs.
Warning!
G
Keep driver’s foot area clear at all times. Ob-
jects stored in this area may impair pedal
movement.