Page 79 of 442

79 Safety and Security
Driving safety systems
Switching on the ESP�
Press ESP button1.
The ABS/ESP warning lamp v in
the instrument cluster goes out.
You are now again in normal driving
mode.
The SBC brake system
The SBC brake system combines a hydrau-
lic brake circuit with electronically con-
trolled brake servo assistance. You have
increased braking safety and improved
braking comfort.
Warning!
G
When the ABS/ESP warning lamp v is
illuminated continuously, the ESP is
switched off.
Adapt your speed and driving to the prevail-
ing road conditions and to the non-operating
status of the ESP.!Turn on the ESP immediately if the
aforementioned circumstances do not
apply anymore.
Warning!
G
Never ignore a brake malfunction indicated
in the speedometer display, for example by
the ; (USA only) or 3 (Canada only)
warning lamp. Refer to the “Practical hints”
section (
�page 312). Also read and ob-
serve the messages in the instrument clus-
ter display (�page 318).
Warning!
G
The SBC brake system requires electrical
power to operate.
A malfunction in the vehicle’s power supply
or electrical system may impair brake sys-
tem operation and switch it into its emer-
gency operation mode. In such a case, the
red brake warning lamp (
�page 312) and
warning messages in the instrument cluster
(
�page 318) come on while driving. To
brake, the driver must then apply signifi-
cantly greater brake pedal pressure and de-
press the pedal much further to obtain the
expected braking effect. If necessary, apply
full pressure to the brake pedal. Brakes may
only be applied to the front wheels. Stop-
ping distance is increased!
��
Page 88 of 442

88 Controls in detailLocking and unlocking
�In the “Controls in detail” section you will
find detailed information on how to oper-
ate the equipment installed on your vehi-
cle. If you are already familiar with the
basic functions of your vehicle, this section
will be of particular interest to you.
To quickly familiarize yourself with the ba-
sic functions of the vehicle, refer to the
“Getting started” section of this manual.
The corresponding page numbers are giv-
en at the beginning of each segment.
Locking and unlocking
SmartKey
Your vehicle comes supplied with two
SmartKeys, each with remote controls and
a removable mechanical key. The locking
tabs for the mechanical key portion of the
two SmartKeys are a different color to help
distinguish each key unit.
The SmartKey provides an extended oper-
ating range. To prevent theft, however, it is
advisable to only unlock the vehicle when
you are in close proximity to it.
The SmartKey centrally locks and unlocks�
the doors
�
the trunk
�
the fuel filler flap
SmartKey 1‹ Lock button
2Š Unlock button for the trunk lid
3Mechanical key locking tab
4ΠUnlock button
5Battery check lamp
6Â Panic button (
�page 73)
Page 91 of 442

91 Controls in detail
Locking and unlocking
Checking the batteries�
Press button‹ orŒ.
Battery check lamp5 comes on brief-
ly to indicate that the SmartKey batter-
ies are in order.Loss of SmartKey or mechanical key
If you lose a SmartKey or mechanical key,
you should do the following:
�
Have the SmartKey deactivated by an
authorized Mercedes-Benz Center.
�
Report the loss of the SmartKey or the
mechanical key immediately to your
car insurance company.
�
If necessary, have the mechanical lock
replaced.
Your authorized Mercedes-Benz Center
will be glad to supply you with a replace-
ment.
SmartKey with KEYLESS-GO*
Specially equipped vehicles come with two
SmartKeys with KEYLESS-GO, each with
remote controls and a removable mechan-
ical key. The locking tabs for the mechani-
cal key portion of the two SmartKeys are a
different color to help distinguish each
SmartKey unit.
The KEYLESS-GO function is integrated
into the SmartKey. On these vehicles, the
validity of the SmartKey with KEYLESS-GO
is checked every time you grasp a door
handle.
If the SmartKey with KEYLESS-GO is valid,
your vehicle unlocks�
the doors
�
the trunk lid
�
the fuel filler flap
!If battery check lamp5 does not
come on briefly during check, then the
SmartKey batteries are discharged.
Replace the batteries (
�page 355).
You can obtain the required batteries
at any authorized Mercedes-Benz
Center.
iIf the batteries are checked within sig-
nal range of the vehicle, pressing the
button‹ orŒ will lock or unlock
the vehicle accordingly.
Page 159 of 442

159 Controls in detail
Automatic transmission
One-touch gearshifting
Even with an automatic transmission you
can change the gears manually when the
gear selector lever is in positionD.
Downshifting�
Briefly press the gear selector lever to
the left in theD-direction.
The transmission will shift from the current
gear to the next lower gear. This action
simultaneously limits the gear range of the
transmission (
�page 160).Upshifting
�
Briefly press the gear selector lever to
the right in theD+direction.
The transmission will shift from the current
gear to the next higher gear as permitted
by the shift program. This action simul-
taneously extends the gear range of the
transmission.Canceling gear range limit
�
Press and hold the gear selector lever
in theD+direction until
D reappears in
the multifunction display.
The transmission will shift from the current
gear range directly to gear rangeD.
Shifting into optimal gear range
�
Press and hold the gear selector lever
in theD-direction.
The transmission will automatically select
the gear range suited for optimal
acceleration and deceleration. This will
involve shifting down one or more gears.
Warning!
G
On slippery road surfaces, never downshift
in order to obtain braking action. This could
result in drive wheel slip and reduced
vehicle control. Your vehicle’s ABS will not
prevent this type of loss of control.
iTo avoid overrevving the engine when
the gear selector lever is moved to
theD-direction, the transmission will
not shift to a lower gear if the engine’s
max. speed would be exceeded.
Page 163 of 442

163 Controls in detail
Automatic transmission
The steering wheel gearshift buttons are
located to the left and right of the steering
wheel.
1Left button: downshift
2Right button: upshiftDownshifting
�
Press button1 on the left side of the
steering wheel.
The gear range is limited when you are not
driving in the manual program mode
(
�page 160).
When driving in the manual program mode
(�page 165), the transmission will shift
from the current gear to the next lower
gear (
�page 166).Upshifting
�
Press button2 on the right side of the
steering wheel.
The gear range is extended when you are
not driving in the manual program mode
(
�page 160).
When driving in the manual program mode
(�page 165), the transmission will shift
from the current gear to the next higher
gear (
�page 166).
Warning!
G
On slippery road surfaces, never downshift
in order to obtain braking action. This could
result in drive wheel slip and reduced
vehicle control. Your vehicle’s ABS will not
prevent this type of loss of control.iYou cannot shift with the steering
wheel gearshift buttons when the gear
selector lever is in positionP,N orR.
iYou cannot shift with the steering
wheel gearshift buttons when the gear
selector lever is in positionP,N orR.
Page 166 of 442
.
or
�
Press button1 on the left side of the
steering wheel")
166 Controls in detailAutomatic transmissionDownshifting�
Briefly press the gear selector lever to
the left in theD-direction
(�page 159).
or
�
Press button1 on the left side of the
steering wheel (
�page 162).
The transmission shifts to the next
lower gear.Upshifting
�
Briefly press the gear selector lever to
the right in theD+direction
(�page 159).
or
�
Press button2 on the right side of the
steering wheel (
�page 162).
The transmission shifts to the next
higher gear.Kickdown
The kickdown can also be used for
maximum acceleration when driving in the
manual program mode.
�
Press the accelerator past the point of
resistance.
The transmission shifts to a lower gear.
�
Shift up once the desired speed has
been reached.
Warning!
G
On slippery road surfaces, never downshift
in order to obtain braking action. This could
result in drive wheel slip and reduced
vehicle control. Your vehicle’s ABS will not
prevent this type of loss of control.
iWhen driving at full throttle, the trans-
mission shifts to the next higher gear
when maximum engine speed has been
reached.
When you brake or stop, the transmis-
sion shifts down to a gear from which
you can easily accelerate or take off.
Page 211 of 442

211 Controls in detail
Driving systems
�Driving systems
The following driving systems are ex-
plained on the following pages:�
Cruise control and Distronic*, with
which the vehicle can maintain a preset
speed
�
Airmatic* adjusts the vehicle suspen-
sion characteristics automatically and
controls the vehicle level
�
Parktronic system*, which assists the
driver during parking maneuvers
The BAS, ABS, ESP and SBC are described
in the “Safety and Security” section
(
�page 74).
Cruise control
The cruise control automatically maintains
the speed you set for your vehicle.
Use of cruise control is recommended for
driving at a constant speed for extended
periods of time. You can set any speed
over 20 mph (30 km / h).
The cruise control function is operated by
means of the cruise control lever.
The cruise control lever is the uppermost
lever found on the left-hand side of the
steering column (
�page 20).
Warning!
G
Cruise control is a convenience system de-
signed to assist the driver during vehicle op-
eration. The driver is and must always
remain responsible for the vehicle speed
and for safe brake operation.
Only use cruise control if the road, traffic
and weather conditions make it advisable to
travel at a steady speed.�
The use of cruise control can be danger-
ous on winding roads or in heavy traffic
because conditions do not allow safe
driving at a steady speed.
�
The use of cruise control can be danger-
ous on slippery roads. Rapid changes in
tire traction can result in wheel spin and
loss of control.
�
Deactivate cruise control when driving
in fog.
The “Resume” function should only be oper-
ated if the driver is fully aware of the previ-
ously set speed and wishes to resume this
particular preset speed.
Page 235 of 442
235 Controls in detail
Loading
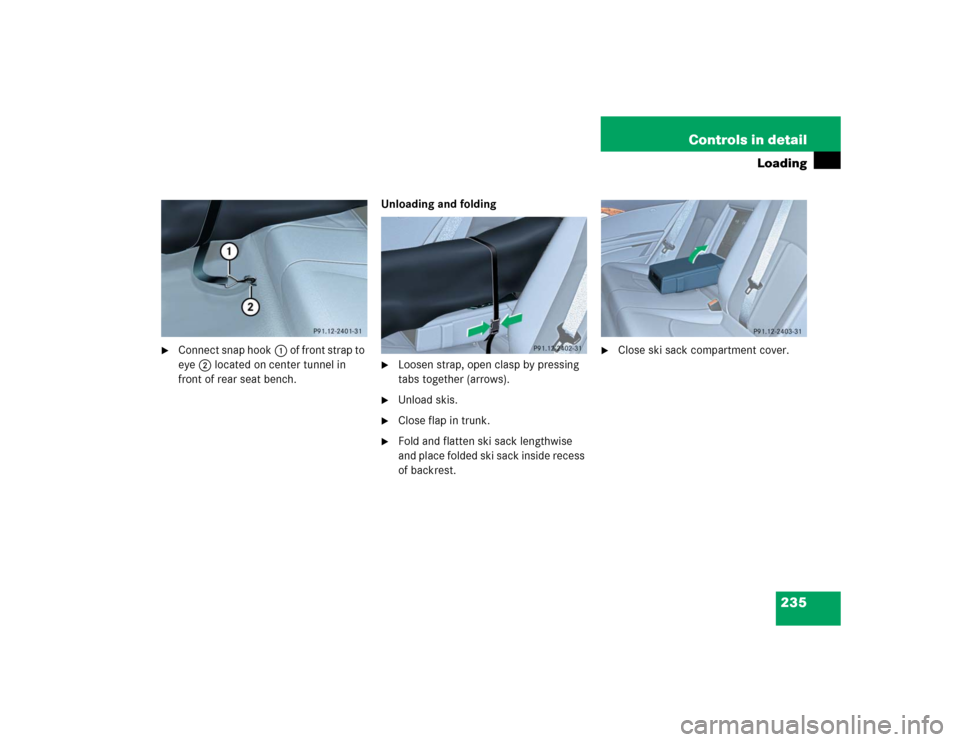
�
Connect snap hook1 of front strap to
eye2 located on center tunnel in
front of rear seat bench.Unloading and folding
�
Loosen strap, open clasp by pressing
tabs together (arrows).
�
Unload skis.
�
Close flap in trunk.
�
Fold and flatten ski sack lengthwise
and place folded ski sack inside recess
of backrest.
�
Close ski sack compartment cover.