Page 21 of 442
21 At a glance
Cockpit
Item
Page
1
Parking brake pedal
45, 51
2
Hood lock release
281
3
Steering wheel adjustment
stalk
37
Heated steering wheel*
248
4
Parking brake release
45
5
Combination switch�
Turn signals
47
�
Windshield wipers
48
�
High beam
47
6
Door control panel
28
7
Exterior lamp switch
119
Item
Page
8
Headlamp washer button*
170
9
Cruise control lever�
Cruise control
218
�
Distronic*
214
a
Instrument cluster
22,
126
b
Multifunction steering
wheel
24,
130
c
Horn
d
Lever for voice control sys-
tem*, see separate
operating instructions
Item
Page
e
Starter switch
31
f
Front Parktronic* warning
indicator
229
g
Overhead control panel
27
h
Mobile phone/Glasses box
242
j
Glove box lid release, glove
box lock
242
k
Glove box
242
l
Center console
25
Page 280 of 442
280 OperationAt the gas station
Engine oil level
More information on engine oil
(�page 282).
See also “Opening hood” (
�page 281).
Vehicle lighting
Check function and cleanliness. For more
information on replacing light bulbs, see
the “Practical hints” section (�page 359).
See also the section on the exterior lamp
switch (
�page 119).Tire inflation pressure
More information on tire inflation pressure
(
�page 290).
!If you find that the brake fluid in the
brake fluid reservoir has fallen to the
minimum mark or below, have the
brake system checked for brake pad
thickness and leaks immediately.
Notify an authorized Mercedes-Benz
Center immediately. Do not add brake
fluid as this will not solve the problem.
For more information, see “Practical
hints” (
�page 312).
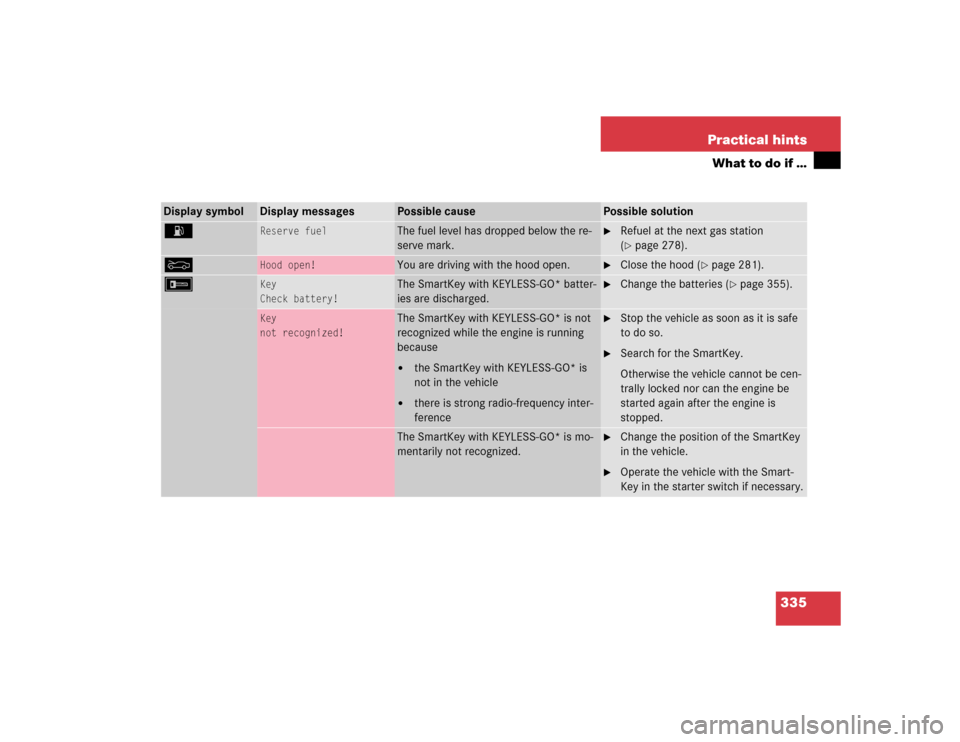
Page 335 of 442

335 Practical hints
What to do if …
Display symbol
Display messages
Possible cause
Possible solution
A
Reserve fuel
The fuel level has dropped below the re-
serve mark.
�
Refuel at the next gas station
(�page 278).
Y
Hood open!
You are driving with the hood open.
�
Close the hood (
�page 281).
F
Key
Check battery!
The SmartKey with KEYLESS-GO* batter-
ies are discharged.
�
Change the batteries (
�page 355).
Key
not recognized!
The SmartKey with KEYLESS-GO* is not
recognized while the engine is running
because�
the SmartKey with KEYLESS-GO* is
not in the vehicle
�
there is strong radio-frequency inter-
ference
�
Stop the vehicle as soon as it is safe
to do so.
�
Search for the SmartKey.
Otherwise the vehicle cannot be cen-
trally locked nor can the engine be
started again after the engine is
stopped.
The SmartKey with KEYLESS-GO* is mo-
mentarily not recognized.
�
Change the position of the SmartKey
in the vehicle.
�
Operate the vehicle with the Smart-
Key in the starter switch if necessary.
Page 361 of 442
361 Practical hints
Replacing bulbs
Replacing bulbs for front lamps
1Bulb socket for turn signal lamp
2High beam halogen bulb
3Bulb socket for parking and standing
lamp
4Cover for Bi-Xenon* (low beam and
high beam) or halogen (low beam)
headlampBi-Xenon* headlamps Low beam halogen bulb
�
Switch off the lights.
�
Open the hood (
�page 281).
�
Turn the locking mechanism counter-
clockwise and remove headlamp
cover4.
�
Pull electrical connector off.
�
Release the retaining springs and take
out the bulb.
�
Insert the new bulb in the socket so
that the base is in the recess on the
lower left.
�
Attach the retaining springs.
�
Insert connector into the bulb.
�
Align headlamp cover and click into
place.
Warning!
G
Do not remove the cover4 for the Bi-Xe-
non headlamp. Because of high voltage in
Xenon lamps, it is dangerous to replace the
bulb or repair the lamp and its components.
We recommend that you have such work
done by a qualified technician.
Page 362 of 442

362 Practical hintsReplacing bulbsHigh beam halogen bulb �
Switch off the lights.
�
Open the hood (
�page 281).
�
Press the clamp and remove headlamp
cover.
�
Pull electrical connector off.
�
Turn the locking mechanism counter-
clockwise and take out the high beam
bulb2.
�
Insert the new bulb in the socket so
that the base is in the recess on the
lower left.
�
Attach the retaining springs.
�
Insert connector into the bulb.
�
Align headlamp cover and click into
place.Front turn signal lamp bulb
�
Switch off the lights.
�
Open the hood (
�page 281).
�
Twist bulb socket 1 counterclockwise
and pull out.
�
Push bulb into socket, turn counter-
clockwise and remove.
�
Insert new bulb in socket, push in and
twist clockwise.
�
Reinsert bulb socket in lamp and twist
clockwise.Parking and standing lamp bulb
�
Switch off the lights.
�
Open the hood (
�page 281).
�
Press the clamp and remove headlamp
cover.
�
Pull out the bulb socket3 with the
bulb.
�
Pull the bulb out of the bulb socket.
�
Insert a new bulb in the socket.
�
Reinstall the bulb socket.
�
Align headlamp cover and click into
place.