Page 294 of 442
294 OperationTires and wheels
For information on wheel change, see the
“Practical hints” section (
�page 350) and
(
�page 366).
!If your ve hic le i s eq uip pe d with a ti re i n-
flation pressure monitor*, there are
electronic components built into the
wheel.
Do not use mounting tools in the area
of the valve as they could damage the
electronic components.
To prevent damage or incorrect instal-
lation, have the tires changed at an au-
thorized Mercedes-Benz Center.
Warning!
G
Have the tightening torque checked after
changing a wheel. Wheels could become
loose if not tightened with a torque of
96 lb-ft (130 Nm).
Use only genuine Mercedes-Benz wheel
bolts specified for your vehicle's rims.
Page 340 of 442
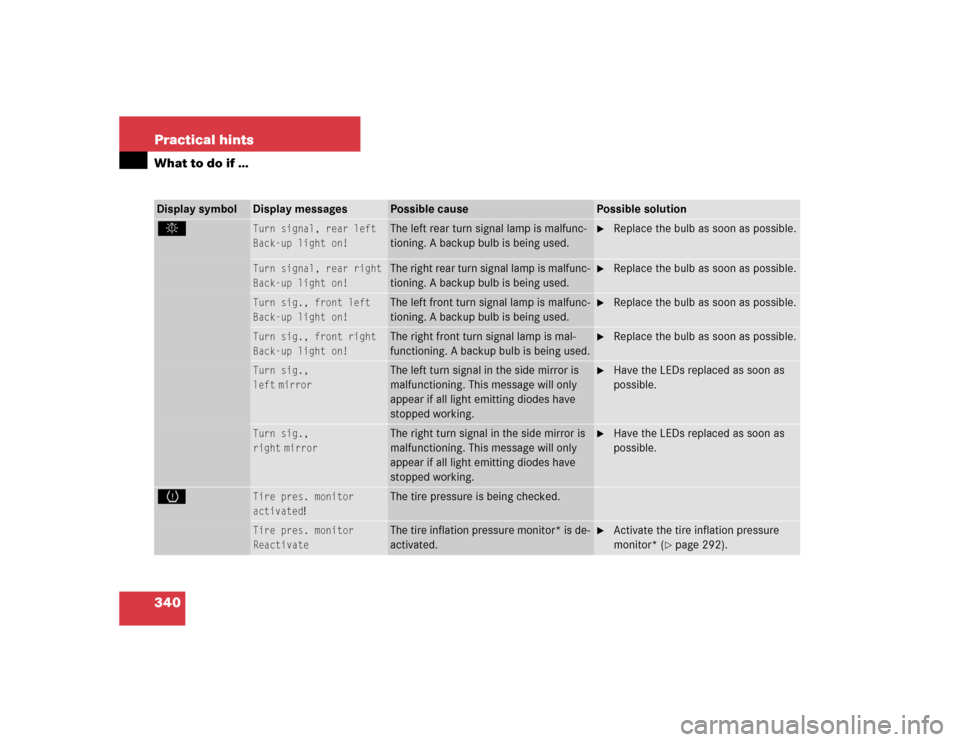
340 Practical hintsWhat to do if …Display symbol
Display messages
Possible cause
Possible solution
.
Turn signal, rear left
Back-up light on!
The left rear turn signal lamp is malfunc-
tioning. A backup bulb is being used.
�
Replace the bulb as soon as possible.
Turn signal, rear right
Back-up light on!
The right rear turn signal lamp is malfunc-
tioning. A backup bulb is being used.
�
Replace the bulb as soon as possible.
Turn sig., front left
Back-up light on!
The left front turn signal lamp is malfunc-
tioning. A backup bulb is being used.
�
Replace the bulb as soon as possible.
Turn sig., front right
Back-up light on!
The right front turn signal lamp is mal-
functioning. A backup bulb is being used.
�
Replace the bulb as soon as possible.
Turn sig.,
left
mirror
The left turn signal in the side mirror is
malfunctioning. This message will only
appear if all light emitting diodes have
stopped working.
�
Have the LEDs replaced as soon as
possible.
Turn sig.,
right
mirror
The right turn signal in the side mirror is
malfunctioning. This message will only
appear if all light emitting diodes have
stopped working.
�
Have the LEDs replaced as soon as
possible.
H
Tire pres. monitor
activated
!
The tire pressure is being checked.
Tire pres. monitor
Reactivate
The tire inflation pressure monitor* is de-
activated.
�
Activate the tire inflation pressure
monitor* (
�page 292).
Page 341 of 442
341 Practical hints
What to do if …
Display symbol
Display messages
Possible cause
Possible solution
H
Tire pres. monitor
not activated!
The tire inflation pressure monitor* is un-
able to monitor the tire pressure due to�
the presence of several wheel sensors
in the vehicle.
�
excessive wheel sensor tempera-
tures.
�
a nearby radio interference source.
�
unrecognized wheel sensors mount-
ed.
�
Check the tire pressure at the next
service station.
Tire pres. monitor
Pres. display after
driving a few mins. Re-
activate using R button
The tire pressure is being checked.
Warning!
G
Do not drive with a flat tire. A flat tire affects
the ability to steer or brake the vehicle.
You may lose control of the vehicle. Contin-
ued driving with a flat tire will cause exces-
sive heat build-up and possibly a fire.
Page 342 of 442
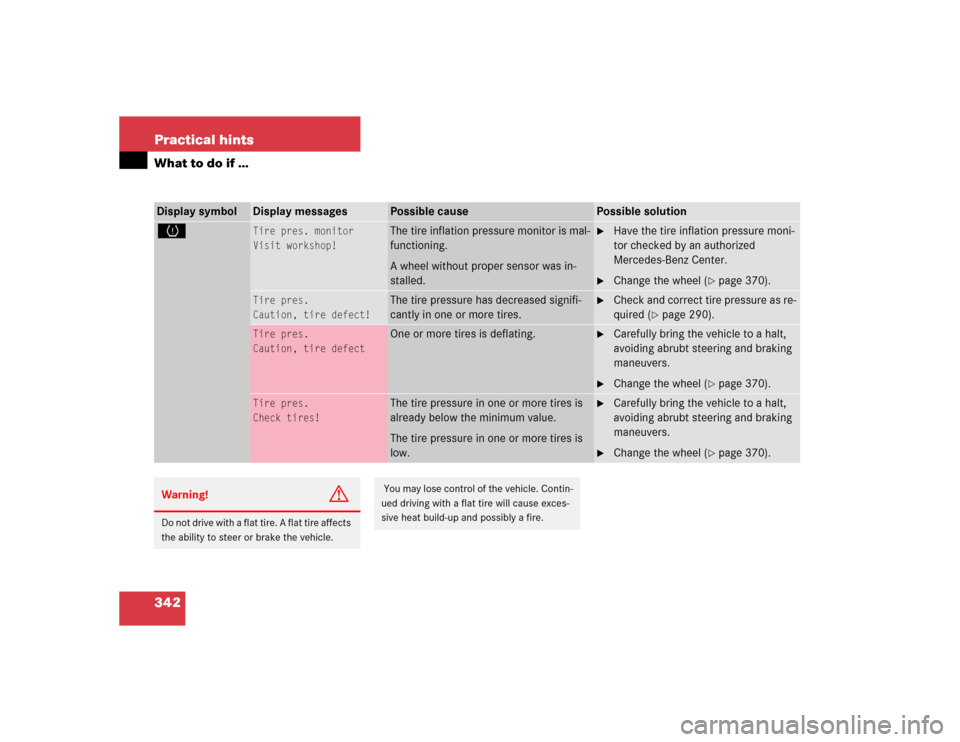
342 Practical hintsWhat to do if …Display symbol
Display messages
Possible cause
Possible solution
H
Tire pres. monitor
Visit workshop!
The tire inflation pressure monitor is mal-
functioning.
A wheel without proper sensor was in-
stalled.
�
Have the tire inflation pressure moni-
tor checked by an authorized
Mercedes-Benz Center.
�
Change the wheel (
�page 370).
Tire pres.
Caution, tire defect!
The tire pressure has decreased signifi-
cantly in one or more tires.
�
Check and correct tire pressure as re-
quired (
�page 290).
Tire pres.
Caution, tire defect
One or more tires is deflating.
�
Carefully bring the vehicle to a halt,
avoiding abrubt steering and braking
maneuvers.
�
Change the wheel (
�page 370).
Tire pres.
Check tires!
The tire pressure in one or more tires is
already below the minimum value.
The tire pressure in one or more tires is
low.
�
Carefully bring the vehicle to a halt,
avoiding abrubt steering and braking
maneuvers.
�
Change the wheel (
�page 370).
Warning!
G
Do not drive with a flat tire. A flat tire affects
the ability to steer or brake the vehicle.
You may lose control of the vehicle. Contin-
ued driving with a flat tire will cause exces-
sive heat build-up and possibly a fire.
Page 343 of 442
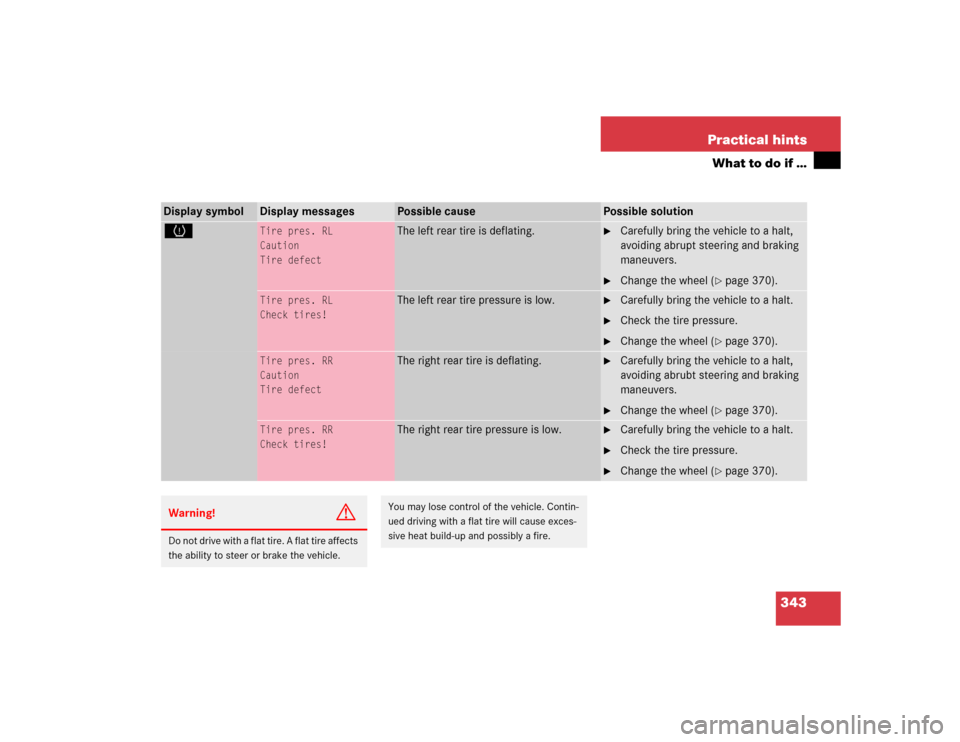
343 Practical hints
What to do if …
Display symbol
Display messages
Possible cause
Possible solution
H
Tire pres. RL
Caution
Tire defect
The left rear tire is deflating.
�
Carefully bring the vehicle to a halt,
avoiding abrupt steering and braking
maneuvers.
�
Change the wheel (
�page 370).
Tire pres. RL
Check tires!
The left rear tire pressure is low.
�
Carefully bring the vehicle to a halt.
�
Check the tire pressure.
�
Change the wheel (
�page 370).
Tire pres. RR
Caution
Tire defect
The right rear tire is deflating.
�
Carefully bring the vehicle to a halt,
avoiding abrubt steering and braking
maneuvers.
�
Change the wheel (
�page 370).
Tire pres. RR
Check tires!
The right rear tire pressure is low.
�
Carefully bring the vehicle to a halt.
�
Check the tire pressure.
�
Change the wheel (
�page 370).
Warning!
G
Do not drive with a flat tire. A flat tire affects
the ability to steer or brake the vehicle.
You may lose control of the vehicle. Contin-
ued driving with a flat tire will cause exces-
sive heat build-up and possibly a fire.
Page 344 of 442
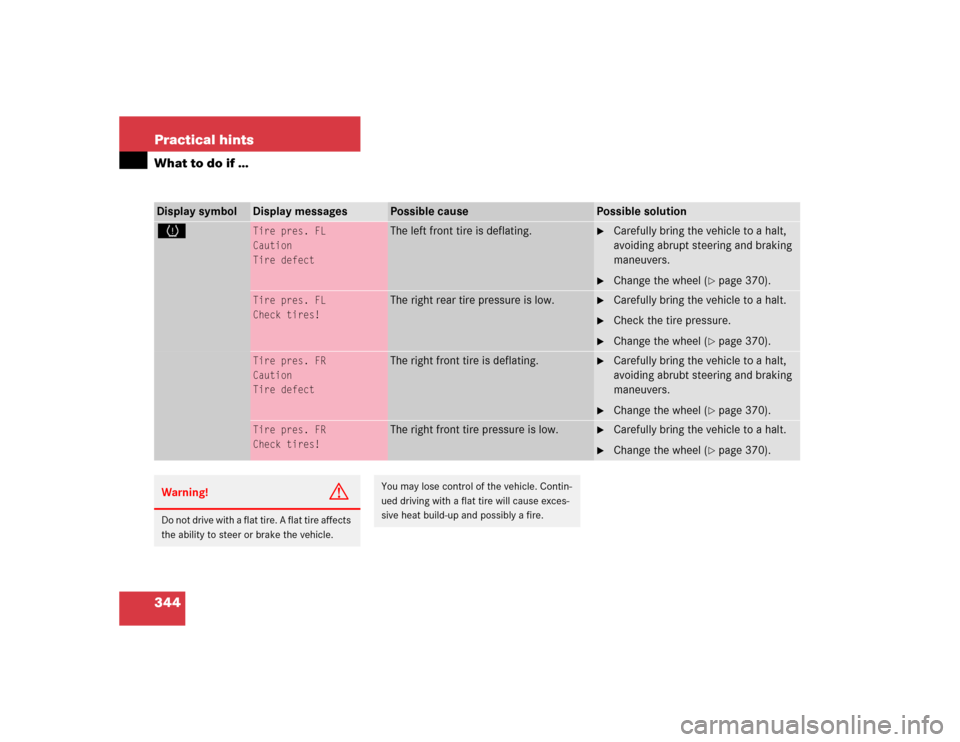
344 Practical hintsWhat to do if …Display symbol
Display messages
Possible cause
Possible solution
H
Tire pres. FL
Caution
Tire defect
The left front tire is deflating.
�
Carefully bring the vehicle to a halt,
avoiding abrupt steering and braking
maneuvers.
�
Change the wheel (
�page 370).
Tire pres. FL
Check tires!
The right rear tire pressure is low.
�
Carefully bring the vehicle to a halt.
�
Check the tire pressure.
�
Change the wheel (
�page 370).
Tire pres. FR
Caution
Tire defect
The right front tire is deflating.
�
Carefully bring the vehicle to a halt,
avoiding abrubt steering and braking
maneuvers.
�
Change the wheel (
�page 370).
Tire pres. FR
Check tires!
The right front tire pressure is low.
�
Carefully bring the vehicle to a halt.
�
Change the wheel (
�page 370).
Warning!
G
Do not drive with a flat tire. A flat tire affects
the ability to steer or brake the vehicle.
You may lose control of the vehicle. Contin-
ued driving with a flat tire will cause exces-
sive heat build-up and possibly a fire.
Page 367 of 442
367 Practical hints
Flat tire
�
Take the TIREFIT kit out of the trunk
(�page 350).
�
Foreign objects (e.g. screws or nails)
should not be removed from the tire.
�
Attach the sticker where it will be easily
seen by the driver on the instrument
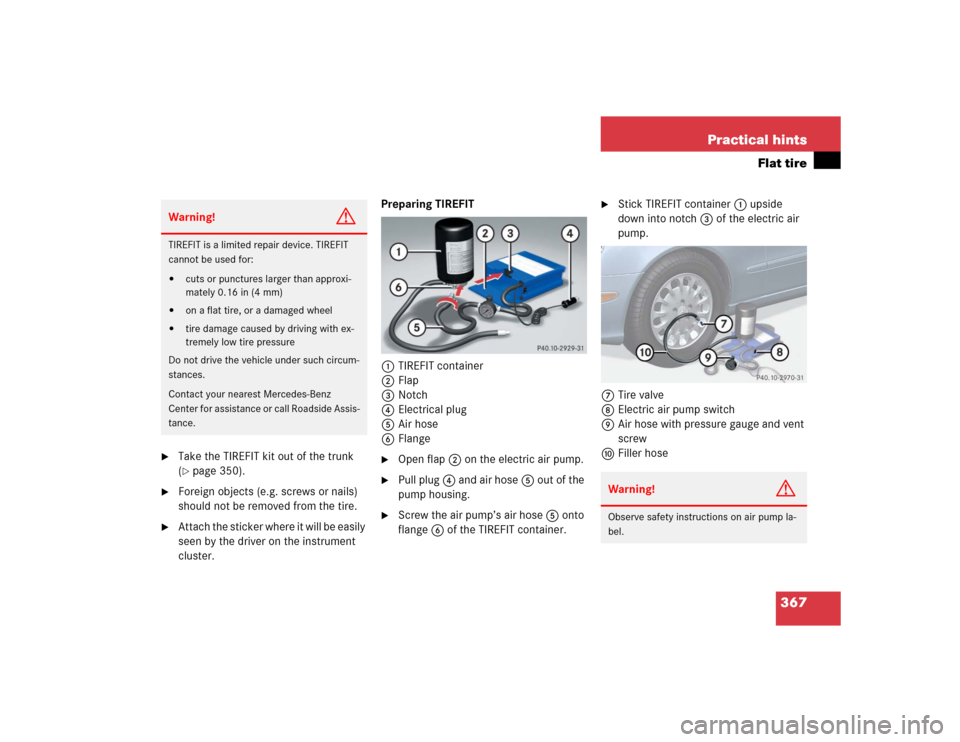
cluster.Preparing TIREFIT
1TIREFIT container
2Flap
3Notch
4Electrical plug
5Air hose
6Flange
�
Open flap2 on the electric air pump.
�
Pull plug4 and air hose5 out of the
pump housing.
�
Screw the air pump’s air hose5 onto
flange6 of the TIREFIT container.
�
Stick TIREFIT container1 upside
down into notch3 of the electric air
pump.
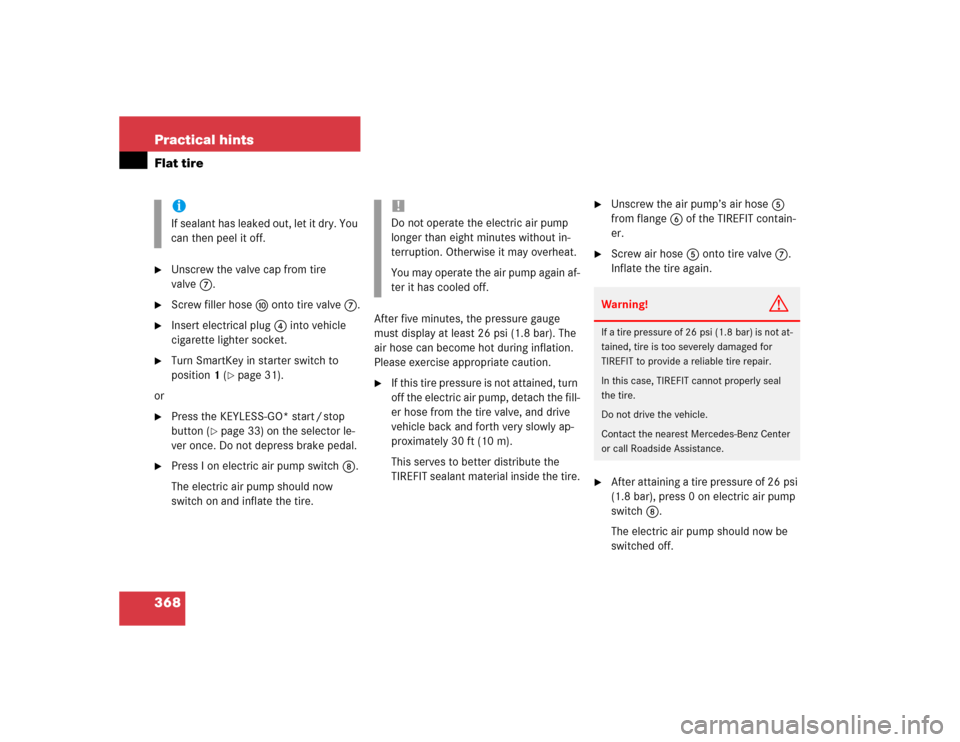
7Tire valve
8Electric air pump switch
9Air hose with pressure gauge and vent
screw
aFiller hose
Warning!
G
TIREFIT is a limited repair device. TIREFIT
cannot be used for:�
cuts or punctures larger than approxi-
mately 0.16 in (4 mm)
�
on a flat tire, or a damaged wheel
�
tire damage caused by driving with ex-
tremely low tire pressure
Do not drive the vehicle under such circum-
stances.
Contact your nearest Mercedes-Benz
Center for assistance or call Roadside Assis-
tance.
Warning!
G
Observe safety instructions on air pump la-
bel.
Page 368 of 442
368 Practical hintsFlat tire�
Unscrew the valve cap from tire
valve7.
�
Screw filler hosea onto tire valve7.
�
Insert electrical plug4 into vehicle
cigarette lighter socket.
�
Turn SmartKey in starter switch to
position1 (
�page 31).
or
�
Press the KEYLESS-GO* start / stop
button (
�page 33) on the selector le-
ver once. Do not depress brake pedal.
�
Press I on electric air pump switch8.
The electric air pump should now
switch on and inflate the tire.After five minutes, the pressure gauge
must display at least 26 psi (1.8 bar). The
air hose can become hot during inflation.
Please exercise appropriate caution.
�
If this tire pressure is not attained, turn
off the electric air pump, detach the fill-
er hose from the tire valve, and drive
vehicle back and forth very slowly ap-
proximately 30 ft (10 m).
This serves to better distribute the
TIREFIT sealant material inside the tire.
�
Unscrew the air pump’s air hose5
from flange6 of the TIREFIT contain-
er.
�
Screw air hose5 onto tire valve7.
Inflate the tire again.
�
After attaining a tire pressure of 26 psi
(1.8 bar), press 0 on electric air pump
switch8.
The electric air pump should now be
switched off.
iIf sealant has leaked out, let it dry. You
can then peel it off.
!Do not operate the electric air pump
longer than eight minutes without in-
terruption. Otherwise it may overheat.
You may operate the air pump again af-
ter it has cooled off.
Warning!
G
If a tire pressure of 26 psi (1.8 bar) is not at-
tained, tire is too severely damaged for
TIREFIT to provide a reliable tire repair.
In this case, TIREFIT cannot properly seal
the tire.
Do not drive the vehicle.
Contact the nearest Mercedes-Benz Center
or call Roadside Assistance.