Page 70 of 442
70 Safety and SecurityOccupant safety2Hook
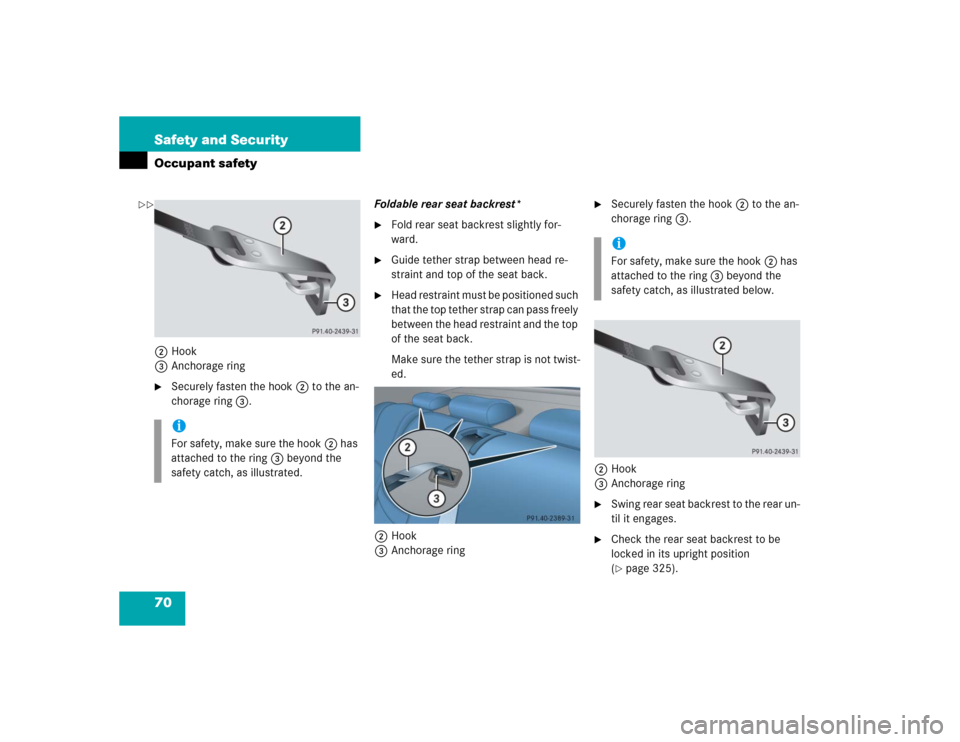
3Anchorage ring�
Securely fasten the hook2 to the an-
chorage ring3.Foldable rear seat backrest*
�
Fold rear seat backrest slightly for-
ward.
�
Guide tether strap between head re-
straint and top of the seat back.
�
Head restraint must be positioned such
that the top tether strap can pass freely
between the head restraint and the top
of the seat back.
Make sure the tether strap is not twist-
ed.
2Hook
3Anchorage ring
�
Securely fasten the hook2 to the an-
chorage ring3.
2Hook
3Anchorage ring
�
S w i n g r e a r s e a t b a c k r e s t t o t h e r e a r u n -
til it engages.
�
Check the rear seat backrest to be
locked in its upright position
(�page 325).
iFor safety, make sure the hook2 has
attached to the ring3 beyond the
safety catch, as illustrated.
iFor safety, make sure the hook2 has
attached to the ring3 beyond the
safety catch, as illustrated below.
��
Page 71 of 442
71 Safety and Security
Occupant safety
Child seat anchors - LATCH type
This vehicle is equipped with two LATCH
(Lower A
nchors and T
ethers for CH
ildren)
type anchors (at each of the outer rear
seats) for the installation of a “LATCH”
child seat with the matching anchor fit-
tings. The anchors are located behind an uphol-
stery blend.
1Indicates the position of the anchors
2Anchors
�
Install child seat according to the
manufacturer’s instructions.!Make sure the seat belt for the center
seat can operate freely with a child
seat installed.iNon-LATCH type child seats may also
be used and can be installed using the
vehicle’s seat belt system. Install child
seat according to the manufacturer’s
instructions.
Page 72 of 442

72 Safety and SecurityOccupant safety
Blocking of rear door window operation
1Override switch
2Indicator lamp�
Press override switch1.
Indicator lamp2 comes on. The rear
door windows can no longer be operat-
ed using the switches located in the
rear doors.For more information on power windows,
see the “Controls in detail” section
(
�page 197).
Warning!
G
Children too big for child restraint systems
must ride in back seats using regular seat
belts. Position shoulder belt across chest
and shoulder, not face or neck. A booster
seat may be necessary to achieve proper
belt positioning for children from 41 lbs until
they reach a height where a lap/shoulder
belt fits properly without a booster.
Install child seat according to manufactur-
er’s instructions.
T h e c h i l d s e a t m u s t b e f i r m l y a t t a c h e d i n t h e
right and left side anchors2.
An incorrectly mounted child seat may come
loose during an accident which could result
in serious injury or death to your child.
Damaged or impact damaged child seats or
child seat mounting fittings must be re-
placed.
Do not leave children unattended in the ve-
hicle, even if the children are secured in a
child restraint system.
!Operation of the rear door windows
with the switches located on the door
control panel of the driver’s door is still
possible.
Warning!
G
Activate the override switch when children
are riding in the back seats of the vehicle.
The children may otherwise injure them-
selves, e.g. by becoming trapped in the win-
dow opening.
When leaving the vehicle, always remove the
SmartKey from the starter switch, and lock
the vehicle. Do not leave children unattend-
ed in the vehicle, or with access to an un-
locked vehicle. Unsupervised use of vehicle
equipment can cause an accident and/or
serious personal injury.
Page 108 of 442
.
Easy-entry / exit feature*
With the easy-entry / exit feature activat-")
108 Controls in detailSeats
�SeatsInformation on seat adjustment can be
found in the “Getting started” section
(�page 35).
Easy-entry / exit feature*
With the easy-entry / exit feature activat-
ed, the steering wheel tilts upwards and
the driver’s seat moves to the rear.
This allows easier entry into and exit from
the vehicle when the driver’s door is
opened. However, the engine must be
turned off.
When the SmartKey is inserted in the start-
er switch or you have pressed the Key-
less-Go* start/stop button and the
driver’s door is closed, the steering wheel
and the driver’s seat return to their last set
positions.You can activate the following functions:
�
Steering column:
Only the steering column is adjusted.
�
Steering column and seat:
The steering column and the seat are
adjusted.
The easy-entry / exit feature can be
switched on or off in the convenience sub-
menu of the control system (
�page 150).
Warning!
G
You must ensure that no one can become
trapped or injured by the moving steering
wheel and driver’s seat when the
easy-entry / exit feature is activated, the
driver’s door is being opened and the engine
is turned off or the SmartKey removed from
the starter switch.
Do not leave children unattended in the ve-
hicle, or with access to an unlocked vehicle.
Children could open the driver’s door and
unintentionally activate the easy-entry / exit
feature*, which could result in an accident
and / or serious personal injury.
iTo cancel seat / steering wheel move-
ment, do one of the following:�
Press seat adjustment switch
(�page 28).
�
Move steering column stalk
(�page 37).
�
Press the memory switch
(�page 28).
Page 109 of 442
.
Front seat hea")
109 Controls in detailSeats
Removing and installing front seat head restraints
Information on head restraint adjustment
can be found in the “Getting started” sec-
tion (
�page 36).
Front seat head restraints
Removing front head restraints
�
Press switch1upwards and hold until
the head restraint is fully extended.
�
Pull out head restraint.Installing front head restraints:
�
Press switch1upwards and hold for
about five seconds.
�
Push the head restraint down until it
engages.
�
Adjust head restraint to desired posi-
tion (
�page 36).
Warning!
G
For your protection, drive only with properly
positioned head restraints.
Adjust head restraint so that the center of
the head restraint supports the back of the
head at eye level. This will reduce the poten-
tial for injury to the head and neck in the
event of an accident or similar situation.
Do not drive the vehicle without the seat
head restraints. Head restraints are intend-
ed to help reduce injuries during an acci-
dent.
iTilt the backrest to the rear for easier
removal and installation of the head re-
straints.
Page 110 of 442
110 Controls in detailSeatsRear seat head restraints
Folding head restraints back with
switch in the center console
The rear seat head restraints can be folded
backward for increased visibility.
1Head restraint release switch
�
Make sure the ignition is switched on.
All the lights in the instrument cluster
come on.
�
Press the symbol-side on rocker
switch1to release the head re-
straints.
The head restraints will fold backward.Placing head restraints upright
�
Pull the head restraint forward until it
locks into position.
!The rear seat head restraints cannot be
adjusted.
Warning!
G
For safety reasons, always drive with the
rear head restraints in the upright position
when the rear seats are occupied.
Keep the area around head restraints clear
of articles (e.g. clothing) to not obstruct the
folding operation of the head restraints.
!Make sure the head restraints engage
when placing them upright. Otherwise
their protective function cannot be as-
sured.
Page 111 of 442

Multicontour s")
111 Controls in detailSeats
Removing and installing rear seat head
restraints
For removing and installing rear seat head
restraints, see “Expanding the cargo ar-
ea*” (
�page 239)
Multicontour seat*
The multicontour seat has a movable seat
cushion and inflatable air cushions built
into the backrest to provide additional lum-
bar and side support.
The seat cushion movement, backrest
cushion height and curvature can be con-
tinuously varied with switches on the right
side of the seat after turning the SmartKey
in the starter switch to position2 or press-
ing the KEYLESS-GO* start/stop button
twice.1Seat cushion depth
2Backrest bottom
3Backrest center
4Backrest side bolster adjustment
�
Make sure the ignition is switched on.
All lights in the instrument cluster
come on.Seat cushion depth
�
Adjust the seat cushion depth to the
length of your upper leg using
switch1.
Backrest contour
�
Adjust the contour of the backrest to
the desired position using æ or
ç.
�
Move the backrest support to the bot-
tom by using button2 or to the center
by using button3.
Backrest side bolsters
�
Adjust the side bolsters so that they
provide good lateral support using
switch4.
Page 116 of 442

116 Controls in detailMemory function
�Memory function
You can store up to three different settings
per SmartKey.
The following settings are saved for each
stored position:�
Driver’s seat and backrest position
�
Steering wheel position
�
Driver’s side exterior rear view mirror
position
�
Passenger side exterior rear view mir-
ror position
�
Front passenger seat position
These SmartKey-dependent memory set-
tings can be deactivated if desired
(
�page 152).
!Prior to operating the vehicle, the driv-
er should check and adjust the seat
height, seat position fore and aft, and
seat backrest angle if necessary, to en-
sure adequate control, reach and com-
fort. The head restraint should also be
adjusted for proper height. See also the
section on airbags (
�page 57) for
more information on proper seat posi-
tioning.
In addition, adjust the steering wheel to
ensure adequate control, reach, opera-
tion and comfort. Both the interior and
outside rear view mirrors should be ad-
justed for adequate rear vision.
Fasten seat belts. Infants and small
children should be seated in a properly
secured restraint system that complies
with U.S. Federal Motor Vehicle Safety
Standards 213 and 225 and Canadian
Motor Vehicle Safety Standards 213
and 210.2.
Warning!
G
Do not activate the memory function while
driving. Activating the memory function
while driving could cause the driver to lose
control of the vehicle.

type anchors (at each of the outer rear
se")
