Page 358 of 442
358 Practical hintsOpening / closing in an emergency
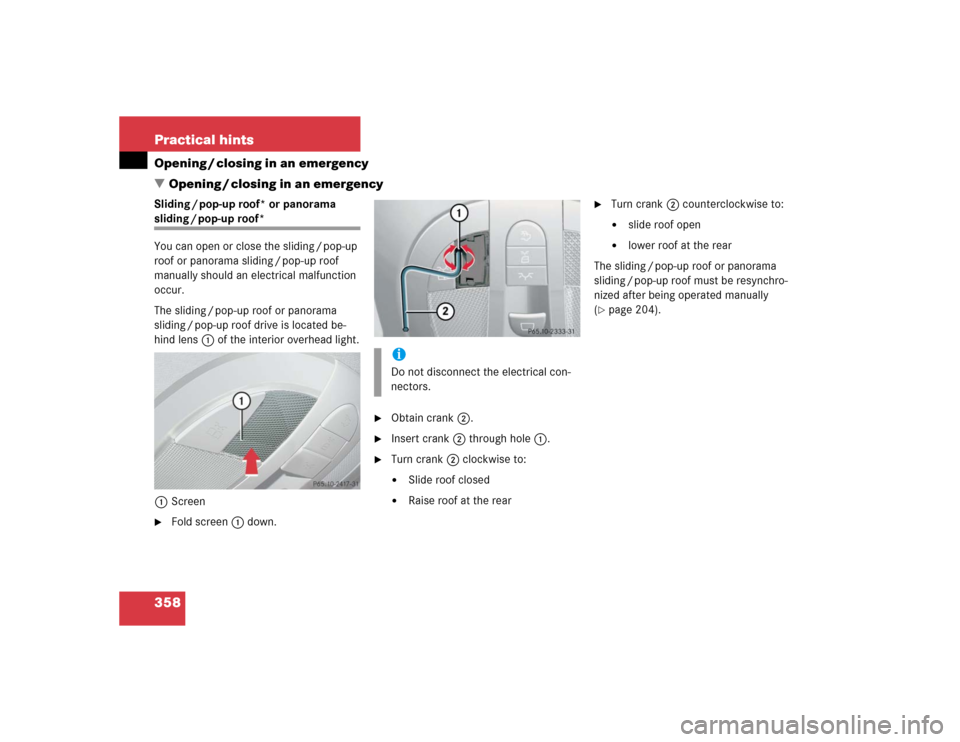
�Opening / closing in an emergencySliding / pop-up roof* or panorama sliding / pop-up roof*
You can open or close the sliding / pop-up
roof or panorama sliding / pop-up roof
manually should an electrical malfunction
occur.
The sliding / pop-up roof or panorama
sliding / pop-up roof drive is located be-
hind lens1 of the interior overhead light.
1Screen�
Fold screen1 down.
�
Obtain crank2.
�
Insert crank2 through hole1.
�
Turn crank2 clockwise to:�
Slide roof closed
�
Raise roof at the rear
�
Turn crank2 counterclockwise to:�
slide roof open
�
lower roof at the rear
The sliding / pop-up roof or panorama
sliding / pop-up roof must be resynchro-
nized after being operated manually
(
�page 204).
iDo not disconnect the electrical con-
nectors.
Page 364 of 442
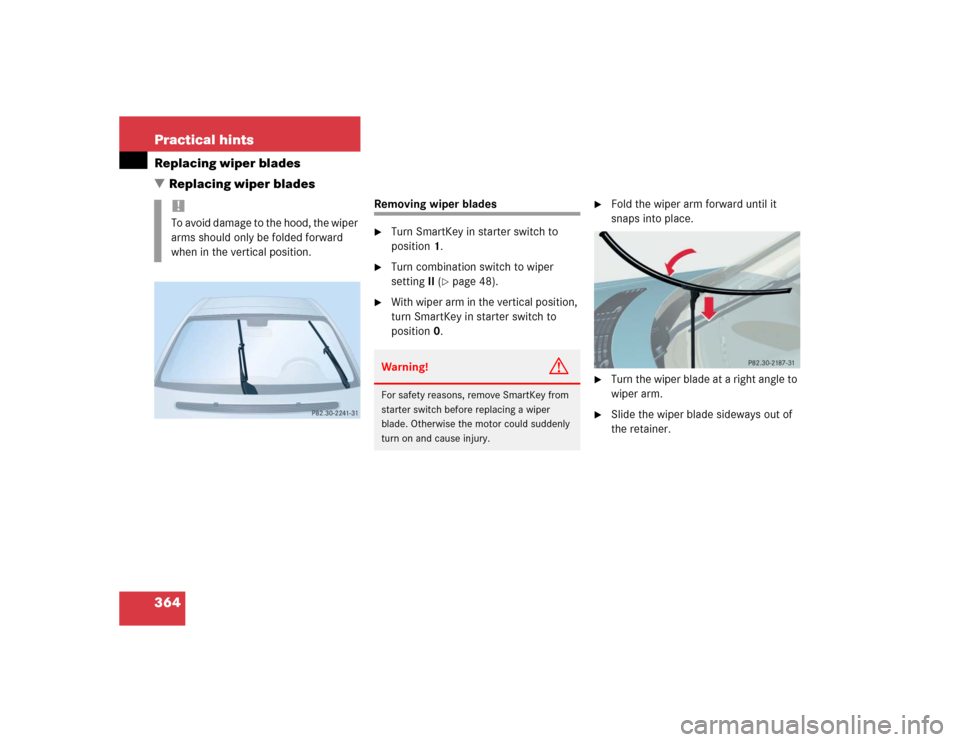
364 Practical hintsReplacing wiper blades
�Replacing wiper blades
Removing wiper blades�
Turn SmartKey in starter switch to
position1.
�
Turn combination switch to wiper
settingII (
�page 48).
�
With wiper arm in the vertical position,
turn SmartKey in starter switch to
position0.
�
Fold the wiper arm forward until it
snaps into place.
�
Turn the wiper blade at a right angle to
wiper arm.
�
Slide the wiper blade sideways out of
the retainer.
!To avoid damage to the hood, the wiper
arms should only be folded forward
when in the vertical position.
Warning!
G
For safety reasons, remove SmartKey from
starter switch before replacing a wiper
blade. Otherwise the motor could suddenly
turn on and cause injury.
Page 365 of 442
365 Practical hints
Replacing wiper blades
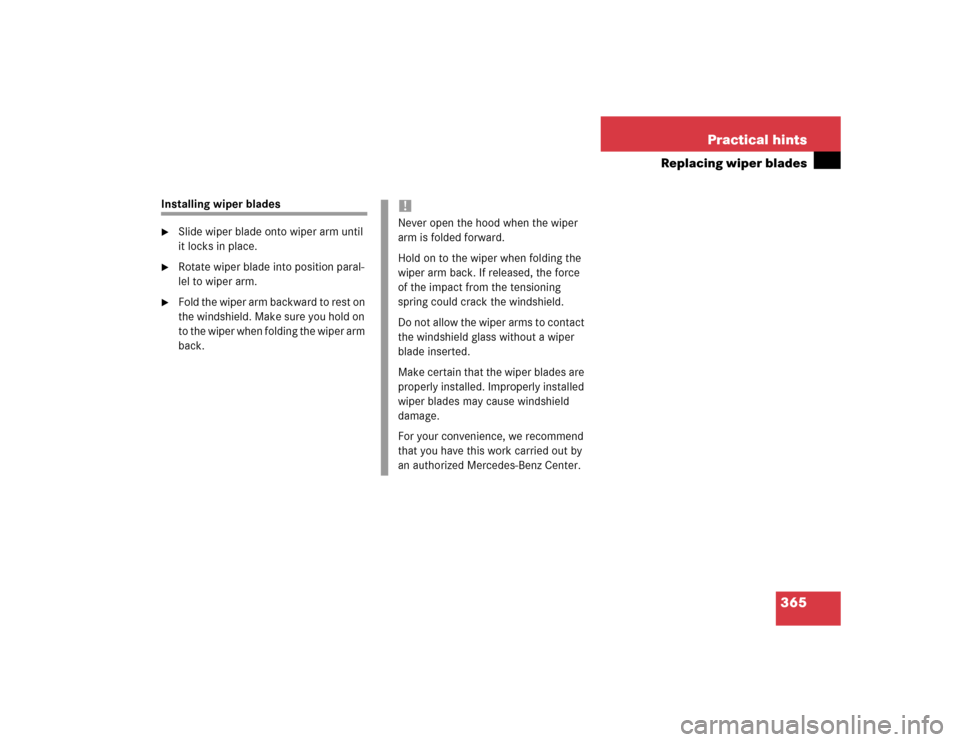
Installing wiper blades�
Slide wiper blade onto wiper arm until
it locks in place.
�
Rotate wiper blade into position paral-
lel to wiper arm.
�
Fold the wiper arm backward to rest on
the windshield. Make sure you hold on
to the wiper when folding the wiper arm
back.
!Never open the hood when the wiper
arm is folded forward.
Hold on to the wiper when folding the
wiper arm back. If released, the force
of the impact from the tensioning
spring could crack the windshield.
Do not allow the wiper arms to contact
the windshield glass without a wiper
blade inserted.
Make certain that the wiper blades are
properly installed. Improperly installed
wiper blades may cause windshield
damage.
For your convenience, we recommend
that you have this work carried out by
an authorized Mercedes-Benz Center.
Page 384 of 442
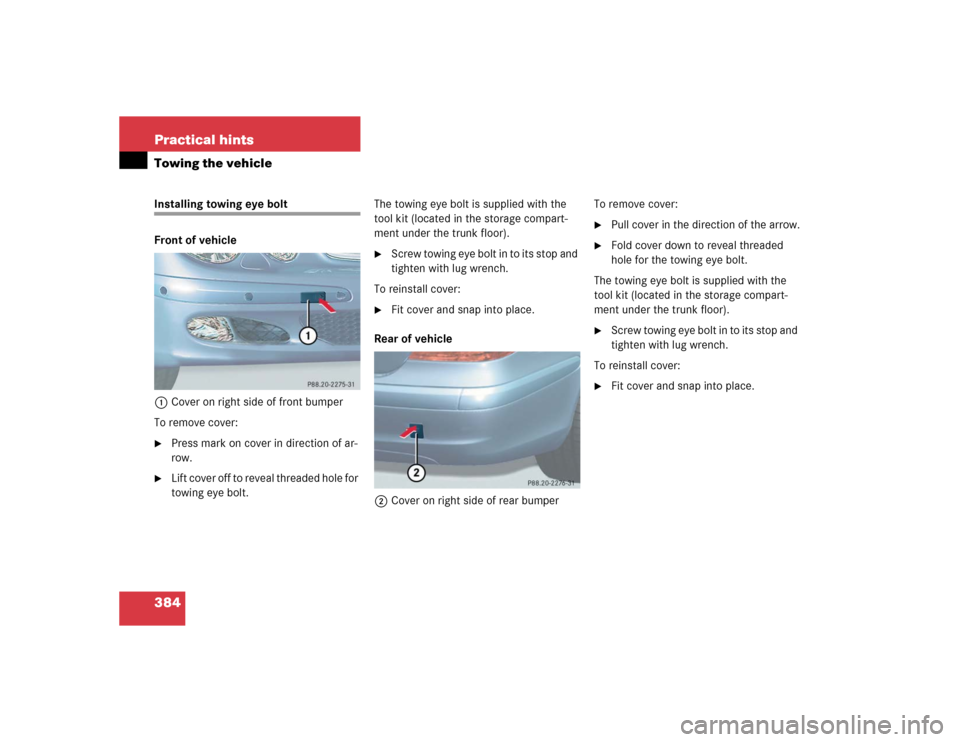
384 Practical hintsTowing the vehicleInstalling towing eye bolt
Front of vehicle
1Cover on right side of front bumper
To remove cover:�
Press mark on cover in direction of ar-
row.
�
L i f t c o v e r o f f t o r e v e a l t h r e a d e d h o l e f o r
towing eye bolt.The towing eye bolt is supplied with the
tool kit (located in the storage compart-
ment under the trunk floor).
�
Screw towing eye bolt in to its stop and
tighten with lug wrench.
To reinstall cover:
�
Fit cover and snap into place.
Rear of vehicle
2Cover on right side of rear bumperTo remove cover:
�
Pull cover in the direction of the arrow.
�
Fold cover down to reveal threaded
hole for the towing eye bolt.
The towing eye bolt is supplied with the
tool kit (located in the storage compart-
ment under the trunk floor).
�
Screw towing eye bolt in to its stop and
tighten with lug wrench.
To reinstall cover:
�
Fit cover and snap into place.
Page 385 of 442

385 Practical hintsFuses
�Fuses
Fuse box in passenger compartment
1CoverOpening
�
Pull cover1 open with a screwdriver
or similar tool.
�
Remove cover1 rearward.
Closing
�
Attach cover1 in the front.
�
Fold cover1 in until it engages.
2Cover
3Catches
�
Turn catches3 anti-clockwise and re-
move cover2.Fuse chart
The fuse chart is found in the fuse box in
the passenger compartment. The amper-
ages of the fuses are also given there.
Spare fuses
Spare fuses are found in the vehicle tool kit
in the trunk.
Fuse extractor
The fuse extractor is found in the vehicle
tool kit in the trunk.
iOnly install fuses that have been tested
and approved by Mercedes-Benz and
that have the specified amperage rat-
ing.
Never attempt to repair or bridge a
blown fuse. Have the cause determined
and remedied by an authorized
Mercedes-Benz Center.
iOnly install fuses that have been tested
and approved by Mercedes-Benz and
that have the specified amperage rat-
ing.
Never attempt to repair or bridge a
blown fuse. Have the cause determined
and remedied by an authorized
Mercedes-Benz Center.
Page 419 of 442
 165
Manual shifting 159
One-touch gearshifting 159
Program mode selector switch 164
Selector lever position 158
Starting the engine 43
Winte")
419 Index
Manual shift program mode
(SL 55 AMG Kompressor) 165
Manual shifting 159
One-touch gearshifting 159
Program mode selector switch 164
Selector lever position 158
Starting the engine 43
Winter program mode 164
B
BabySmartTM
Airbag deactivation system 67
Compatible child seats 411
Self-test 68
BabySmartTM airbag deactivation
system 411
Backrest
Folding forward 236
Folding rearward 238
BAS 76, 411
Batteries, SmartKey
Changing 355, 356
Check lamp 90, 94
Checking 91, 96Batteries, SmartKey with KEYLESS-GO*
Changing 355, 356
Checking 91, 96
Batteries, vehicle
Charging 377
Disconnecting 376
Messages in display 320, 324, 325
Reconnecting 377
Removing 377
Service 375
Battery discharged
Jump starting 378
Bi-Xenon headlamps* 411
Block heater* 296
Blocking
Rear window operation 72
Brake assist system (BAS) 411
Brake fluid 279, 328
Brake pads
Message in display 326
Brakes
Warning lamp 312
Break-in period 266Bulbs, replacing
Additional turn signals 359
Fog lamps 359
Front lamps 359, 361
High beam 359
High beam bulb (Bi-Xenon* headlamps
only) 362
High beam bulb (Halogen headlamps
only) 362
High mounted brake lamp 360
License plate lamps 360, 363
Low beam 359
Parking lamps 360, 362
Side marker lamps 359, 363
Standing lamps 360, 362
Tail lamp 360
Tail lamp assemblies 363
Turn signal lamp 359
Page 432 of 442

432 IndexPower seat
Adjusting backrest tilt 36
Adjusting head restraint height 36
Adjusting head restraint tilt 36
Adjusting seat cushion tilt 36
Adjusting seat height 36
Memory function 116
Removing/installing head
restraints 109
Seat fore and aft adjustment 35
Power train 414
Power washer 303
Power windows 197
Blocking of rear window operation 72
Side windows 197
Synchronizing 200
Pracitcal hints
First aid kit 350
Practical hints
Jump starting 378
Lamp in center console 317
Lamps in instrument cluster 310
Messages in the display 318
Spare wheel 350
TIREFIT(E 55 AMG) 350Vehicle tool kit 352
Problems
While driving 50
With vehicle 17
Product information 9
Program mode selector switch 414
Automatic transmission 164
PULSE function (Massage function) 113
Q
Quick search
Phone book* 156
R
Radio
Selecting stations 134
Selecting stations (satellite*) 135
Radio transmitters, control and
operation 275
Range (distance to empty)
Calling up 154
Rear bench seat
Foldable 236
Rear fog lamp
Bulb 359
Switching on 122Rear lamp bulbs 360
Rear lamps see Tail lamps
Rear passenger compartment
Adjustable air vents 195
Rear view mirror automatic antiglare 168
Rear view mirrors see Mirrors 168
Rear window
Blocking operation 72
Rear window defroster 173
Activating 173
Deactivating 173
Rear window sunshade* 172
Reconnecting
Vehicle battery 377
Regular checks 279
Reinstalling the battery 377
Remote controls
Integrated 259
SmartKey 88, 92
SmartKey with KEYLESS-GO* 91
Remote door unlock
With Tele Aid* 257
Remote Vehicle Diagnostics 414
Page 435 of 442
 178, 188
Temperature indicator 141
Ti")
435 Index
Speed in cruise control 213
Speed in Distronic* 219
Speedometer display mode 141
Suspension tuning 226
Synchronizing the time 144
Temperature (interior) 178, 188
Temperature indicator 141
Tire inflation pressure 143
Units
Speedometer 141
Temperature 141
Tire inflation pressure 143
Vehicle level control 227
Settings
Calling up Distronic* 136, 217
Convenience functions 150
Factory, KEYLESS-GO* 94
Factory, SmartKey 89
Individual 152
Lighting (control system) 146
Menus and submenus 131
Resetting all (control system) 138
Resetting in the submenu 139
Selective 89, 94Settings menu
Functions in 138
Individual vehicle settings 138
Submenus 139
Shift lock 415
Shifting
Gear selector lever positions 161
Into optimal gear range (automatic
transmission) 159
Side impact airbags 61
Side marker lamps 359, 363
Side windows
Automatic opening 198
Cleaning 306
Closing 197, 198, 199
Closing with KEYLESS-GO* 200, 203
Closing with SmartKey 199
Opening 197, 199
Opening fully (Express-open) 198
Opening with SmartKey 199
Stopping 199
Synchronizing power windows 200
Simultaneous wiping and washing
Windshield wipers 49Single wipe 49
Ski sack* 233
Removing 236
Unfolding and loading 233
Unloading and folding 235
SL 55 AMG Kompressor
MANUAL shift program mode 165
Sliding/pop-up roof* 201
Closing 201
Closing with KEYLESS-GO* 200, 203
Closing with SmartKey 202
Opening 201
Opening with SmartKey 202
Stopping 202
Synchronizing 204
Sliding/pop-up roof* or panorama slid-
ing/pop-up roof*
Emergency operations 358
SmartKey 88
Battery check lamp 89, 94
Checking the batteries 91, 96
Factory setting 89
Global locking 89
Global locking and unlocking 89
Global unlocking 89
Page:
< prev 1-8 9-16 17-24