Page 352 of 442
352 Practical hintsWhere will I find ...?Install luggage box�
Insert luggage box into trunk so that
fastening clips are in line with fastening
bolts.
�
Push front edge of luggage box in direc-
tion of arrow under cover of trunk sill.
�
Press fastening clips onto fastening
bolts until they lock into place.
Vehicle tool kit
The vehicle tool kit is stored in the com-
partment underneath the trunk floor
(�page 350).
The vehicle tool kit includes:
�
One towing eye bolt
�
One wheel wrench
�
One alignment bolt
�
One fuse extractor
�
Spare fuses
Page 370 of 442

370 Practical hintsFlat tire
�
Visit an authorized Mercedes-Benz
Center as soon as possible to obtain a
new TIREFIT container.
�
Bring used TIREFIT materials to an au-
thorized Mercedes-Benz Center for
proper disposal.
�
Replace your TIREFIT container every
four years. Replacement containers are
available at your authorized
Mercedes-Benz Center.
Mounting the spare wheel
Preparing the vehicle
Prepare the vehicle as described under
“Preparing the vehicle” on this page.�
Take the spare wheel out of the trunk
(�page 350).
Lifting the vehicle
�
Prevent the vehicle from rolling away
by blocking wheels with wheel chocks
(not included) or other sizable objects.
When changing wheel on a level surface:
�
Place one chock in front of and one be-
hind the wheel that is diagonally oppo-
site to the wheel being changed.
Warning!
G
Follow recommend inflation pressures.
Do not overinflate tires. Overinflating tires
can result in sudden deflation (blowout) be-
cause they are more likely to become punc-
tured or damaged by road debris, potholes
etc.
Do not underinflate tires. Underinflated tires
wear unevenly, adversely affect handling
and fuel economy, and are more likely to fail
from being overheated.
Do not overload the tires by exceeding the
specified vehicle capacity weight (as indicat-
ed by the label on the pillar in the driver’s
door opening). Overloading the tires can
overheat them, possibly causing a blowout.
Warning!
G
Do not exceed vehicle speed of 50 mph
(80 km / h). A TIREFIT repair is not designed
to operate at higher speeds.
The sticker must be attached on the instru-
ment cluster where it will be easily seen by
the driver.
Vehicle handling characteristics may
change. Adapt your driving accordingly.
��
Page 373 of 442

373 Practical hints
Flat tire
Mounting the Minispare wheel�
Clean contact surfaces of wheel and
wheel hub.
�
Guide the spare wheel onto the align-
ment bolt and push it on.
�
Insert wheel bolts and tighten them
slightly.
�
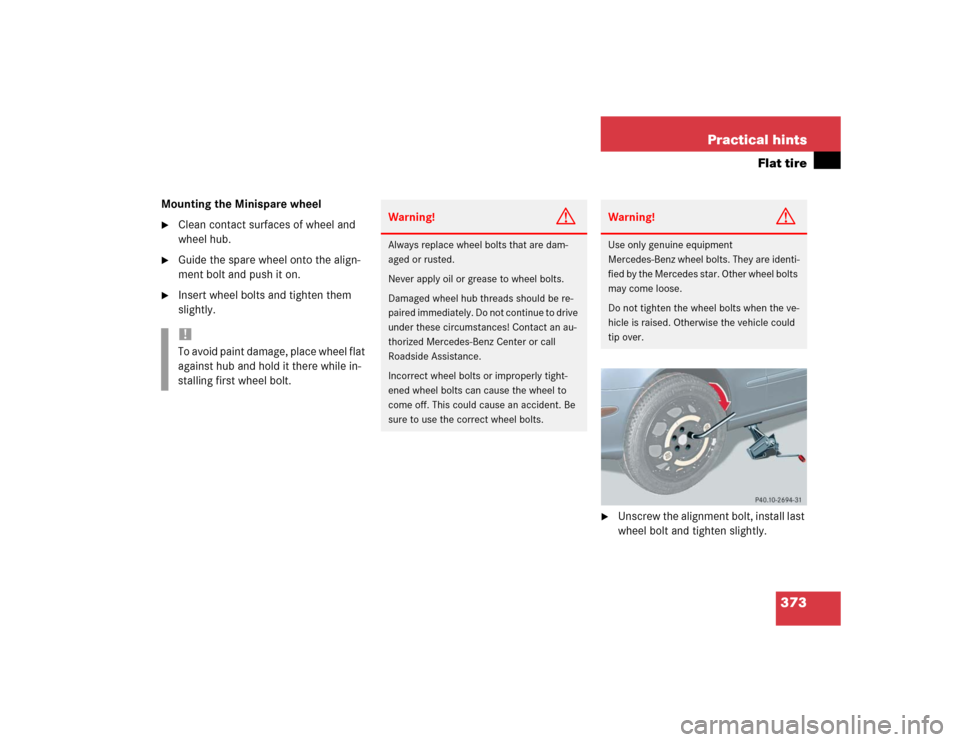
Unscrew the alignment bolt, install last
wheel bolt and tighten slightly.
!To avoid paint damage, place wheel flat
against hub and hold it there while in-
stalling first wheel bolt.
Warning!
G
Always replace wheel bolts that are dam-
aged or rusted.
Never apply oil or grease to wheel bolts.
Damaged wheel hub threads should be re-
paired immediately. Do not continue to drive
under these circumstances! Contact an au-
thorized Mercedes-Benz Center or call
Roadside Assistance.
Incorrect wheel bolts or improperly tight-
ened wheel bolts can cause the wheel to
come off. This could cause an accident. Be
sure to use the correct wheel bolts.
Warning!
G
Use only genuine equipment
Mercedes-Benz wheel bolts. They are identi-
fied by the Mercedes star. Other wheel bolts
may come loose.
Do not tighten the wheel bolts when the ve-
hicle is raised. Otherwise the vehicle could
tip over.
Page 374 of 442

374 Practical hintsFlat tireIn the case of a flat tire, you may tempo-
rarily use the Minispare wheel when ob-
serving the following restrictions:�
Do not exceed a vehicle speed of
50 mph (80 km / h).
�
Drive to the nearest tire repair facility
to have the flat tire repaired or re-
placed as appropriate.
�
Do not operate vehicle with more than
one spare wheel mounted.Lowering the vehicle
�
Lower vehicle by turning crank coun-
terclockwise until vehicle is resting ful-
ly on its own weight.
�
Remove the jack.
1-5 Wheel bolts
�
Tighten the five wheel bolts evenly, fol-
lowing the diagonal sequence illustrat-
ed (1 to 5), until all bolts are tight.
Observe a tightening torque of 96 lb-ft
(130 Nm).
�
Before storing the jack in the trunk, it
should be fully collapsed.
Warning!
G
The dimensions of the Minispare wheel are
different from those of the road wheels. As
a result, the vehicle handling characteristics
change when driving with a Minispare wheel
mounted.
The spare wheel should only be used tempo-
rarily, and replaced with a regular road
wheel as quickly as possible.
Warning!
G
Have the tightening torque checked after
changing a wheel. The wheels could come
loose if they are not tightened to a torque of
96 lb-ft (130 Nm).iWrap the damaged wheel in the protec-
tive film that comes with the spare
wheel and put the wheel in the trunk.
You can also place the damaged wheel
down into the spare wheel well. In this
case, you must stow the holder from
the spare wheel well in the trunk.
Do not activate the tire inflation pres-
sure monitor until the depressurized
tire is no longer in the vehicle.
Page 375 of 442

375 Practical hints
Batteries
�Batteries
Your vehicle is equipped with two batter-
ies:�
Main battery (battery for starter and
electrical consumers; located in the
trunk).
�
Auxiliary battery (back-up battery; sta-
bilizes the electrical system if the main
battery is discharged; located in the en-
gine compartment)
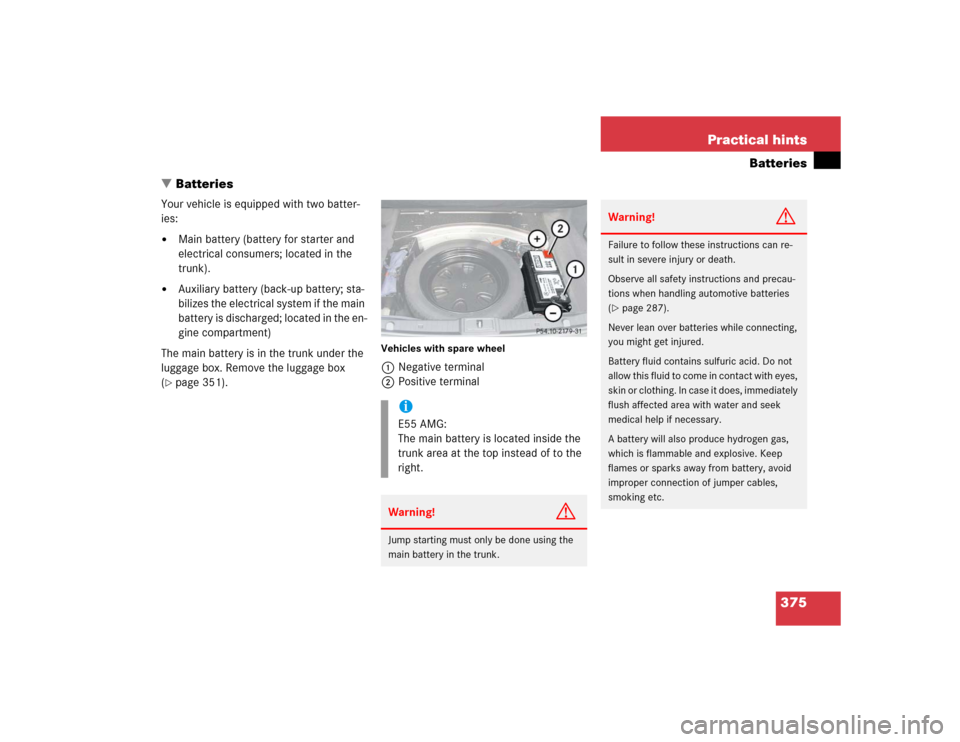
The main battery is in the trunk under the
luggage box. Remove the luggage box
(
�page 351).
Vehicles with spare wheel1Negative terminal
2Positive terminal
iE55 AMG:
The main battery is located inside the
trunk area at the top instead of to the
right. Warning!
G
Jump starting must only be done using the
main battery in the trunk.
Warning!
G
Failure to follow these instructions can re-
sult in severe injury or death.
Observe all safety instructions and precau-
tions when handling automotive batteries
(�page 287).
Never lean over batteries while connecting,
you might get injured.
Battery fluid contains sulfuric acid. Do not
allow this fluid to come in contact with eyes,
skin or clothing. In case it does, immediately
flush affected area with water and seek
medical help if necessary.
A battery will also produce hydrogen gas,
which is flammable and explosive. Keep
flames or sparks away from battery, avoid
improper connection of jumper cables,
smoking etc.
Page 396 of 442
396 Technical dataRims and tiresMixed size tires (E 55 AMG only)Minispare wheel
E55AMG
Front axle:
AMG light alloy rims
8 J x 18
Wheel offset
1.18 in (30 mm)
Summer tires (radial-ply tires)
245 / 40 ZR18
1
Rear axle:
AMG light alloy rims
9 J x 18
Wheel offset
1.54 in (39 mm)
Summer tires (radial-ply tires)
265 / 35 ZR18 Extra Load M0
1
1Must not be used with snow chains
E 320 / E 320 4MATIC
E 500 / E 500 4MATIC
Rim
4 J x 17
Wheel offset
1.34 (34 mm)
Tire
T 155/70 R 17 110 M
1
1Must not be used with snow chains.
iThe E 55 AMG does not have a spare
wheel. The E 55 AMG is equipped with
TIREFIT (
�page 350).
Page 424 of 442

424 IndexElectronic Stability Program see ESP 76,
412
Emergency call system* 250
Emergency calls
Initiating an emergency call 253
With Tele Aid* 252
Emergency operation (Limp Home
Mode) 167
Opening/closing Sliding/pop-up roof*
or panorama sliding/pop-up
roof* 358
Releasing trunk lid from inside 104
Emergency operations
Remote door unlock 257
Unlocking the trunk lid 354
Unlocking the vehicle 353
Emergency tensioning device see
ETD 64, 412
Emission control 276
Ending
A call (telephone) 156Engine 392
Compartment 281
Message in the display 313
Starting 43
Starting with KEYLESS-GO* 44
Starting with the SmartKey 44
Turning off with the key 53
Engine compartment
Hood 281
Engine malfunction indicator lamp 313
Engine number 412
Engine oil
Adding 284
Additives 403
Checking level 282
Consumption 282
Display messages 333
Filler neck 285
Messages in display 283
Viscosity 412
Entry position
Messages in the display 347ESP 76, 412
Four wheel electronic traction system
with ESP 82
Switching off 78
Switching on 79
Synchronizing 323
Warning lamp 311
ETD 412
Safety guidelines 60
Exterior lamp switch 119
Exterior rear view mirrors
Adjusting 38
Parking position for 152
F
Fahrenheit
Setting temperature units 141
Fastening the seat belts 40
Fine adjustment
Cruise control 213
First aid kit 350
Flat tire 366
Mounting the spare wheel 370
Spare wheel 370
Flexible 297
Page 425 of 442

425 Index
Flexible Service System (FSS) 297, 412
Fog lamp, rear 122
Fog lamps, front 122
Messages in display 337
Replacing bulbs 359
Switching on 122
Following distance in Distronic* 221
Four wheel electronic traction system
(4MATIC) with ESP 82
4MATIC 82
Front airbags 61
Front lamps 359
Messages in display 338
Replacing bulbs 361
Switching on 119
Front seat head restraints
Power seat 109
removing and installing 109
Front seats
Heater* 113
FSS (Flexible Service System) 297, 412
Fuel 279
Fuel tank reserve warning lamp 315
Premium unleaded gasoline 279Fuel consumption statistics
After start 153
Since last reset 154
Fuel filler flap 278
Locking 278
Unlocking 278
Fuel reserve tank
Message in display 335
Fuel tank
Filler flap 278
Fuels, coolants, lubricants etc. 400
Fully closing (Express-close) the slid-
ing/pop-up roof 202
Fully opening (Express-open) the slid-
ing/pop-up roof 202
Functions (control system) 133
Resetting 139
Fuse chart 385
Fuses 385
Fuse chart 385
Fuse extractor 385
Spare fuses 385G
Garage door opener 27, 258
Erasing the integrated remote
control 263
Integrated remote control 259
Rolling code programming 261
Gasoline see Fuel 279
Gear range 413
Automatic transmission 160
Limiting 160
Shifting into optimal 159
Gear range limit
Canceling 159
Gear selector lever
Position 161
Global
Locking 89
Locking with KEYLESS-GO* 94
Unlocking 89
Unlocking with KEYLESS-GO* 94
Global Positioning System (GPS) 413
Glove box 242
Closing 242
Opening 242
Good visibility 168