Page 353 of 440
353 Practical hints
Replacing bulbs
Low beam and high beam bulb�
Switch off the lights.
�
Open the hood (
�page 281).
�
Turn housing cover1 or 2 counter-
clockwise and remove.
�
Turn bulb holder 4 or 5 with the bulb
counterclockwise and remove.
�
Press the bulb backwards and turn
counterclockwise out of the bulb hold-
er.
�
Press the new bulb into the holder and
twist it clockwise.
�
Place the bulb holder back into the
lamp and turn it clockwise.
�
Place the corresponding housing cov-
ers back on and turn them clockwise.Front turn signal lamp bulb
�
Switch off the lights.
�
Open the hood (
�page 281).
�
Twist bulb socket3 counterclockwise
and pull out.
�
Push bulb into socket, turn counter-
clockwise and remove.
�
Insert new bulb in socket, push in and
twist clockwise.
�
Reinsert bulb socket in lamp and twist
clockwise.Parking and standing lamp bulb
�
Switch off the lights.
�
Open the hood (
�page 281).
�
Turn housing cover2 counterclock-
wise and remove.
�
Pull out the bulb socket with the bulb.
�
Pull the bulb out of the bulb socket.
�
Insert a new bulb in the socket.
�
Reinstall the bulb socket.
�
Align housing cover and click into
place.
Page 354 of 440
354 Practical hintsReplacing bulbsFront lamps Bi-Xenon*-type
1Bulb socket for turn signal lamp
2Housing cover for high beam flasher
lamp
3Housing cover for Bi-Xenon* lamp4High beam flasher bulb
5Parking and standing lampHigh beam bulb for high beam flasher
�
Switch off the lights.
�
Open the hood (
�page 281).
�
Turn housing cover2 counterclock-
wise and remove.
�
Turn bulb holder 4 with the bulb coun-
terclockwise and remove.
�
Press the bulb backwards and turn
counterclockwise out of the bulb hold-
er.
�
Press the new bulb into the holder and
twist it clockwise.
�
Place the bulb holder back into the
lamp and turn it clockwise.
�
Place the housing cover 2 back on
and turn them clockwise.
Warning!
G
Do not remove the cover
3
for the Bi-Xe-
non* headlamp. Because of high voltage in
xenon lamps, it is dangerous to replace the
bulb or repair the lamp and its components.
We recommend that you have such work
done by a qualified technician.
Page 355 of 440
355 Practical hints
Replacing bulbs
Front turn signal lamp bulb�
Switch off the lights.
�
Open the hood (
�page 281).
�
Twist bulb socket1 counterclockwise
and pull out.
�
Push bulb into socket, turn counter-
clockwise and remove.
�
Insert new bulb in socket, push in and
twist clockwise.
�
Reinsert bulb socket in lamp and twist
clockwise.Parking and standing lamp bulb
�
Switch off the lights.
�
Open the hood (
�page 281).
�
Turn housing cover2 counterclock-
wise and remove.
�
Pull out the bulb socket with the bulb.
�
Pull the bulb out of the bulb socket.
�
Insert a new bulb in the socket.
�
Reinstall the bulb socket.
�
Align housing cover and click into
place.
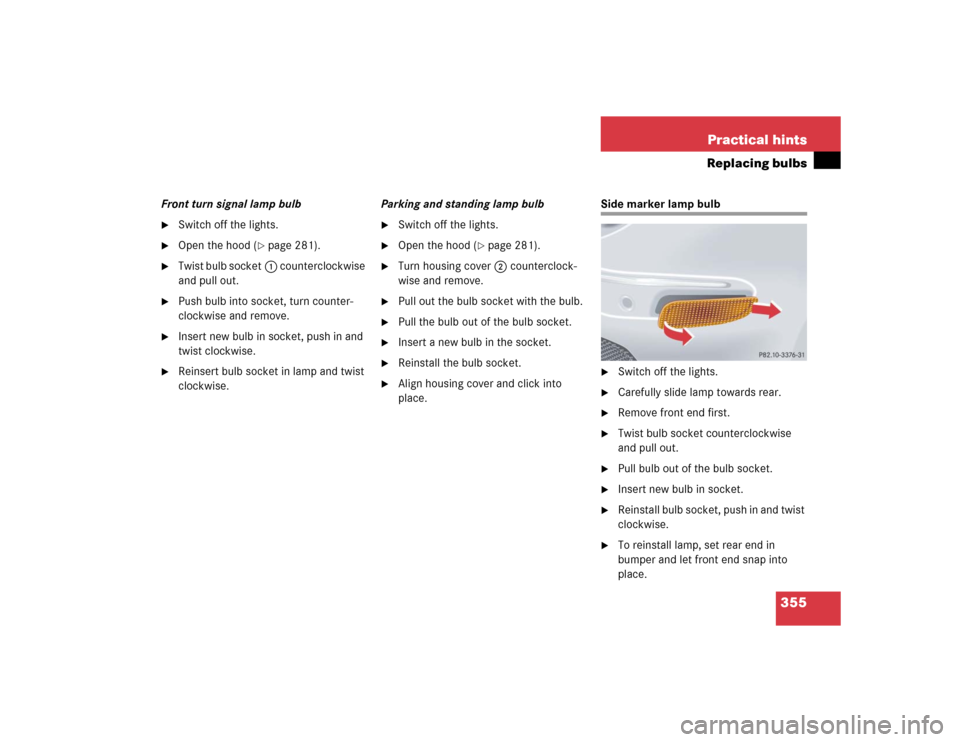
Side marker lamp bulb�
Switch off the lights.
�
Carefully slide lamp towards rear.
�
Remove front end first.
�
Twist bulb socket counterclockwise
and pull out.
�
Pull bulb out of the bulb socket.
�
Insert new bulb in socket.
�
Reinstall bulb socket, push in and twist
clockwise.
�
To reinstall lamp, set rear end in
bumper and let front end snap into
place.
Page 356 of 440
356 Practical hintsReplacing bulbsReplacing bulbs for rear lamps
Tail lamp assemblies
1Brake lamp
2Turn signal lamp
3Backup lamp
4Standing and side marker lamp
5Rear fog lamp (driver’s side)/tail�
Switch off the lights.
�
Open trunk.
�
Swing the trim panel covering the cor-
responding rear lights to the side.
�
Squeeze tabs together and remove the
bulb holder with the bulb.
�
Twist bulb counterclockwise and pull
out of bulb holder.
�
Insert new bulb into the holder and turn
it clockwise.
�
Reinstall bulb holder. The tabs must au-
dibly click.
�
Close trim panel.
�
Place the housing cover back on so
that its tabs click in place. License plate lamp
1Screws
�
Switch off the lights.
�
Loosen both screws1 and remove
lamp.
�
Replace the tubular lamp and reinstall
lamp.
�
Retighten the screws.
Page 369 of 440
369 Practical hints
Towing the vehicle
!
To be certain to avoid a possibility of
damage to the transmission, however,
we recommend the drive shaft be dis-
connected at the rear axle drive flange
for any towing beyond a short tow to a
nearby garage.
Warning!
G
Prior to towing the vehicle with all wheels on
the ground, make certain that the SmartKey
is in starter switch position
2.
If the SmartKey is left in starter switch posi-
tion
0 for an extended period of time, it can
no longer be turned in the switch. In this
case, the steering is locked. To unlock, re-
move SmartKey from starter switch and re-
insert.
If circumstances require towing the vehicle
with all wheels on the ground, always tow
with a tow bar if:
�
the engine will not run
�
there is a malfunction in the power sup-
ply or in the vehicle’s electrical system
as that will be necessary to adequately con-
trol the towed vehicle.
Warning!
G
With the engine not running, there is no
power assistance for the brake and steering
systems. In this case, it is important to keep
in mind that a considerably higher degree of
effort is necessary to brake and steer the ve-
hicle. Adapt your driving accordingly.iTo signal turns while being towed with
the hazard warning flasher in use, turn
SmartKey in starter switch to
position2 and activate the combina-
tion switch for the left or right turn sig-
nal in the usual manner – only the
selected turn signal will operate.
Upon canceling the turn signal, the haz-
ard warning flasher will operate again.
Page 403 of 440
403 Index
A
ABS 23, 76, 397
Malfunction indicator lamp 306
Messages in display 315
Accelerator position,
automatic transmission 163
Accident
In case of 50
Activating
Air conditioning (cooling) 181
Air recirculation mode 178
Anti-theft alarm system 82
Automatic climate control 173
Central locking (control system) 149
Charcoal filter 179, 180
Distance warning function* 230
Distronic* 225, 226
Easy-entry/exit feature 150
ESP 80
Exterior headlamps 47
Exterior lamps 120
Exterior rear view
mirror parking position 168
Front and rear fog lamp 121, 122
Hazard warning flasher 123
Headlamps 47High beams 123
Ignition 31
Ignition with KEYLESS-GO* 33
Immobilizer 53, 81
Manual shift program
CLK 55 AMG 164
Rapid seat heating*
with seat ventilation* 115
Rapid seat heating*
without seat ventilation* 114
Rear window defroster 171
Residual heat 181
Seat heating*
with seat ventilation* 115
Seat heating*
without seat ventilation* 114
Seat ventilation* 113
Steering wheel gearshift
control (CLK 55 AMG) 164
Tow-away alarm 83
Trunk lid opening limiter*
(control system) 149
Windshield wipers 49Adding
Coolant 287
Engine oil 285
Additional turn signals 351
Adjustable air vents,
rear passenger compartment 182
Adjusting 34
Air distribution 176
Air volume 177
Backrest tilt 36
Exterior rear view mirror 39
Head restraint height 36
Head restraint tilt 36
Instrument cluster illumination 126
Interior rear view mirror 38
Mirrors 38
Multicontour seat* 112
Seat cushion depth 112
Seat cushion tilt 36
Seat fore and aft adjustment 35
Seat height 36
Seats 34
Steering column in/out 38
Steering column up/down 38
Steering wheel 37
Page 406 of 440
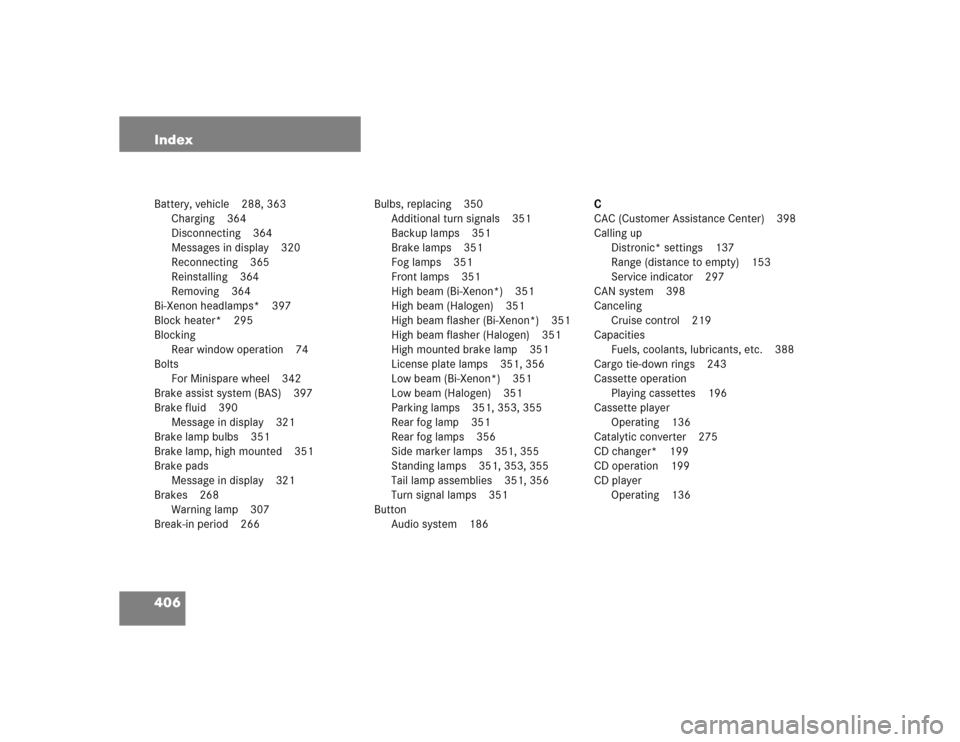
406 IndexBattery, vehicle 288, 363
Charging 364
Disconnecting 364
Messages in display 320
Reconnecting 365
Reinstalling 364
Removing 364
Bi-Xenon headlamps* 397
Block heater* 295
Blocking
Rear window operation 74
Bolts
For Minispare wheel 342
Brake assist system (BAS) 397
Brake fluid 390
Message in display 321
Brake lamp bulbs 351
Brake lamp, high mounted 351
Brake pads
Message in display 321
Brakes 268
Warning lamp 307
Break-in period 266Bulbs, replacing 350
Additional turn signals 351
Backup lamps 351
Brake lamps 351
Fog lamps 351
Front lamps 351
High beam (Bi-Xenon*) 351
High beam (Halogen) 351
High beam flasher (Bi-Xenon*) 351
High beam flasher (Halogen) 351
High mounted brake lamp 351
License plate lamps 351, 356
Low beam (Bi-Xenon*) 351
Low beam (Halogen) 351
Parking lamps 351, 353, 355
Rear fog lamp 351
Rear fog lamps 356
Side marker lamps 351, 355
Standing lamps 351, 353, 355
Tail lamp assemblies 351, 356
Turn signal lamps 351
Button
Audio system 186C
CAC (Customer Assistance Center) 398
Calling up
Distronic* settings 137
Range (distance to empty) 153
Service indicator 297
CAN system 398
Canceling
Cruise control 219
Capacities
Fuels, coolants, lubricants, etc. 388
Cargo tie-down rings 243
Cassette operation
Playing cassettes 196
Cassette player
Operating 136
Catalytic converter 275
CD changer* 199
CD operation 199
CD player
Operating 136
Page 408 of 440
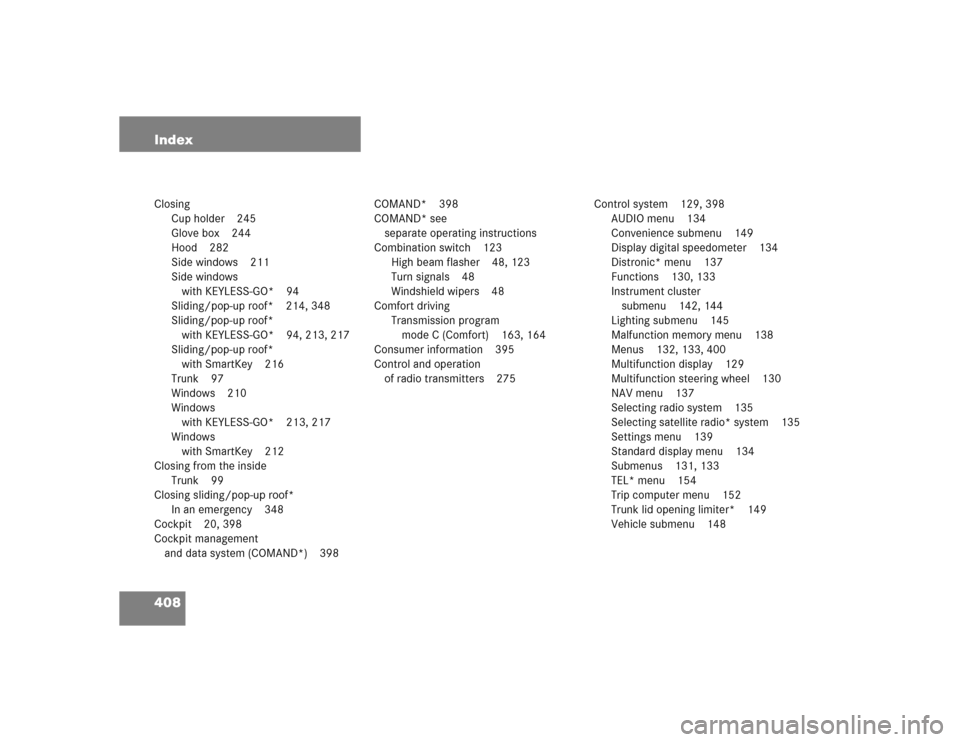
408 IndexClosing
Cup holder 245
Glove box 244
Hood 282
Side windows 211
Side windows
with KEYLESS-GO* 94
Sliding/pop-up roof* 214, 348
Sliding/pop-up roof*
with KEYLESS-GO* 94, 213, 217
Sliding/pop-up roof*
with SmartKey 216
Trunk 97
Windows 210
Windows
with KEYLESS-GO* 213, 217
Windows
with SmartKey 212
Closing from the inside
Trunk 99
Closing sliding/pop-up roof*
In an emergency 348
Cockpit 20, 398
Cockpit management
and data system (COMAND*) 398COMAND* 398
COMAND* see
separate operating instructions
Combination switch 123
High beam flasher 48, 123
Turn signals 48
Windshield wipers 48
Comfort driving
Transmission program
mode C (Comfort) 163, 164
Consumer information 395
Control and operation
of radio transmitters 275Control system 129, 398
AUDIO menu 134
Convenience submenu 149
Display digital speedometer 134
Distronic* menu 137
Functions 130, 133
Instrument cluster
submenu 142, 144
Lighting submenu 145
Malfunction memory menu 138
Menus 132, 133, 400
Multifunction display 129
Multifunction steering wheel 130
NAV menu 137
Selecting radio system 135
Selecting satellite radio* system 135
Settings menu 139
Standard display menu 134
Submenus 131, 133
TEL* menu 154
Trip computer menu 152
Trunk lid opening limiter* 149
Vehicle submenu 148