Page 190 of 440
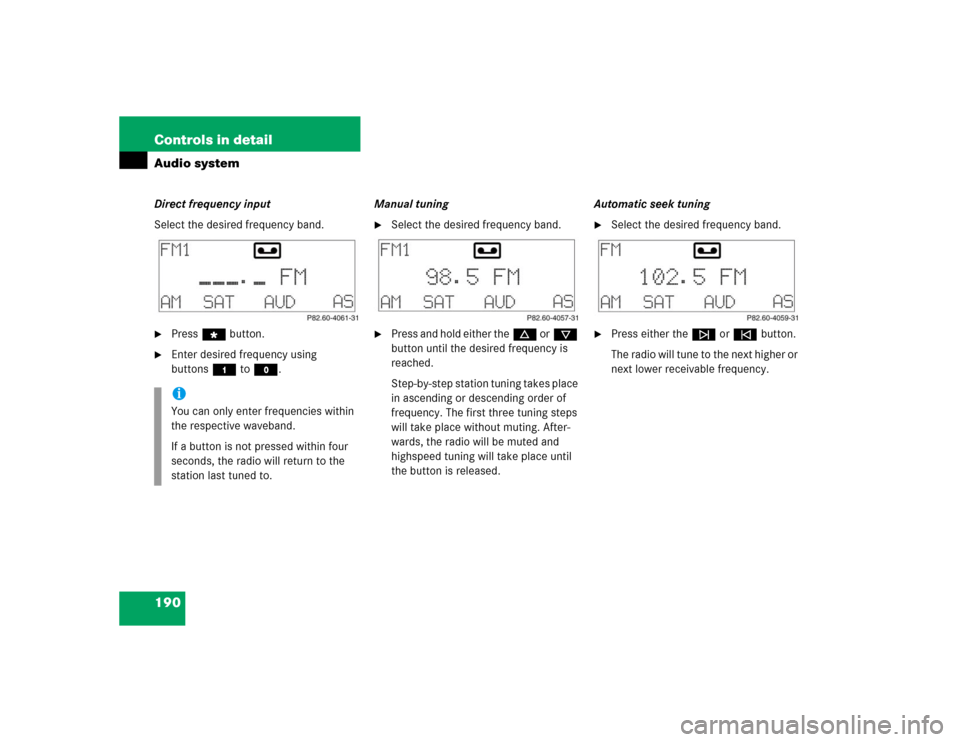
190 Controls in detailAudio systemDirect frequency input
Select the desired frequency band.�
Press“ button.
�
Enter desired frequency using
buttons4 toM.Manual tuning
�
Select the desired frequency band.
�
Press and hold either thed orc
button until the desired frequency is
reached.
Step-by-step station tuning takes place
in ascending or descending order of
frequency. The first three tuning steps
will take place without muting. After-
wards, the radio will be muted and
highspeed tuning will take place until
the button is released.Automatic seek tuning
�
Select the desired frequency band.
�
Press either thef ore button.
The radio will tune to the next higher or
next lower receivable frequency.
iYou can only enter frequencies within
the respective waveband.
If a button is not pressed within four
seconds, the radio will return to the
station last tuned to.
Page 195 of 440
 mode
In PTY mode, you can tune in and select
channels of a specific program type.
Calling up PTY mode�
Start SAT radio mode.
�
Press the
PTY
key")
195 Controls in detail
Audio system
Program type (PTY) mode
In PTY mode, you can tune in and select
channels of a specific program type.
Calling up PTY mode�
Start SAT radio mode.
�
Press the
PTY
key.
The name of the channel currently
being received is shown.
Leaving PTY mode
�
Press the
CH
key.
The number of the channel currently
being received is shown.Selecting channel category
�
Press d or c button.
The individual program types are se-
lected.
Tuning in a PTY channel
Once you have selected a program type,
you can tune in channels broadcasting a
program that corresponds to the selected
program type.
�
Pressf ore button.
The radio will tune to the next highest
or lowest channel broadcasting this
type of program.Program Descriptive Text (PDT)
In PDT mode, you can call up additional in-
formation on the channel, the current track
and the performing artist(s).
�
Press the
TXT
key.
The station category appears on the
display.
�
Press the
TXT
key again within four
seconds.
The title of the current track appears.
�
Press the
TXT
key again within four
seconds.
The name of the musician(s) of the cur-
rent track appear on the display.
Page 200 of 440

200 Controls in detailAudio systemOnly use original CDs. Using copied CDs
may create problems during playback.
Clean CDs from time to time with a com-
mercially available cleaning cloth. Do not
use solvents, anti-static sprays, etc. for
cleaning. Replace the CD in its case after
use. Protect CDs from heat and direct sun-
light.
Only use CDs, which bear the label shown
and that conform to the compact disc
digital audio standard (IEC 60908). You
can therefore only use CDs with a maxi-
mum thickness of 1.3 mm.Operational readiness of CD changer
If a CD changer has been installed in the
system, it can be operated from the front
control panel of the radio. A loaded maga-
zine must be installed to play CDs.
Loading/unloading the CD magazine
�
Slide changer door to the right and
press eject buttong.
�
The magazine will be ejected.
iUse of CDs which do not meet this
standard may cause damage to the CD
changer. Do not play single-CDs
(80 mm) with an adapter.
Your CD drive has been designed to
play CDs which correspond to the
EN 60908 standard.
If you insert thicker data carriers, e.g.
ones that have data on both sides (one
side with DVD data, the other side with
audio data), they cannot be ejected and
will damage the drive.Warning!
G
The CD changer* is a Class 1 laser product.
There is a danger of invisible laser radiation
if the cover is opened or damaged.
Do not remove the cover. The CD changer*
does not contain any parts which can be ser-
viced by the user. For safety reasons, have
any service work which may be necessary
performed only by qualified personnel.
Page 201 of 440

201 Controls in detail
Audio system
1CD
2CD changer
3CD tray
4CD magazine�
Remove magazine and pull CD tray fully
out.
�
Place CD in recess of tray, label side
up.
�
Push tray into magazine in direction of
arrow.
�
Push magazine into CD changer in di-
rection of arrow and close sliding door.
Playing CDs
�
Pressi button.CD will appear on the display.
The last CD listened to will then start play-
ing at the point where it was switched off.
After the last track on a CD has finished,
the next CD is automatically played.Selecting CDs
�
You can select from among the CDs in
the CD magazine using buttons 4
to6.CD a n d t h e m a g a z i n e s l o t n u m b e r o f t h e
s e l e c t e d C D a p p e a r o n t h e d i s p l a y . T h e
number of the current track is dis-
played after
TRACK
.
If there is no CD in the selected maga-
zine slot,
NO CD
appears on the display
with the corresponding slot number.
iCDs which have been inserted improp-
erly or are unreadable will not be
played.
Page 208 of 440
.
You can make an emergency call to an
emergency rescu")
208 Controls in detailAudio systemEmergency call�
Press button4 longer than one
second.
�
A call will be placed to the saved num-
ber (e.g. 911).
You can make an emergency call to an
emergency rescue station with a mobile
communications network.
The emergency call will be placed as long
as the corresponding mobile communica-
tions network is available. To do this,
switch the telephone on if this has not al-
ready been done.The call will also be placed even if the un-
lock code is not entered.
Emergency calls may not be possible with
all telephone networks or if certain net-
work services and/or telephone functions
are active. Check with your local network
operation company. It may take some time
to set up an emergency call.
To use this function you must ensure that
the number stored in memory location 1 is
the number to be dialed in case of emer-
gency.
If an emergency call cannot be connected,
the message
SYSTM BUSY
appears.Accepting an incoming call
Accepting an incoming call in telephone
mode
With an incoming call, a ringing tone can
be heard and the caller’s telephone num-
ber, or the name under which this tele-
phone number has been saved in the
telephone book, appears on the display. If
the caller’s number is not transmitted,
CALL
will appear in the display.
�
Press the
SND
key to accept call.
!Please be aware that the 911 emergen-
cy call system is a public service. Using
it without due cause is a criminal of-
fense.
Page 210 of 440

210 Controls in detailPower windows
�Power windowsOpening and closing the windows
The side windows can be opened and
closed electrically. The switches for all the
side windows are on the driver’s door. The
switches for the respective windows are
on the front passenger door and the rear
side trim panels.
1Left front window
2Right front window
3Right rear window
4Left rear window
5Rear window override switch
(
�page 74)
Warning!
G
When closing the windows, make sure there
is no danger of anyone being harmed by the
closing procedure.
The closing of the door windows can be im-
mediately halted by releasing the switch or,
if switch was pulled past the resistance
point and released, by either pressing or
pulling the respective switch.
The closing of the rear side windows can be
immediately halted by releasing the switch.
The door windows are equipped with the ex-
press-close and automatic reversal func-
tion. If a door window encounters an
obstruction that blocks its path in a circum-
stance where you pulled the switch past the
resistance point and released it to close the
window, the automatic reversal function will
stop the window and open it slightly.
If a door window encounters an obstruction
that blocks its path in a circumstance where
you are closing the window by pulling and
holding the switch, by pressing and holding
button
‹
on the SmartKey, or by press-
ing and holding the lock button
(vehicles with KEYLESS-GO*) on the door
handle, the automatic reversal function will
not operate.
When leaving the vehicle, always remove the
SmartKey from starter switch, take the
SmartKey with KEYLESS-GO* with you, and
lock your vehicle. Do not leave children un-
attended in the vehicle, or with access to an
unlocked vehicle. Unsupervised use of vehi-
cle equipment can cause an accident
and/or serious personal injury.
Page 211 of 440

211 Controls in detail
Power windows
�
Turn SmartKey in the starter switch to
position1 or2 or press the
KEYLESS-GO* start/stop button.Opening the windows
�
Press switch1 to4 to the resistance
point.
The corresponding window will move
downwards until you release the
switch.
Closing the windows
�
Pull on switch1 to4 to the resis-
tance point.
The corresponding window will move
upwards until you release the switch.Fully opening the door windows
(Express-open)
�
Press switch1 or2 past the resis-
tance point and release.
The corresponding window opens com-
pletely.
Fully closing the door windows
(Express-close)
�
Pull switch1 or2 past the resis-
tance point and release.
The corresponding window closes com-
pletely.
iYou can also open or close the win-
dows using the:�
SmartKey (summer opening/con-
venience feature) (
�page 212)
�
button, in the control panel of
the automatic climate control
(�page 173).
�
buttone in the control panel of
the automatic climate control
(�page 173).
Warning!
G
If you pull and hold the switch up when clos-
ing the window, and upward movement of
the window is blocked by some obstruction
including but not limited to arms, hands, fin-
gers, etc., the automatic reversal will not op-
erate.
��
Page 212 of 440
 will
also be opene")
212 Controls in detailPower windows
Stopping windows�
Press or pull respective switch again.Opening and closing the windows with
the SmartKey
The sliding/pop-up roof* (
�page 214) will
also be opened or closed when the power
windows are operated with the SmartKey.
�
Aim transmitter eye at the front door
handle.
!If the upward movement of a door win-
dow is blocked during the closing pro-
cedure, the door window will stop and
open slightly.
Remove the obstruction, pull the
switch again past the resistance point
and release.
If the door window still does not close
when there is no obstruction, then pull
the switch and hold it. The door window
will then close without the obstruction
sensor function.
Warning!
G
Driver's door only:
If within five seconds you again pull the
switch past the resistance point and re-
lease, the automatic reversal will not func-
tion.
Warning!
G
Never operate the windows or
sliding/pop-up roof* if there is the possibil-
ity of anyone being harmed by the opening
or closing procedure.
In the event that the procedure causes po-
tential danger, the procedure can be imme-
diately halted by releasing the button on the
SmartKey. To reverse direction of move-
ment press Œ for opening or ‹ for
closing.
��