Page 90 of 440

90 Controls in detailLocking and unlocking�
the fuel filler flap
SmartKey with remote controls1‹ Lock button
2Š Opening button for trunk lid
3Mechanical key locking tab
4ΠUnlock button
5Battery check lamp
6Â Panic button (
�page 75)
For more information on using the
SmartKey buttons, see “SmartKeys”
(
�page 86) Important notes on using KEYLESS-GO*
�
You can also use the SmartKey with
KEYLESS-GO like a normal SmartKey
(�page 86).
�
You can combine KEYLESS-GO func-
tions with normal SmartKey functions
(e.g. unlocking with KEYLESS-GO and
locking with the remote control).
�
Always carry the SmartKey with
KEYLESS-GO with you.
�
Never store the SmartKey with
KEYLESS-GO together with:�
electronic items such as a cellular
phone or another SmartKey with
KEYLESS-GO
�
metallic objects such as coins or
metal foil
Doing so could impair the function of
the KEYLESS-GO system.
Warning!
G
When leaving the vehicle, always remove the
SmartKey from the starter switch, take the
SmartKey with KEYLESS-GO with you and
lock the vehicle. Do not leave children unat-
tended in the vehicle, or with access to an
unlocked vehicle. Unsupervised use of vehi-
cle equipment may cause an accident
and/or serious personal injury.iYou can also open and close the power
windows (
�page 212) and slid-
ing/pop-up roof* (
�page 216) using
the SmartKey.
iIf the vehicle has been parked for a
longer period of time, you must pull the
door handle in order to activate the
KEYLESS-GO function.
Page 94 of 440
 is required to open the trunk lid.
The handle is located in the rear licen")
94 Controls in detailLocking and unlockingUnlocking and opening the trunk lid
A minimum height clearance of 5.71 ft
(1.74 m) is required to open the trunk lid.
The handle is located in the rear license
plate recess.
1Handle�
Pull on handle1.
The trunk opens.
or
�
Press and hold button Š until the
trunk unlocks and begins to open.The trunk can also be opened from its in-
side in an emergency, see “Trunk lid emer-
gency release” (
�page 103).Closing the side windows and
sliding/pop-up roof*
�
Press and hold lock button at door
(�page 55) until the side windows and
the sliding/pop-up roof* are closed.
!The trunk lid swings open upwards au-
tomatically. Always make sure there is
sufficient overhead clearance.
Vehicles with trunk lid opening/closing
system*: To stop the opening proce-
dure, press buttonŠ. The Trunk lid
stops moving.iIf the trunk lid does not open, it is still
locked separately (if applicable)
(�page 104)
If the vehicle was previously centrally
locked, the trunk lid will lock automati-
cally when closed (
�page 97). The
turn signals will flash three times to
confirm locking.
Warning!
G
When closing the windows and the
sliding/pop-up roof*, make sure there is no
danger of anyone being harmed by the clos-
ing procedure.
If potential danger exists, proceed as fol-
lows:�
Release the lock button.
�
Pull on the door handle and hold firmly.
The side windows and the
sliding/pop-up roof* will open for about
two seconds if the door handle is held
but the door not opened.
Page 96 of 440
96 Controls in detailLocking and unlocking
Opening the trunk
Opening the trunk from outside
(vehicles without KEYLESS-GO*)
A minimum height clearance of 5.71 ft
(1.74 m) is required to open the trunk lid.
The handle is located in the rear license
plate recess.
1Handle�
Pull on handle1.
The trunk opensThe trunk can also be opened using the
SmartKey (
�page 88) or from its inside in
an emergency, see “Trunk lid emergency
release” (
�page 103).
iIf you open a door, the side windows on
that side of the vehicle will lower slight-
ly. The windows close again when you
close the door.
!The trunk lid swings open upwards au-
tomatically. Always make sure there is
sufficient overhead clearance.iIf the trunk lid does not open, it is still
locked separately (if applicable)
(�page 105).
The vehicle must be unlocked.
Page 167 of 440
.
Automatic antiglare rear vie")
167 Controls in detail
Good visibility
Rear view mirror
More information on setting the rear view
mirrors can be found in the “Getting start-
ed” section (
�page 38).
Automatic antiglare rear view mirror
The reflection brightness of the exterior
rear view mirror on the driver’s side and
the interior rear view mirror will respond
automatically to glare when
�
the ignition is switched on,
and
�
incoming light from headlamps falls on
the sensor in the interior rear view mir-
ror.
The rear view mirror will not react if
�
reverse gear is engaged
�
the interior lighting is turned on
Warning!
G
The automatic antiglare function does not
react if incoming light is not aimed directly
at sensors in the interior rear view mirror.
The interior rear view mirror and the exterior
rear view mirror on the driver’s side do not
react, for example, if the rear window sun
shade* is in raised position.
Glare can endanger you and others.Warning!
G
In the case of an accident, liquid electrolyte
may escape from the mirror housing if the
mirror glass breaks.
Electrolyte has an irritating effect. Do not al-
low the liquid to come into contact with
eyes, skin, clothing, or respiratory system.
In case it does, immediately flush affected
area with water, and seek medical help if
necessary.
Warning!
G
Exercise care when using the passenger
side exterior rear view mirror. The mirror
surface is convex (outwardly curved surface
for a wider field of view). Objects in mirror
are closer than they appear. Check your in-
terior rear view mirror or glance over your
shoulder before changing lanes.!Electrolyte drops coming into contact
with the vehicle paint finish can be
completely removed only while in the
liquid state by applying plenty of water.
Page 169 of 440
169 Controls in detail
Good visibility
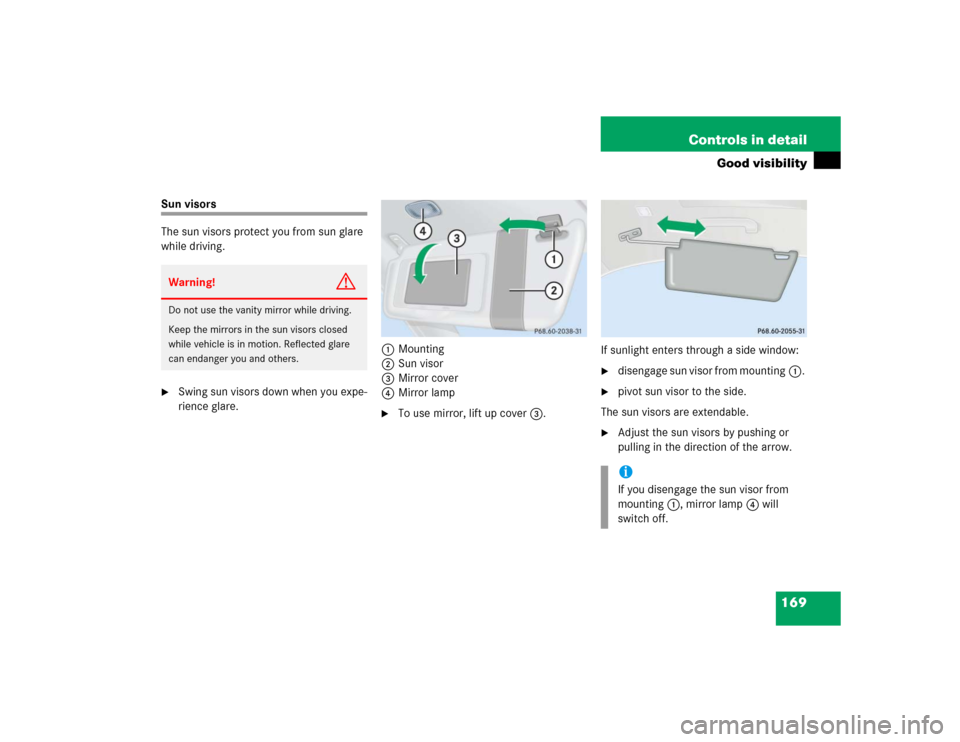
Sun visors
The sun visors protect you from sun glare
while driving.�
Swing sun visors down when you expe-
rience glare.1Mounting
2Sun visor
3Mirror cover
4Mirror lamp
�
To use mirror, lift up cover3.If sunlight enters through a side window:
�
disengage sun visor from mounting1.
�
pivot sun visor to the side.
The sun visors are extendable.
�
Adjust the sun visors by pushing or
pulling in the direction of the arrow.
Warning!
G
Do not use the vanity mirror while driving.
Keep the mirrors in the sun visors closed
while vehicle is in motion. Reflected glare
can endanger you and others.
iIf you disengage the sun visor from
mounting1, mirror lamp4 will
switch off.
Page 170 of 440

170 Controls in detailGood visibilityRear window sunshade*
The switch is located in the center console.�
Turn the SmartKey to starter switch po-
sition 1 or 2. Vehicles with
KEYLESS-GO*: press the start/stop
button once or twice.
�
Press the switch briefly at 1 to raise
the sunshade.
�
Press the switch briefly at 2 to lower
the sunshade.
Always raise the sunshade fully for its sup-
port against the window frame.
Warning!
G
When operating the rear window sunshade,
make sure there is no danger of anyone be-
ing harmed by the raising or lowering proce-
dure.
The raising or lowering procedure can be im-
mediately halted by briefly pressing the up-
per or lower half of the switch.
Briefly press upper or lower half of the
switch again to raise or lower the rear win-
dow sunshade completely.
Warning!
G
When leaving the vehicle, always remove the
SmartKey from the starter switch, take the
SmartKey with KEYLESS-GO* with you and
lock your vehicle. Do not leave children un-
attended in the vehicle, or with access to an
unlocked vehicle. Unsupervised use of vehi-
cle equipment may cause an accident and⁄or
serious personal injury.
Page 171 of 440

171 Controls in detail
Good visibility
Rear window defroster
The rear window defroster uses a large
amount of power. To keep battery drain to
a minimum, switch off the defroster as
soon as the rear window is clear. The de-
froster is automatically deactivated after
approximately 6 to 17 minutes of opera-
tion depending on the outside tempera-
ture.Activating
�
Press buttonF (
�page 173).
The indicator lamp on the button
comes on.
Deactivating
�
Press buttonF (
�page 173) again.
The indicator lamp on the button goes
out.
Warning!
G
Any accumulation of snow and ice should be
removed from the rear window before driv-
ing. Visibility could otherwise be impaired,
endangering you and others.!If the rear window defroster switches
off too soon and the indicator lamp
starts flashing, this means that too
many electrical consumers are operat-
ing simultaneously and there is insuffi-
cient voltage in the battery. The system
responds automatically by deactivating
the rear window defroster.
As soon as the battery has sufficient
voltage, the rear window defroster
automatically switches on again.
Page 173 of 440

173 Controls in detail
Automatic climate control
Automatic climate control panel
Item
1
Left side air vent, adjustable
2
Left center air vent, adjustable
3
Thumbwheel for air volume control
for center air vents
4
Right center air vent, adjustable
5
Right side air vent, adjustable
6
Automatic climate control panel
7
Thumbwheel for air volume control
for right side center air vent
8
Thumbwheel for lowering tempera-
ture, center and side air vents
9
Thumbwheel for air volume control
for left side center air ventiFor draft-free ventilation, move the slid-
ers for the center air vents1, 2, 4,
5 to the middle position.
Item
1
Temperature control, left, lowering
2
Temperature control, left, raising
3
Left-side air distribution
(automatic or manual operation)
4
Activated charcoal filter
5
Display
6
Right-side air distribution
(automatic or manual operation)
7
Temperature control, right, raising
8
Temperature control, right,
lowering
9
Rear window defroster
a
AC cooling on/off °Residual heat/ventilation
b
Air volume control
c
Automatic climate control on/off
(complete system)
d
Air recirculation
e
Defrosting

A minimum height clearance of 5.71 ft
(1.74 m) is required to open the tru")