Page 350 of 440
350 Practical hintsReplacing bulbs
�Replacing bulbsSafe vehicle operation depends on proper
exterior lighting and signaling. It is there-
fore essential that all bulbs and lamp as-
semblies are in good working order at all
times.
Correct headlamp adjustment is extremely
important. Have headlamps checked and
readjusted at regular intervals and when a
bulb has been replaced. See your autho-
rized Mercedes-Benz Center for headlamp
adjustment.
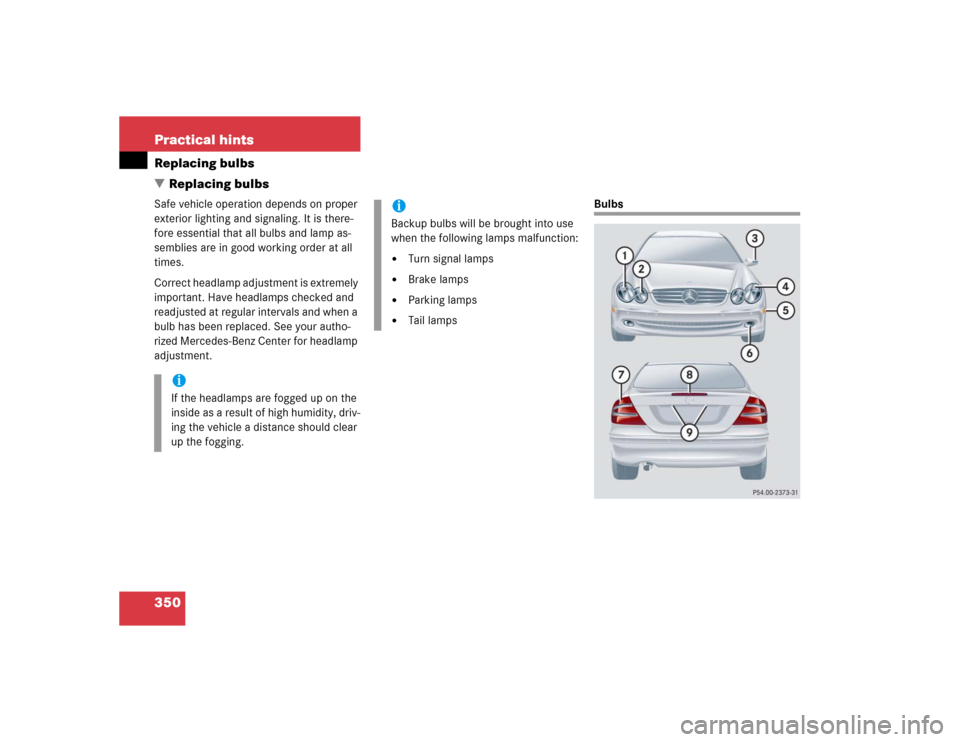
Bulbs
iIf the headlamps are fogged up on the
inside as a result of high humidity, driv-
ing the vehicle a distance should clear
up the fogging.
iBackup bulbs will be brought into use
when the following lamps malfunction:�
Turn signal lamps
�
Brake lamps
�
Parking lamps
�
Tail lamps
Page 352 of 440
352 Practical hintsReplacing bulbs�
Only use 12 volt bulbs of the same type
and with the specified watt rating.
�
Switch lights off before changing a bulb
to prevent short circuits.
�
Always use a clean lint-free cloth when
handling bulbs.
�
Your hands should be dry and free of oil
and grease.
�
If the newly installed bulb does not
come on, visit an authorized
Mercedes-Benz Center.
�
Have the LEDs and bulbs for the follow-
ing lamps replaced by an authorized
Mercedes-Benz Center.�
Additional turn signal lamps in the
exterior rear view mirrors
�
High mounted brake lamp
�
Bi-Xenon* lamps
�
Front fog lamps
Replacing bulbs for front lamps
Front lamps halogen-type
1Housing cover for low beam lamp
2Housing cover for high beam lamp3Bulb socket for turn signal lamp
4Low beam bulb
5High beam bulb
6Parking and standing lamp
Page 356 of 440
356 Practical hintsReplacing bulbsReplacing bulbs for rear lamps
Tail lamp assemblies
1Brake lamp
2Turn signal lamp
3Backup lamp
4Standing and side marker lamp
5Rear fog lamp (driver’s side)/tail�
Switch off the lights.
�
Open trunk.
�
Swing the trim panel covering the cor-
responding rear lights to the side.
�
Squeeze tabs together and remove the
bulb holder with the bulb.
�
Twist bulb counterclockwise and pull
out of bulb holder.
�
Insert new bulb into the holder and turn
it clockwise.
�
Reinstall bulb holder. The tabs must au-
dibly click.
�
Close trim panel.
�
Place the housing cover back on so
that its tabs click in place. License plate lamp
1Screws
�
Switch off the lights.
�
Loosen both screws1 and remove
lamp.
�
Replace the tubular lamp and reinstall
lamp.
�
Retighten the screws.
Page 361 of 440
�
Clean contact surfaces")
361 Practical hints
Flat tire
Mounting the new wheel
1Wheel bolt for light alloy rims
2Wheel bolt for Minispare wheel or other
steel rims (located in trunk with spare
wheel)�
Clean contact surfaces of wheel and
wheel hub.
�
Guide the spare wheel onto the align-
ment bolt and push it on.
�
Insert wheel bolts and tighten them
slightly.
!Wheel bolts2 must be used when
mounting the Minispare wheel. The use
of any wheel bolts other than wheel
bolts2 for the Minispare will physical-
ly damage the vehicle's brakes.
!To avoid paint damage, place wheel flat
against hub and hold it there while in-
stalling first wheel bolt.Warning!
G
Always replace wheel bolts that are dam-
aged or rusted.
Never apply oil or grease to wheel bolts.
Damaged wheel hub threads should be re-
paired immediately. Do not continue to drive
under these circumstances! Contact an au-
thorized Mercedes-Benz Center or call
Roadside Assistance.
Incorrect wheel bolts or improperly tight-
ened wheel bolts can cause the wheel to
come off. This could cause an accident.
Make sure to use the correct wheel bolts.
��
Page 367 of 440

367 Practical hints
Jump starting
The battery is located on the right side of
the engine compartment. For jump start-
ing use the terminals in front of the bat-
tery.�
Make sure the two vehicles do not
touch.
�
Turn off all electrical consumers.
�
Apply parking brake.
�
Shift gear selector lever to positionP.
�
Open the hood.1Positive terminal of charged battery
2Positive under hood terminal in front of
discharged battery
3Negative under hood terminal in front
of discharged battery
4Negative terminal of charged battery
�
Connect the positive terminal1 of the
charged battery with the positive under
hood terminal 2 in front of the dis-
charged battery with the jumper cable.
Clamp cable to charged battery1
first.
�
Start engine of the vehicle with the
charged battery and run at idle speed.
�
Connect the negative terminal4 of
the charged battery with the negative
under hood terminal 3 in front of the
discharged battery with the jumper ca-
ble. Clamp cable to charged battery4
first.
�
Start the engine of the disabled vehi-
cle.
You can now turn on the electrical con-
sumers. Do not turn on the lights under
any circumstances.
�
Remove the jumper cables first from
the negative terminals3 and4 and
then from the positive terminals1
and2.
You can now turn on the lights.
�
Have the battery checked at the near-
est authorized Mercedes-Benz Center.
Warning!
G
Keep flames or sparks away from battery.
Do not smoke.
Observe all safety instructions and precau-
tions when handling automotive batteries
(�page 288).
!Never invert the terminal connections.
!Do not tow-start the vehicle.
Page 397 of 440

Prevents the wheels from locking up
during braking so that the vehicle can
continue to be steered.
Alignment bolt
Metal pin with thread. The center")
397 Technical terms
ABS
(A
ntilock B
rake S
ystem)
Prevents the wheels from locking up
during braking so that the vehicle can
continue to be steered.
Alignment bolt
Metal pin with thread. The centering
pin is an aid used when changing a tire
to align the wheel with the wheel hub.BabySmart
TM1
airbag deactivation
system
This system detects if a special system
compatible child restraint seat is in-
stalled on the front passenger seat. The
system will automatically deactivate
the passenger front airbag when such a
seat is properly installed (indicator
lamp PASS. AIRBAG OFF in the center
console comes on). See your autho-
rized Mercedes-Benz Center for avail-
ability.
BabySmart
TM compatible child seats
Special restraint system for children.
The sensor system for the passenger
seat prevents deployment of the pas-
senger front airbag if a BabySmart
TM
compatible child seat is installed.BAS
(B
rake A
ssist S
ystem)
System for potentially reducing braking
distances in emergency braking situa-
tions. The system is activated when it
senses an emergency based on how
fast the brake is applied.
Bi-Xenon headlamps*
Headlamps which use an electric arc as
the light source and produce a more in-
tense light than filament headlamps.
Bi-Xenon headlamps produce low
beam and high beam.
1BabySmart
TM is a trademark of Siemens
Automotive Corp.
Page 415 of 440

Replacing bulbs 354
High beam flasher 48, 123
Replacing bulbs (Bi-Xenon*) 351
Replacing bulbs (Halogen) 351
High beam headlamps
Messages in")
415 Index
High beam bulb for high beam flasher
(Bi-Xenon*)
Replacing bulbs 354
High beam flasher 48, 123
Replacing bulbs (Bi-Xenon*) 351
Replacing bulbs (Halogen) 351
High beam headlamps
Messages in display 330
Replacing bulbs (Bi-Xenon*) 351
Replacing bulbs (Halogen) 351, 353
Switching on 123
High mounted brake lamp 351
Hood 281
Closing 282
Message in display 328
Opening 281
Hydroplaning 271I
Identification labels 378
Ignition 31, 33
Switching on 44
Immobilizer 81
Activating 81
Deactivating 81
Indicator lamps see
Lamps, indicator and warning
Infant and child restraint systems 68
Installing 72
LATCH child seat anchors 73
Information
About service and warranty 10
Button for Tele Aid 256
Installing
Floormates* 249
Infant and child restraint systems 72
Towing eye bolt 370
Towing eye bolt (CLK 55 AMG) 371
Wiper blades 357Instrument cluster 22, 126, 399
Cleaning 303
Coolant temperature indicator 127
Illumination 126
Lamps in 306–312
Multifunction display 129
Outside temperature indicator 128
Selecting language 143
Instruments and controls see Cockpit
Interior lighting 124
Activating automatic control 124
Deactivating automatic control 125
Delayed switch-off 148
Manual operation 125
Interior rear view mirror
Adjusting 38
Antiglare 167
Interior storage spaces 244
Armrest 246
Glove box 244
Parcel net 247
Storage bags 247
Page 416 of 440

416 IndexJ
Jack 337, 339
Jump starting 366K
Key, mechanical 343
Key, SmartKey with KEYLESS-GO*
Changing the batteries 346
Key-dependency memory
Settings 151
KEYLESS-GO* 399
Activating ignition with 33
Closing side windows with 94
Closing sliding/pop-up roof*
with 94, 213, 217
Closing windows with 213, 217
Factory setting 92
Global locking 92
Global unlocking 92
Important notes 90
Locking the vehicle 93
Messages in display 328
Remote controls 89
Starting the engine 44
Turning off the engine 54
Unlocking with 32
Unlocking, trunk lid 94
Kickdown 163, 399
Kilometers/miles in speedometer 142
Km/h or mph in speedometer 142L
Labels, identification 378
Lamp bulbs, exterior 350
Lamp sensor
Messages in display 330
Lamps, exterior
Front 351
Light sensor 330
Messages in display 329–332
Rear 351
Lamps, indicator and warning
ABS 306
Battery (SmartKey) 87, 92
Brakes 307
Center console 313
CHECK ENGINE 308
Coolant 309, 322
Distance warning 310
Distronic* 223, 229
Engine diagnostics 308
ESP 310, 311