Page 303 of 440

303 Operation
Vehicle care
Light alloy wheels
Mercedes-Benz approved Wheel Care
should be used for regular cleaning of the
light alloy wheels.
If possible, clean wheels once a week with
Mercedes-Benz approved Wheel Care, us-
ing a soft bristle brush and a strong spray
of water.
Follow instructions on container.
Instrument cluster
Use a gentle dishwashing detergent or
mild detergent for delicate fabrics as a
washing solution. Wipe with a cloth moist-
ened in lukewarm solution. Do not use
scouring agents.Steering wheel and gear selector lever
Wipe with a damp cloth and dry thoroughly
or clean with Mercedes-Benz approved
Leather Care.
Cup holder
Use a gentle dishwashing detergent or
mild detergent for delicate fabrics as a
washing solution. Wipe with a cloth moist-
ened in lukewarm solution. Do not use
scouring agents.
Hard plastic trim items
Pour Mercedes-Benz approved Interior
Care onto soft lint-free cloth and apply
with light pressure.
Headliner and rear window shelf
Clean with soft bristle brush, or use a
dry-shampoo cleaner in case of excessive
dirt.Seat belts
The webbing must not be treated with
chemical cleaning agents. Only use clear,
lukewarm water and soap. Do not dry the
webbing at temperatures above 176°F
(80°C) or in direct sunlight.
iOnly use acid-free cleaning materials.
Acid may cause corrosion or damage
the clear coat.
Warning!
G
Do not bleach or dye seat belts as this may
severely weaken them. In a crash they may
not be able to provide adequate protection.
Page 342 of 440
342 Practical hintsWhere will I find...?Minispare wheel bolts
1Wheel bolt for light alloy rims
2Wheel bolt for Minispare wheel or other
steel rims (located in trunk with spare
wheel)
!Wheel bolts2 must be used when
mounting the Minispare wheel. The use
of any wheel bolts other than wheel
bolts 2 for the Minispare will physical-
ly damage the vehicle's brakes.Warning!
G
Be sure to use the original length wheel
bolts when remounting the original wheel af-
ter it has been repaired.
Page 354 of 440
354 Practical hintsReplacing bulbsFront lamps Bi-Xenon*-type
1Bulb socket for turn signal lamp
2Housing cover for high beam flasher
lamp
3Housing cover for Bi-Xenon* lamp4High beam flasher bulb
5Parking and standing lampHigh beam bulb for high beam flasher
�
Switch off the lights.
�
Open the hood (
�page 281).
�
Turn housing cover2 counterclock-
wise and remove.
�
Turn bulb holder 4 with the bulb coun-
terclockwise and remove.
�
Press the bulb backwards and turn
counterclockwise out of the bulb hold-
er.
�
Press the new bulb into the holder and
twist it clockwise.
�
Place the bulb holder back into the
lamp and turn it clockwise.
�
Place the housing cover 2 back on
and turn them clockwise.
Warning!
G
Do not remove the cover
3
for the Bi-Xe-
non* headlamp. Because of high voltage in
xenon lamps, it is dangerous to replace the
bulb or repair the lamp and its components.
We recommend that you have such work
done by a qualified technician.
Page 361 of 440
�
Clean contact surfaces")
361 Practical hints
Flat tire
Mounting the new wheel
1Wheel bolt for light alloy rims
2Wheel bolt for Minispare wheel or other
steel rims (located in trunk with spare
wheel)�
Clean contact surfaces of wheel and
wheel hub.
�
Guide the spare wheel onto the align-
ment bolt and push it on.
�
Insert wheel bolts and tighten them
slightly.
!Wheel bolts2 must be used when
mounting the Minispare wheel. The use
of any wheel bolts other than wheel
bolts2 for the Minispare will physical-
ly damage the vehicle's brakes.
!To avoid paint damage, place wheel flat
against hub and hold it there while in-
stalling first wheel bolt.Warning!
G
Always replace wheel bolts that are dam-
aged or rusted.
Never apply oil or grease to wheel bolts.
Damaged wheel hub threads should be re-
paired immediately. Do not continue to drive
under these circumstances! Contact an au-
thorized Mercedes-Benz Center or call
Roadside Assistance.
Incorrect wheel bolts or improperly tight-
ened wheel bolts can cause the wheel to
come off. This could cause an accident.
Make sure to use the correct wheel bolts.
��
Page 362 of 440
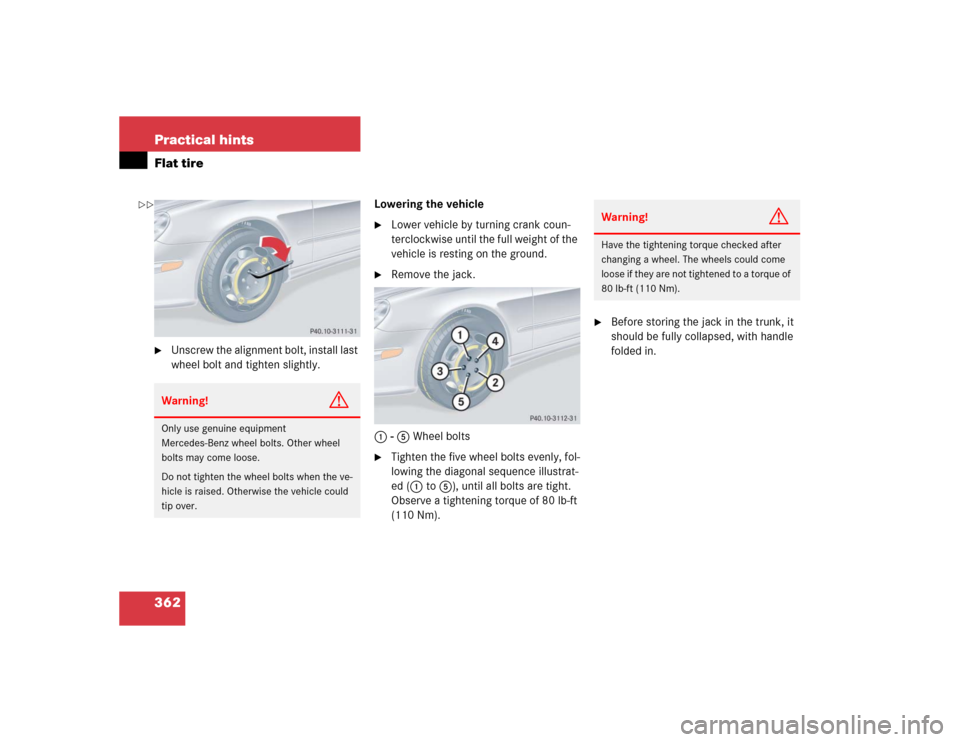
362 Practical hintsFlat tire�
Unscrew the alignment bolt, install last
wheel bolt and tighten slightly.Lowering the vehicle
�
Lower vehicle by turning crank coun-
terclockwise until the full weight of the
vehicle is resting on the ground.
�
Remove the jack.
1 - 5 Wheel bolts
�
Tighten the five wheel bolts evenly, fol-
lowing the diagonal sequence illustrat-
ed (1 to 5), until all bolts are tight.
Observe a tightening torque of 80 lb-ft
(110 Nm).
�
Before storing the jack in the trunk, it
should be fully collapsed, with handle
folded in.
Warning!
G
Only use genuine equipment
Mercedes-Benz wheel bolts. Other wheel
bolts may come loose.
Do not tighten the wheel bolts when the ve-
hicle is raised. Otherwise the vehicle could
tip over.
Warning!
G
Have the tightening torque checked after
changing a wheel. The wheels could come
loose if they are not tightened to a torque of
80 lb-ft (110 Nm).
��
Page 367 of 440

367 Practical hints
Jump starting
The battery is located on the right side of
the engine compartment. For jump start-
ing use the terminals in front of the bat-
tery.�
Make sure the two vehicles do not
touch.
�
Turn off all electrical consumers.
�
Apply parking brake.
�
Shift gear selector lever to positionP.
�
Open the hood.1Positive terminal of charged battery
2Positive under hood terminal in front of
discharged battery
3Negative under hood terminal in front
of discharged battery
4Negative terminal of charged battery
�
Connect the positive terminal1 of the
charged battery with the positive under
hood terminal 2 in front of the dis-
charged battery with the jumper cable.
Clamp cable to charged battery1
first.
�
Start engine of the vehicle with the
charged battery and run at idle speed.
�
Connect the negative terminal4 of
the charged battery with the negative
under hood terminal 3 in front of the
discharged battery with the jumper ca-
ble. Clamp cable to charged battery4
first.
�
Start the engine of the disabled vehi-
cle.
You can now turn on the electrical con-
sumers. Do not turn on the lights under
any circumstances.
�
Remove the jumper cables first from
the negative terminals3 and4 and
then from the positive terminals1
and2.
You can now turn on the lights.
�
Have the battery checked at the near-
est authorized Mercedes-Benz Center.
Warning!
G
Keep flames or sparks away from battery.
Do not smoke.
Observe all safety instructions and precau-
tions when handling automotive batteries
(�page 288).
!Never invert the terminal connections.
!Do not tow-start the vehicle.
Page 409 of 440

409 Index
Convenience submenu 149
Activating
easy-entry/exit feature 150
Setting key-dependency 151
Setting parking position
for exterior rear view mirror 151
Coolant 286, 392
Adding 287
Anticorrosion/antifreeze
quantity 392
Capacities 388
Checking level 286
Messages in display 322
Temperature 277
Temperature indicator 127
Warning lamp 309, 323
Coolant level
Checking 286Cruise control 218, 398
Canceling 219
Driving downhill 219
Driving uphill 219
Fine adjustment 220
Lever 225
Messages in display 317
Setting current speed 219
Setting to last stored speed
("Resume" function) 220
Cruise control lever 218
Cup holder
Cleaning 303
Closing 245
In rear seat armrest 245
In the dashboard 245
Opening 245
Customer Assistance Center (CAC) 398D
Daytime running lamp mode 121
Setting 145, 146
Deactivating
Air conditioning (cooling) 181
Air recirculation mode 179
Alarm 82
Anti-theft alarm system 82
Automatic climate control 173
Central locking (control system) 149
Defrosting 177
Distance warning function* 230
Distronic* 225, 228
Engine with KEYLESS-GO* 54
Engine with the SmartKey 53
ESP 79
Exterior lamps 120
Hazard warning flasher 124
Headlamps 53
Immobilizer 81
Interior lighting
delayed switch-off 148
Manual shift programm
CLK 55 AMG 165
Rapid seat heating*
with seat ventilation* 115
Page 410 of 440

410 Index
Rapid seat heating*
without seat ventilation* 114
Rear window defroster 171
Residual heat 182
Seat heating*
with seat ventilation* 115
Seat heating*
without seat ventilation* 114
Seat ventilation* 113
Steering wheel gearshift control
(CLK 55 AMG) 165
Tow-away alarm 83, 84
Trunk lid opening limiter*
(control system) 149
Deceleration
With Distronic* 224
Deep water see Standing water
Defogging
Windshield 176
Defrosting 177
Delayed switch-off
Interior lighting 148
Dialing
A number (telephone) 155Difficulties
While driving see
Problems while driving
With starting 45
Digital speedometer 134
Direction of rotation (tires) 291
Discharged battery
Jump starting 366
Disconnecting
Vehicle battery 364
Display
Selecting 143, 144
Display elements
Audio system 184
Displays
Digital speedometer 134
Distronic* 223
Messages 284, 314
Selecting 143
Service indicator 296
Showing malfunctions 138Distance
Decreasing in Distronic* 229
Increasing in Distronic* 229
Setting in Distronic* 228
Warning function 229
Distance to empty (range)
Calling up 152
Distance warning function* 229
Activating 230
Deactivating 230
Distance warning lamp 229
Intermittent warning sound 229
Symbol in multifunction display 137
Distronic* 221, 398
Activated 225
Activating 226
Calling up settings 137, 224
Cleaning system sensor 301
Cruise control lever 225
Deactivated 225
Deactivating 228
Deceleration 224
Decreasing distance 229
Decreasing time interval 228
Displays in the speedometer dial 223
Distance warning function 229

!Wheel bolts2 m")