Page 211 of 440
211 Controls in detail
Power windows
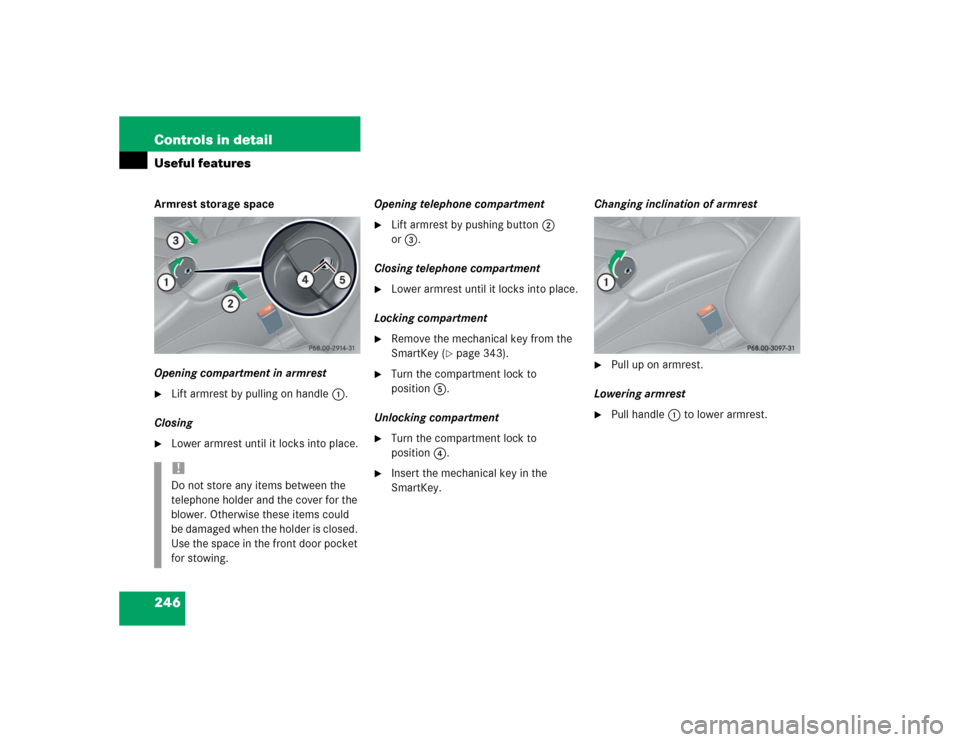
�
Turn SmartKey in the starter switch to
position1 or2 or press the
KEYLESS-GO* start/stop button.Opening the windows
�
Press switch1 to4 to the resistance
point.
The corresponding window will move
downwards until you release the
switch.
Closing the windows
�
Pull on switch1 to4 to the resis-
tance point.
The corresponding window will move
upwards until you release the switch.Fully opening the door windows
(Express-open)
�
Press switch1 or2 past the resis-
tance point and release.
The corresponding window opens com-
pletely.
Fully closing the door windows
(Express-close)
�
Pull switch1 or2 past the resis-
tance point and release.
The corresponding window closes com-
pletely.
iYou can also open or close the win-
dows using the:�
SmartKey (summer opening/con-
venience feature) (
�page 212)
�
button, in the control panel of
the automatic climate control
(�page 173).
�
buttone in the control panel of
the automatic climate control
(�page 173).
Warning!
G
If you pull and hold the switch up when clos-
ing the window, and upward movement of
the window is blocked by some obstruction
including but not limited to arms, hands, fin-
gers, etc., the automatic reversal will not op-
erate.
��
Page 212 of 440
212 Controls in detailPower windows
Stopping windows�
Press or pull respective switch again.Opening and closing the windows with
the SmartKey
The sliding/pop-up roof* (
�page 214) will
also be opened or closed when the power
windows are operated with the SmartKey.
�
Aim transmitter eye at the front door
handle.
!If the upward movement of a door win-
dow is blocked during the closing pro-
cedure, the door window will stop and
open slightly.
Remove the obstruction, pull the
switch again past the resistance point
and release.
If the door window still does not close
when there is no obstruction, then pull
the switch and hold it. The door window
will then close without the obstruction
sensor function.
Warning!
G
Driver's door only:
If within five seconds you again pull the
switch past the resistance point and re-
lease, the automatic reversal will not func-
tion.
Warning!
G
Never operate the windows or
sliding/pop-up roof* if there is the possibil-
ity of anyone being harmed by the opening
or closing procedure.
In the event that the procedure causes po-
tential danger, the procedure can be imme-
diately halted by releasing the button on the
SmartKey. To reverse direction of move-
ment press Œ for opening or ‹ for
closing.
��
Page 213 of 440
213 Controls in detail
Power windows
Opening (Summer opening feature)�
Press and hold button Πafter un-
locking the vehicle.
The windows and sliding/pop-up roof*
begin to open after approximately one
second.
�
Release the Πbutton to stop proce-
dure.
Closing (Convenience feature)
�
Press and hold button ‹ after lock-
ing the vehicle.
The windows and sliding/pop-up roof*
begin to close after approximately one
second.
�
Release the ‹ button to stop proce-
dure.
Make sure all side windows and the slid-
ing/pop-up roof* are properly closed be-
fore leaving the vehicle.Closing the side windows and
sliding/pop-up roof* with KEYLESS-GO
�
Press and hold lock button at door
(�page 55) until the side windows and
the sliding/pop-up* roof are closed.
Synchronizing power windows
The power windows must be resynchroni-
zed each time�
after the battery has been disconnect-
ed.
�
if the power windows cannot be fully
opened (Express-open) or closed (Ex-
press-close).
Synchronizing the power windows
�
Switch ignition on.
�
Pull the power window switches until
the side windows are closed.
Hold the switches for approximately
one second.
The power windows are adjusted.
Warning!
G
When closing the windows and the
sliding/pop-up roof* make sure there is no
danger of anyone being harmed by the clos-
ing procedure.
The windows will not automatically reopen if
blocked during convenience closing.
If potential danger exists, proceed as fol-
lows:�
Release the lock button.
�
Pull on the door handle and hold firmly.
The side windows and the
sliding/pop-up roof* will open for about
two seconds if the door handle is held
but the door not opened.
Page 216 of 440
216 Controls in detailSliding/pop-up roof*Stopping the sliding / pop-up roof�
Move the switch in any direction.
If the movement of the sliding/pop-up
roof is blocked during the closing pro-
cedure, the roof will stop and reopen
slightly.
Opening and closing the sliding/pop-up
roof with the SmartKey
The power windows (
�page 212) will also
be opened or closed when you operate the
sliding/pop-up roof with the SmartKey.
�
Aim transmitter eye at the front door
handle.Opening (Summer opening feature)
�
Press and hold button Πafter un-
locking the vehicle.
The windows and the sliding/pop-up
roof begin to open after approximately
one second.
�
Release the Πbutton to stop proce-
dure.
Closing (Convenience feature)
�
Press and hold button ‹ after lock-
ing the vehicle.
The windows and the sliding/pop-up
roof begin to close after approximately
one second.
�
Release ‹ button to stop proce-
dure.
Make sure all side windows and the slid-
ing/pop-up roof are properly closed before
leaving the vehicle.
Warning!
G
Never operate the windows or
sliding/pop-up roof if there is the possibility
of anyone being harmed by the opening or
closing procedure.
In the event that the procedure causes po-
tential danger, the procedure can be imme-
diately halted by releasing the button on the
SmartKey. To reverse direction of move-
ment, press Œ for opening or ‹ for
closing.
Page 217 of 440
217 Controls in detail
Sliding/pop-up roof*
Closing the sliding/pop-up roof with
KEYLESS-GO* (Convenience feature)
The power windows (
�page 212) will also
be closed when the sliding/pop-up roof is
operated with the SmartKey.
�
Press and hold lock button at door
(�page 55) until the side windows and
the sliding/pop-up roof are closed.
Synchronizing the sliding / pop-up roof
The power sliding/pop-up roof must be re-
synchronized each time after:�
the battery has been disconnected
�
the sliding/pop-up roof has been
closed manually
�
the sliding/pop-up roof does not open
smoothly
�
a malfunction
Synchronizing
�
Switch on ignition.
�
Press and hold the switch in
direction1 until the sliding/pop-up
roof is fully raised at the rear.
Hold the switch for approximately one
second.
The sliding/pop-up roof is adjusted.
Warning!
G
When closing the windows and the
sliding/pop-up roof, make sure there is no
danger of anyone being harmed by the clos-
ing procedure.
The sliding/pop-up roof will not automati-
cally reopen if blocked during convenience
closing.
If potential danger exists, proceed as fol-
lows:�
Release the lock button.
�
Pull on the door handle and hold firmly.
The side windows and the
sliding/pop-up roof will open for as long
as the door handle is held but the door
not opened.
Page 242 of 440
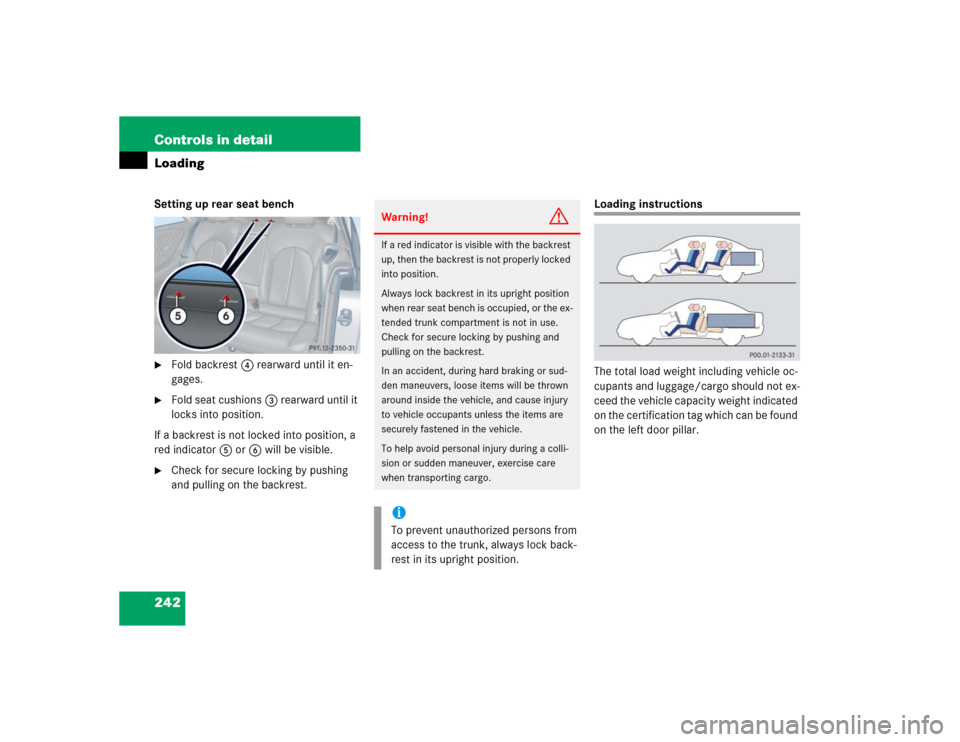
242 Controls in detailLoadingSetting up rear seat bench�
Fold backrest4 rearward until it en-
gages.
�
Fold seat cushions3 rearward until it
locks into position.
If a backrest is not locked into position, a
red indicator5 or6 will be visible.
�
Check for secure locking by pushing
and pulling on the backrest.
Loading instructions
The total load weight including vehicle oc-
cupants and luggage/cargo should not ex-
ceed the vehicle capacity weight indicated
on the certification tag which can be found
on the left door pillar.
Warning!
G
If a red indicator is visible with the backrest
up, then the backrest is not properly locked
into position.
Always lock backrest in its upright position
when rear seat bench is occupied, or the ex-
tended trunk compartment is not in use.
Check for secure locking by pushing and
pulling on the backrest.
In an accident, during hard braking or sud-
den maneuvers, loose items will be thrown
around inside the vehicle, and cause injury
to vehicle occupants unless the items are
securely fastened in the vehicle.
To help avoid personal injury during a colli-
sion or sudden maneuver, exercise care
when transporting cargo.iTo prevent unauthorized persons from
access to the trunk, always lock back-
rest in its upright position.
Page 246 of 440
246 Controls in detailUseful featuresArmrest storage space
Opening compartment in armrest�
Lift armrest by pulling on handle1.
Closing
�
Lower armrest until it locks into place.Opening telephone compartment
�
Lift armrest by pushing button2
or3.
Closing telephone compartment
�
Lower armrest until it locks into place.
Locking compartment
�
Remove the mechanical key from the
SmartKey (
�page 343).
�
Turn the compartment lock to
position5.
Unlocking compartment
�
Turn the compartment lock to
position4.
�
Insert the mechanical key in the
SmartKey.Changing inclination of armrest
�
Pull up on armrest.
Lowering armrest
�
Pull handle1 to lower armrest.
!Do not store any items between the
telephone holder and the cover for the
blower. Otherwise these items could
be damaged when the holder is closed.
Use the space in the front door pocket
for stowing.
Page 251 of 440
251 Controls in detail
Useful features
Tele Aid The Tele Aid system
(Tele
matic A
larm I
dentification on D
e-
mand)
The Tele Aid system consists of three
types of response:
�
automatic and manual emergency
�
roadside assistance and
�
information
The Tele Aid system is operational provid-
ing that the vehicle’s battery is charged,
properly connected, not damaged and cel-
lular and GPS coverage is available.
The speaker volume of a Tele Aid call can
be adjusted when using the volume control
on the multifunction steering wheel. To
raise, press buttonæ and to lower,
press buttonç.
�
To activate, press the SOS button, the
Roadside Assistance button• or
the Information button¡, depend-
ing on the type of response required.Shortly after the completion of your
Tele Aid acquaintance call, you will receive
a user ID and password via first call mail.
By visiting www.mbusa.com and selecting
“Tele Aid” (USA only), you will have access
to account information, remote door un-
lock, Info Services profile and more.
!The initial activation of the Tele Aid sys-
tem may only be performed by com-
pleting the subscriber agreement and
placing an acquaintance call using the
SOS button. Failure to complete either
of these steps will result in a system
that is not activated. If the system is
not activated, the indicator lamp in the
SOS button stays on after turning
SmartKey in starter switch to
position2 or pressing KEYLESS-GO*
start/stop button twice to position2
(�page 33). The message
Tele Aid
not activated
will be shown in the
multifunction display for approximately
ten seconds.
If you have any questions regarding ac-
tivation, please call the Response Cen-
ter at 1-800-756-9018 (in the USA) or
1-888-923-8367 (in Canada).
iThe SOS button is located above the in-
terior rear view mirror.
The Roadside Assistance button•
and the Information button¡ are
located below the center armrest cov-
er.!The Tele Aid system utilizes the cellular
network for communication and the
GPS (Global Positioning System) satel-
lites for vehicle location. If either of
these signals is unavailable, the
Tele Aid system may not function and if
this occurs, assistance must be sum-
moned by other means.