Page 71 of 440

71 Safety and Security
Occupant safety
Self-test BabySmart
TM1
without special
child seat installed
After turning the SmartKey in the starter
switch to position1 or2 or pressing the
KEYLESS-GO* start/stop button once or
twice, the PASS. AIRBAG OFF indicator
lamp1 located in the center console
comes on for approximately six seconds
and then goes out.
If the indicator lamp should not come on or
is continuously lit, the system is not func-
tioning. You must see an authorized
Mercedes-Benz Center before seating any
child on the passenger seat.
More information can be found in the
“Practical hints” section (�page 313).
1BabySmart
TM is a trademark of Siemens
Automotive Corp.
Warning!
G
The BabySmart
TM airbag deactivation sys-
tem will ONLY work with a special child seat
designed to operate with it. It will not work
with child seats which are not BabySmart
TM
compatible.
Never place anything between seat cushion
and child seat (e.g. pillow), since it reduces
the effectiveness of the deactivation sys-
tem. The bottom of the child seat must
make full contact with the passenger seat
cushion. An incorrectly mounted child seat
could cause injuries to the child in case of an
accident, instead of protecting the child.
Follow the manufacturer’s instructions for
installation of special child seats.
Warning!
G
When using a BabySmart
TM compatible
child seat on the front passenger seat, the
passenger front airbag will not deploy only if
the PASS. AIRBAG OFF indicator lamp re-
mains illuminated.
Please be sure to check the indicator every
time you use the special system child seat.
Should the light go out while the restraint is
installed, please check installation. If the
light remains out, do not use the
BabySmart
TM restraint to transport children
on the front passenger seat until the system
has been repaired.
Page 106 of 440

106 Controls in detailLocking and unlockingLocking and unlocking from the inside
You can lock or unlock the doors and the
trunk from inside using the central locking
switch. This can be useful, for example, if
you want to lock the vehicle before starting
to drive.
The fuel filler flap will not be locked or un-
locked with the central locking switch.The switch is located in the center console.
Central locking switch1Locking
2Unlocking
Locking�
Press upper half1 of the central lock-
ing switch.
If both doors are closed, the vehicle
locks.Unlocking
�
Press lower half2 of the central lock-
ing switch.
The vehicle unlocks.
Warning!
G
When leaving the vehicle, always remove the
SmartKey from the starter switch, take the
SmartKey with KEYLESS-GO* with you and
lock the vehicle. Do not leave children unat-
tended in the vehicle, or with access to an
unlocked vehicle. Unsupervised use of vehi-
cle equipment may cause an accident
and/or serious personal injury.
iYou can open a locked door from the
inside. Open doors only when condi-
tions are safe to do so.
If the vehicle was previously centrally
locked with the SmartKey or the
SmartKey with KEYLESS-GO*, it will
not unlock using the central locking
switch.
If the vehicle was previously locked
with the central locking switch�
while in the global remote control
mode, the vehicle is completely un-
locked when a door is opened from
the inside.
�
while in the selective remote con-
trol mode, only the door opened
from inside is unlocked.
Page 109 of 440

109 Controls in detailSeats
Rear seats head restraints
Head restraint height
1Release button
Raising:�
Manually adjust the height of the head
restraint by pulling it upward.
If the head restraint is fully retracted,
push release button1 and pull the
head restraint out.Lowering:
�
To lower the head restraint, push re-
lease button1 and press down on the
head restraint.Folding head restraints back with re-
lease button
1Release button
�
Push release button1.
The head restraints will fold backward.
Warning!
G
For your protection, drive only with properly
positioned head restraints.
Adjust head restraint so that the center of
the head restraint supports the back of the
head at eye level. This will reduce the poten-
tial for injury to the head and neck in the
event of an accident or similar situation.
Do not drive the vehicle without the seat
head restraints. Head restraints are intend-
ed to help reduce injuries during an acci-
dent.
iYou can also fold the head restraints
back using the switch in the center
console.
Page 110 of 440
110 Controls in detailSeatsFolding head restraints back with
switch in the center console
1Head restraint release button�
Start the engine.
�
Press the symbol-side on the rocker
switch1 to release the head re-
straints.
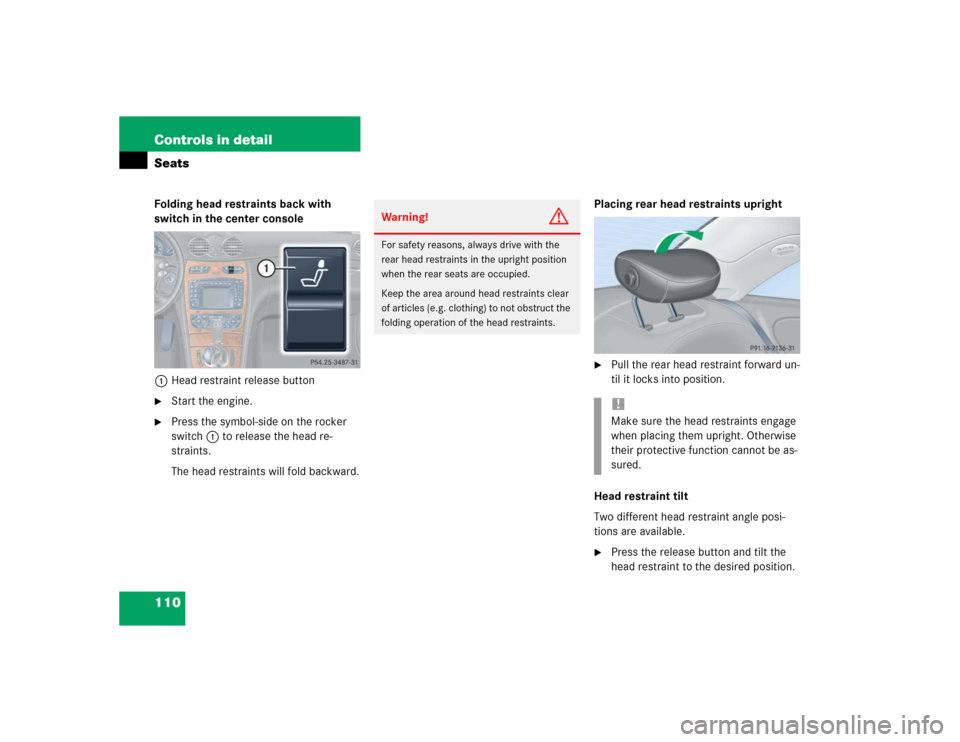
The head restraints will fold backward.Placing rear head restraints upright
�
Pull the rear head restraint forward un-
til it locks into position.
Head restraint tilt
Two different head restraint angle posi-
tions are available.
�
Press the release button and tilt the
head restraint to the desired position.
Warning!
G
For safety reasons, always drive with the
rear head restraints in the upright position
when the rear seats are occupied.
Keep the area around head restraints clear
of articles (e.g. clothing) to not obstruct the
folding operation of the head restraints.
!Make sure the head restraints engage
when placing them upright. Otherwise
their protective function cannot be as-
sured.
Page 113 of 440

113 Controls in detailSeats
Seat ventilation*
Both switches for the front seats are locat-
ed in the center console.
1Seat ventilation
The blue indicator lamps on the switch
show which ventilation level you have
selected:
�
Make sure the ignition is switched on.
All lamps in the instrument cluster
come on.
Switching on seat ventilation
�
Press lower switch position1.
Two blue indicator lamps on the switch
come on.
�
Continue pressing switch1 until the
desired seat ventilation level is
reached.
Switching off seat ventilation
�
Press lower switch position1 repeat-
edly until all blue indicator lamps go
out.
Level2
Two indicator lamps on
1
One indicator lamp on
off
No indicator lamp on
!If one or all of the lamps flash on the
seat ventilation switch, there is insuffi-
cient voltage due to too many electrical
consumers being switched on. The seat
ventilation switches off automatically.
The seat ventilation will switch back on
again automatically as soon as suffi-
cient voltage is available.
Page 114 of 440

114 Controls in detailSeatsSeat heating*
Vehicles without seat ventilation*
Both switches for the front seats are locat-
ed in the center console.
1Normal heating
2Rapid heating�
Make sure the ignition is switched on.
All the lamps in the instrument cluster
come on.Switching on seat heating
�
Press upper switch position1.
A red indicator lamp on the switch
comes on.
Switching off seat heating
�
Press upper switch position1 again.
Switching on rapid seat heating
�
Press lower switch position2.
Both red indicator lamps on the switch
come on.Switching off rapid seat heating
�
Press lower switch position2.
iThe seat heating will be automatically
switched off after approximately
20 minutes. iThe system switches over to normal
heating mode after approximately ten
minutes. Only one indicator lamp re-
mains lit.
!If one or both of the lamps on the seat
heater switch are flashing, there is in-
sufficient voltage available since too
many electrical consumers are turned
on. The seat heater switches off auto-
matically.
The seat heater will switch back on
again automatically as soon as suffi-
cient voltage is available.
Page 115 of 440

115 Controls in detailSeats
Vehicles with seat ventilation*
Both switches for the front seats are locat-
ed in the center console.
1Seat heating
The red indicator lamps on the switch
show the heating level you have selected:
�
Make sure the ignition is switched on.
All the lamps in the instrument cluster
come on.
Switching on seat heating
�
Press upper switch position1 twice.
A red indicator lamp on the switch
comes on.
Switching off seat heating
�
Press upper switch position1 again.
Switching on rapid seat heating
�
Press upper switch position1 once.
Both red indicator lamps on the switch
come on. Switching off rapid seat heating mode
�
Press switch position1 twice.
Level2
Two indicator lamps on
1
One indicator lamp on
off
No indicator lamp on
iThe seat heating will be automatically
switched off after approximately
20 minutes.
iThe system switches over to normal
heating mode after approximately ten
minutes. Only one indicator lamp re-
mains lit. !If one or both of the lamps on the seat
heating switch are flashing, there is in-
sufficient voltage due to too many elec-
trical consumers are turned on. The
seat heating switches off
automatically.
The seat heating will switch back on
again automatically as soon as suffi-
cient voltage is available.
Page 163 of 440

163 Controls in detail
Automatic transmission
Program mode selector switch
The program mode selector switch is
located on the lower part of the center
console.
1Program mode selector switch
S Sport For standard driving
C Comfort For comfort driving
�
Press the program mode selector
switch 1 repeatedly until the letter of
the desired shift program appears in
the multifunction display (
�page 129).
SelectCfor comfort driving:
�
The vehicle starts out in second
gear (both forward and reverse) for
gentler starts. This does not apply if
full throttle is applied or gear
range1 is selected.
�
Traction and driving stability are
improved on icy roads.
�
Upshifts occur earlier even when
you give more gas. The engine then
operates at lower rpms and the
wheels are less likely to spin.
�
The power transmission ratio for
gear selector lever positionR
changes depending on the program
mode selected (SorC).
Accelerator position
Your driving style influences the
transmission’s shifting behavior:
Less throttle Earlier upshifting
More throttle Later upshifting
Kickdown
Use kickdown when you want maximum
acceleration.�
Press the accelerator past the point of
resistance.
The transmission shifts into a lower
gear.
�
Ease on the accelerator when you have
reached the desired speed.
The transmission shifts up again.
!Never change the program mode when
the gear selector lever is out of
positionP. This could result in a
change of driving characteristics for
which you may not be prepared.