Page 213 of 440
�
Press and hold button Πafter un-
locking the vehicle.
The windows and sliding/pop-up roof*
begin to open after approximately o")
213 Controls in detail
Power windows
Opening (Summer opening feature)�
Press and hold button Πafter un-
locking the vehicle.
The windows and sliding/pop-up roof*
begin to open after approximately one
second.
�
Release the Πbutton to stop proce-
dure.
Closing (Convenience feature)
�
Press and hold button ‹ after lock-
ing the vehicle.
The windows and sliding/pop-up roof*
begin to close after approximately one
second.
�
Release the ‹ button to stop proce-
dure.
Make sure all side windows and the slid-
ing/pop-up roof* are properly closed be-
fore leaving the vehicle.Closing the side windows and
sliding/pop-up roof* with KEYLESS-GO
�
Press and hold lock button at door
(�page 55) until the side windows and
the sliding/pop-up* roof are closed.
Synchronizing power windows
The power windows must be resynchroni-
zed each time�
after the battery has been disconnect-
ed.
�
if the power windows cannot be fully
opened (Express-open) or closed (Ex-
press-close).
Synchronizing the power windows
�
Switch ignition on.
�
Pull the power window switches until
the side windows are closed.
Hold the switches for approximately
one second.
The power windows are adjusted.
Warning!
G
When closing the windows and the
sliding/pop-up roof* make sure there is no
danger of anyone being harmed by the clos-
ing procedure.
The windows will not automatically reopen if
blocked during convenience closing.
If potential danger exists, proceed as fol-
lows:�
Release the lock button.
�
Pull on the door handle and hold firmly.
The side windows and the
sliding/pop-up roof* will open for about
two seconds if the door handle is held
but the door not opened.
Page 214 of 440

214 Controls in detailSliding/pop-up roof*
�Sliding/pop-up roof*Opening and closing the sliding/pop-up roof
The sliding/pop-up roof can be opened
and closed electrically. The switch for the
sliding/pop-up roof is on the overhead
control panel.
1Push up to raise roof at rear
2Pull down to lower roof at rear
3Push forward to slide roof closed
4Push back to slide roof openWith the roof closed or tilted open, a
screen can be slid into the roof opening to
guard against sun rays. When sliding the
roof open, the screen will also retract.
Warning!
G
When closing the sliding/pop-up roof, make
sure there is no danger of anyone being
harmed by the closing procedure.
The closing procedure of the sliding/pop-up
roof can be immediately halted by releasing
the switch or, if the switch was moved past
the resistance point and released, by mov-
ing the switch in any direction.
When leaving the vehicle, always remove the
SmartKey from starter switch, take the
SmartKey with KEYLESS-GO* with you, and
lock your vehicle. Do not leave children un-
attended in the vehicle, or with access to an
unlocked vehicle. Unsupervised use of vehi-
cle equipment can cause an accident
and/or serious personal injury.
Page 215 of 440

215 Controls in detail
Sliding/pop-up roof*
�
Turn SmartKey in the starter switch to
position1 or2 or press the
KEYLESS-GO* start/stop button.Opening and closing the
sliding/pop-up roof
�
To open, close, raise or lower the
sliding/pop-up roof, move the switch
to resistance point in the required
direction1 to4.
Release the switch when the roof has
reached the desired position.
Fully opening (Express-open) and clos-
ing (Express-close) the
sliding/pop-up roof
�
To open, close, raise or lower the
sliding/pop-up roof, move the switch
past the resistance point in the re-
quired direction1 to4 and release.
The sliding/pop-up roof opens or clos-
es completely.
!To avoid damaging the seals, do not
transport any objects with sharp edges
which can stick out of the
sliding/pop-up roof.
Do not open the sliding/pop-up roof if
there is snow or ice on the roof, as this
could result in malfunctions.
The sliding/pop-up roof can be opened
or closed manually should an electrical
malfunction occur (
�page 348).
iYou can also open or close the slid-
ing/pop-up roof using the:�
SmartKey (summer opening/con-
venience feature) (
�page 212)
�
button, in the control panel of
the automatic climate control
(�page 173)
�
buttone in the control panel of
the automatic climate control
(�page 173)
Page 216 of 440

216 Controls in detailSliding/pop-up roof*Stopping the sliding / pop-up roof�
Move the switch in any direction.
If the movement of the sliding/pop-up
roof is blocked during the closing pro-
cedure, the roof will stop and reopen
slightly.
Opening and closing the sliding/pop-up
roof with the SmartKey
The power windows (
�page 212) will also
be opened or closed when you operate the
sliding/pop-up roof with the SmartKey.
�
Aim transmitter eye at the front door
handle.Opening (Summer opening feature)
�
Press and hold button Πafter un-
locking the vehicle.
The windows and the sliding/pop-up
roof begin to open after approximately
one second.
�
Release the Πbutton to stop proce-
dure.
Closing (Convenience feature)
�
Press and hold button ‹ after lock-
ing the vehicle.
The windows and the sliding/pop-up
roof begin to close after approximately
one second.
�
Release ‹ button to stop proce-
dure.
Make sure all side windows and the slid-
ing/pop-up roof are properly closed before
leaving the vehicle.
Warning!
G
Never operate the windows or
sliding/pop-up roof if there is the possibility
of anyone being harmed by the opening or
closing procedure.
In the event that the procedure causes po-
tential danger, the procedure can be imme-
diately halted by releasing the button on the
SmartKey. To reverse direction of move-
ment, press Œ for opening or ‹ for
closing.
Page 217 of 440

The power windows (
�page 212) will also
be closed when the sliding/pop-up roof is")
217 Controls in detail
Sliding/pop-up roof*
Closing the sliding/pop-up roof with
KEYLESS-GO* (Convenience feature)
The power windows (
�page 212) will also
be closed when the sliding/pop-up roof is
operated with the SmartKey.
�
Press and hold lock button at door
(�page 55) until the side windows and
the sliding/pop-up roof are closed.
Synchronizing the sliding / pop-up roof
The power sliding/pop-up roof must be re-
synchronized each time after:�
the battery has been disconnected
�
the sliding/pop-up roof has been
closed manually
�
the sliding/pop-up roof does not open
smoothly
�
a malfunction
Synchronizing
�
Switch on ignition.
�
Press and hold the switch in
direction1 until the sliding/pop-up
roof is fully raised at the rear.
Hold the switch for approximately one
second.
The sliding/pop-up roof is adjusted.
Warning!
G
When closing the windows and the
sliding/pop-up roof, make sure there is no
danger of anyone being harmed by the clos-
ing procedure.
The sliding/pop-up roof will not automati-
cally reopen if blocked during convenience
closing.
If potential danger exists, proceed as fol-
lows:�
Release the lock button.
�
Pull on the door handle and hold firmly.
The side windows and the
sliding/pop-up roof will open for as long
as the door handle is held but the door
not opened.
Page 246 of 440
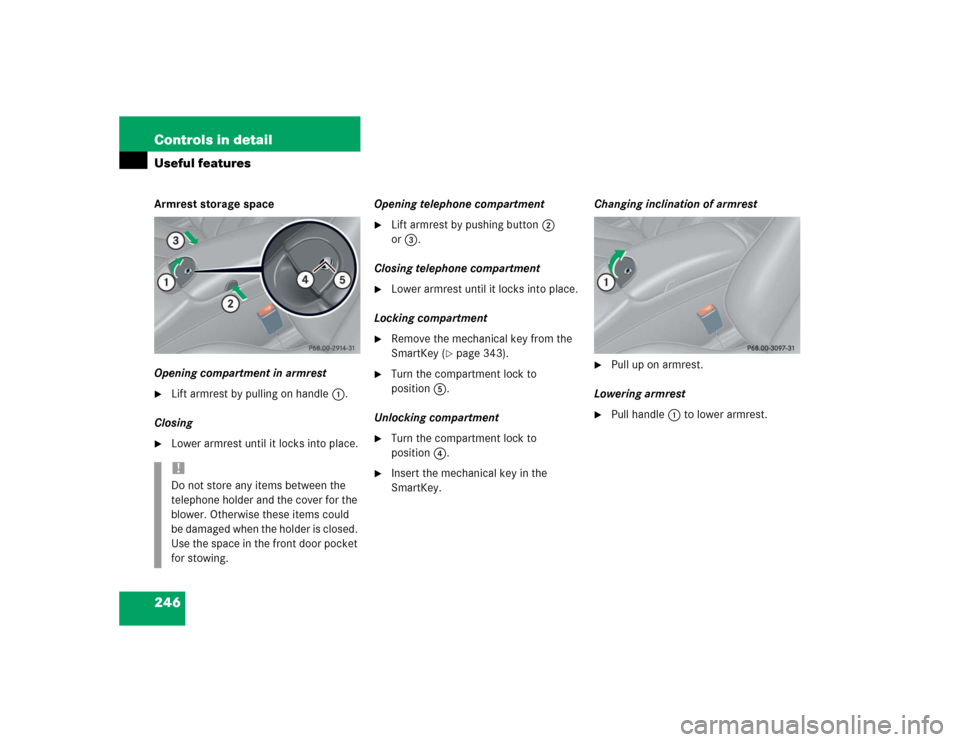
246 Controls in detailUseful featuresArmrest storage space
Opening compartment in armrest�
Lift armrest by pulling on handle1.
Closing
�
Lower armrest until it locks into place.Opening telephone compartment
�
Lift armrest by pushing button2
or3.
Closing telephone compartment
�
Lower armrest until it locks into place.
Locking compartment
�
Remove the mechanical key from the
SmartKey (
�page 343).
�
Turn the compartment lock to
position5.
Unlocking compartment
�
Turn the compartment lock to
position4.
�
Insert the mechanical key in the
SmartKey.Changing inclination of armrest
�
Pull up on armrest.
Lowering armrest
�
Pull handle1 to lower armrest.
!Do not store any items between the
telephone holder and the cover for the
blower. Otherwise these items could
be damaged when the holder is closed.
Use the space in the front door pocket
for stowing.
Page 248 of 440

248 Controls in detailUseful featuresRemoving ashtray insert�
Secure vehicle from movement by set-
ting the parking brake. Move the gear
selector lever to positionN.
Now you have more room to take out
the insert.
�
Push sliding button2 to the right.
The ashtray is disengaged and slides a
short way in direction of arrow3.
�
Remove insert from ashtray frame.
Reinstalling the ashtray insert
�
Install insert by pushing back into
frame until it engages again.Rear seat ashtray
Opening ashtray
�
Pull at top of cover to open ashtray.
Removing ashtray insert
�
Press latch1 to disengage ashtray in-
sert and remove it.
Reinstalling the ashtray insert
�
Install ashtray insert.
�
Close the ashtray.
Cigarette lighter
1Cover
2Cigarette lighter�
Turn SmartKey in the starter switch to
position1 or2.
�
Briefly touch cover plate1.
�
Push in cigarette lighter2.
The lighter will pop out automatically
when hot.
Warning!
G
Remove front ashtray only with vehicle
standing still. Set the parking brake to se-
cure vehicle from movement. Move gear se-
lector lever to positionN. With gear selector
lever in positionN, turn off the engine.
Page 249 of 440

249 Controls in detail
Useful features
Floormats*
Removing�
Pull floormats off of retainer pins2 in
direction of arrow1.
�
Remove the floormats.
Installing
�
Lay down the floormat.
�
Press the floormat eyelets4 onto re-
tainer pins5 in direction of arrow3.
Warning!
G
Never touch the heating element or sides of
the lighter; they are extremely hot. Hold the
knob only.
When leaving the vehicle, always remove the
SmartKey from the starter switch, take the
SmartKey with KEYLESS-GO* with you and
lock the vehicle. Do not leave children unat-
tended in the vehicle, or with access to an
unlocked vehicle. Unsupervised use of vehi-
cle equipment may cause an accident
and/or serious personal injury.iThe lighter socket can be used to ac-
commodate electrical accessories up
to a maximum 85 W.
Warning!
G
Whenever you are using floormats, make
sure there is enough clearance and that the
floormats are securely fastened.
Floormats should always be securely fas-
tened using eyelets
4
and retainer
pins
5
.
Before driving off, check that the floormats
are securely in place and adjust them if nec-
essary. A loose floormat could slip and
hinder proper functioning of the pedals.