Page 7 of 440

Contents
Maintenance...................................... 296
Clearing the service indicator ...... 296
Service term exceeded ................ 296
Calling up the service indicator .... 297
Resetting the service indicator..... 297
Vehicle care ....................................... 298
Cleaning and care of vehicle ........ 298
Practical hints.................................. 305
What to do if …? ................................. 306
Lamps in instrument cluster ......... 306
Lamp in center console................. 313
Messages in the display ................ 314
Where will I find...? ............................. 337
First aid kit.................................... 337
Vehicle tool kit .............................. 337
Minispare wheel............................ 340
Unlocking/locking in an emergency... 343
Unlocking the vehicle.................... 343
Locking the vehicle ....................... 344
Changing batteries in
the SmartKey/ SmartKey
with KEYLESS-GO* ....................... 345
Fuel filler flap ................................ 347
Manually unlocking
the gear selector lever .................. 347
Opening/closing in an emergency ..... 348
Sliding/pop-up roof* .................... 348Replacing bulbs .................................. 350
Bulbs............................................. 350
Replacing bulbs for front lamps .... 352
Side marker lamp bulb.................. 355
Replacing bulbs for rear lamps ..... 356
Replacing wiper blades ...................... 357
Removing wiper blades ................. 357
Installing wiper blades .................. 357
Flat tire............................................... 358
Preparing the vehicle .................... 358
Mounting the Minispare wheel...... 358
Battery ............................................... 363
Disconnecting the battery ............ 364
Removing the battery ................... 364
Charging and reinstalling battery .. 364
Reconnecting the battery ............. 365
Jump starting...................................... 366
Towing the vehicle.............................. 368
Towing the vehicle ........................ 368
Installing towing eye bolt .............. 370
Fuses.................................................. 372
Fuse box in
passenger compartment ............... 372
Fuse box in engine compartment . 373
Auxiliary fuse box in trunk ............ 374
Page 280 of 440
.
2Brake fluid (fuse box c")
280 OperationAt the gas stationCheck regularly and before a long trip
1Coolant level
More information on coolant can be
found in the “Operation” section on
(
�page 286).
2Brake fluid (fuse box cover removed)
Removing fuse box cover (
�page 373)
3Windshield washer and headlamp
cleaning system
More information on refilling the reser-
voir can be found in the “Operation”
section on (
�page 289).Engine oil level
More information on engine oil
(
�page 283).
Opening hood (
�page 281).
Vehicle lighting
Check function and cleanliness.For more
information on replacing light bulbs, see
“Replacing bulbs” (�page 350).
Exterior lamp switch (�page 47)
Tire inflation pressure
More information on tire inflate pressure
(
�page 292).
!If you find that the brake fluid in the
brake fluid reservoir has fallen to the
minimum mark or below, have the
brake system checked for brake pad
thickness and leaks immediately. Noti-
fy an authorized Mercedes-Benz Center
immediately. Do not add brake fluid as
this will not solve the problem. For
more information, see also “Practical
hints” (
�page 307).
Page 297 of 440
.
�
Press button k or j on the mul-
tifunction steering")
297 Operation
Maintenance
Calling up the service indicator�
Switch on ignition.
The standard display of the control sys-
tem appears (
�page 129).
�
Press button k or j on the mul-
tifunction steering wheel until FSS indi-
cator with the service symbol 9 or
´ and the service deadline appears
in the multifunction display.
Resetting the service indicator
In the event that the service on your vehi-
cle is not carried out by an authorized
Mercedes-Benz Center, you can reset the
service indicator yourself.�
Switch on ignition.
The standard display of the control sys-
tem appears (
�page 129).
�
Press button k or j on the mul-
tifunction steering wheel until the FSS
indicator with the service symbol 9
or ´ and the service deadline ap-
pears in the multifunction display.
�
Press reset button to the left in the in-
strument cluster for about three sec-
onds.
This message appears in the multifunc-
tion display:Service interval...
To reset:
Press reset button
for 3 seconds
�
To confirm, press reset button until you
hear a signal.
The service indicator now displays the
reset interval.
iIf the battery is disconnected, the days
of disconnection will not be included in
the count shown by the service indica-
tor. To arrive at the true service dead-
line, you will need to subtract these
days from the days shown in the ser-
vice indicator.
Do not confuse the service indicator
with the engine oil level indicator :.
iIf the service indicator was inadvertent-
ly reset, have a Mercedes-Benz Center
correct it.
Only reset if the proper service has
been performed. Resetting the system
without performing proper service as
called for by the FSS will cause the FSS
to incorrectly determine the next ser-
vice interval which will result in engine
damage not covered by the
Mercedes-Benz Limited Warranty.
Page 300 of 440

300 OperationVehicle careEngine cleaning
Prior to cleaning the engine compartment,
make sure to protect electrical compo-
nents and connectors from the intrusion of
water and cleaning agents.
Corrosion protection, such as MB Anticor-
rosion Wax, should be applied to the en-
gine compartment after every engine
cleaning. Before applying, all control link-
age bushings and joints should be lubricat-
ed. The poly-V-belt and all pulleys should
be protected from any wax. Vehicle washing
Do not use hot water or wash your vehicle
in direct sunlight. Only use a mild car wash
detergent, such as Mercedes-Benz ap-
proved Car Shampoo.
Thoroughly spray the vehicle with a dif-
fused jet of water. Direct only a very weak
spray towards the ventilation intake. Use
plenty of water and rinse the sponge and
chamois frequently.
Rinse with clear water and thoroughly dry
with a chamois. Do not allow cleaning
agents to dry on the finish.
Due to the width of the vehicle, fold in out-
side mirrors prior to running the vehicle
through an automatic car wash to prevent
damage to the mirrors.
In the winter, thoroughly remove all traces
of road salt as soon as possible.
When washing the underbody, do not for-
get to clean the inner sides of the wheels.Ornamental moldings
For regular cleaning and care of very dirty
chrome-plated parts, use a chrome clean-
er.
Headlamps, tail lamps, side markers,
turn signal lenses
Use a mild car wash detergent, such as
Mercedes-Benz approved Car Shampoo,
with plenty of water.
To prevent scratches, never apply strong
force and only use a soft, non-scratchy
cloth when cleaning the lenses. Do not at-
tempt to wipe dirty lenses with a dry cloth
or sponge.
iVehicles with KEYLESS-GO*:
If a door handle is hit by a strong jet of
water, and a SmartKey with
KEYLESS-GO* is in close proximity, i.e.
within approx. 3 ft (approx. 1 m), the
vehicle could be inadvertently locked
or unlocked.
Page 305 of 440
305 Practical hints
What to do if …?
Where will I find...?
Unlocking/locking in an emergency
Opening/closing in an emergency
Replacing bulbs
Replacing wiper blades
Flat tire
Battery
Jump starting
Towing the vehicle
Fuses
Page 349 of 440
349 Practical hints
Opening/closing in an emergency
�
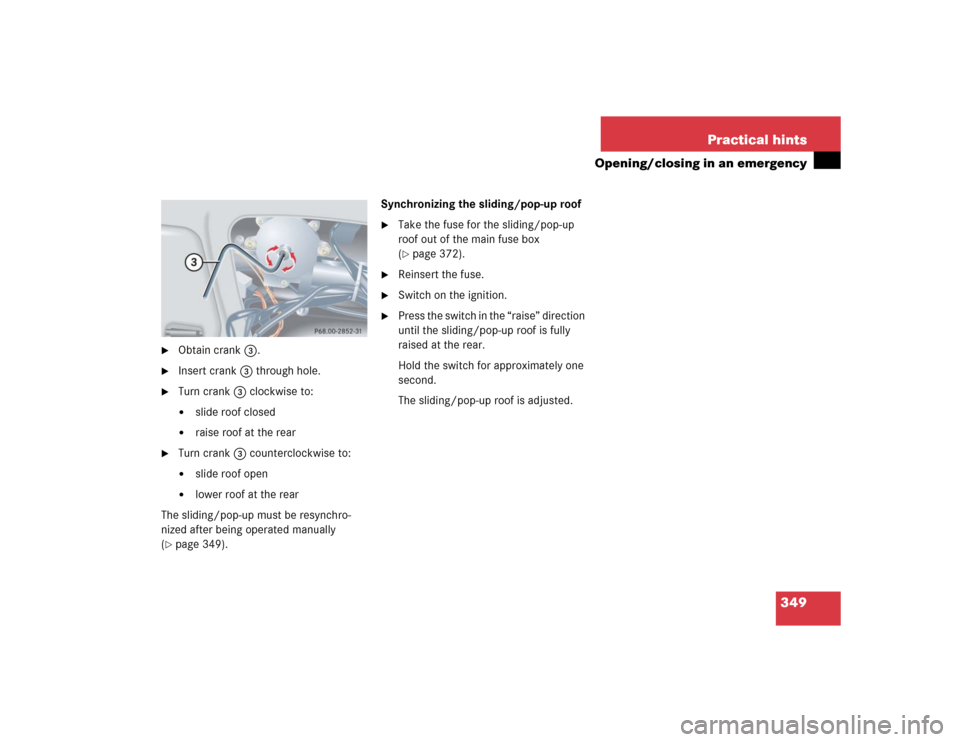
Obtain crank3.
�
Insert crank3 through hole.
�
Turn crank3 clockwise to:�
slide roof closed
�
raise roof at the rear
�
Turn crank3 counterclockwise to:�
slide roof open
�
lower roof at the rear
The sliding/pop-up must be resynchro-
nized after being operated manually
(
�page 349).Synchronizing the sliding/pop-up roof
�
Take the fuse for the sliding/pop-up
roof out of the main fuse box
(�page 372).
�
Reinsert the fuse.
�
Switch on the ignition.
�
Press the switch in the “raise” direction
until the sliding/pop-up roof is fully
raised at the rear.
Hold the switch for approximately one
second.
The sliding/pop-up roof is adjusted.
Page 372 of 440
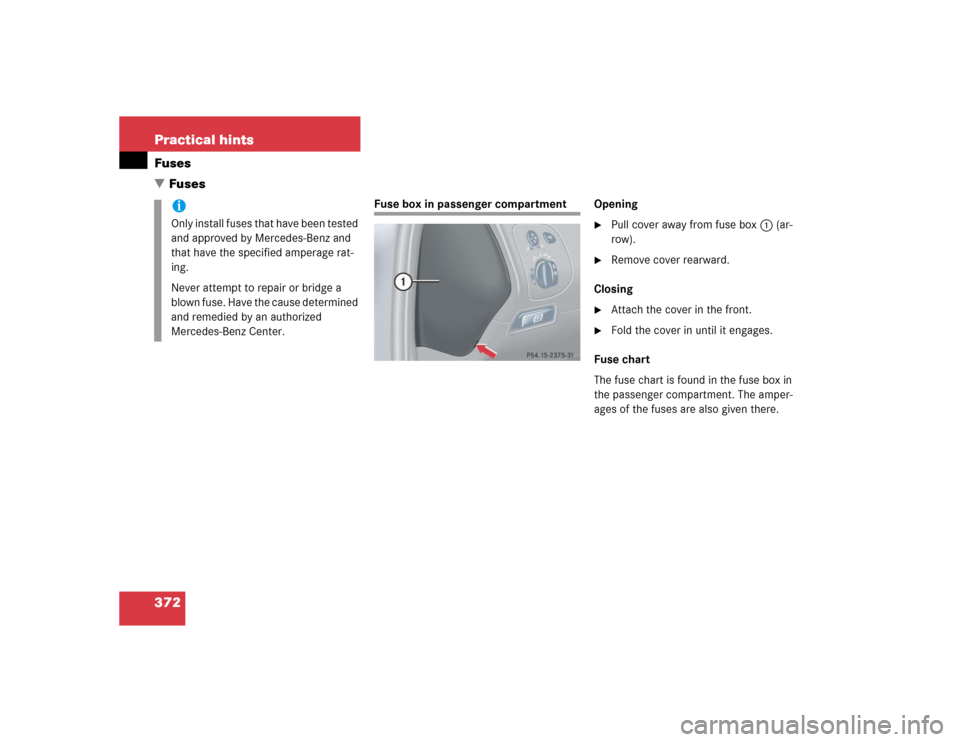
372 Practical hintsFuses
�Fuses
Fuse box in passenger compartment Opening
�
Pull cover away from fuse box1 (ar-
row).
�
Remove cover rearward.
Closing
�
Attach the cover in the front.
�
Fold the cover in until it engages.
Fuse chart
The fuse chart is found in the fuse box in
the passenger compartment. The amper-
ages of the fuses are also given there.
iOnly install fuses that have been tested
and approved by Mercedes-Benz and
that have the specified amperage rat-
ing.
Never attempt to repair or bridge a
blown fuse. Have the cause determined
and remedied by an authorized
Mercedes-Benz Center.
Page 373 of 440
373 Practical hintsFuses
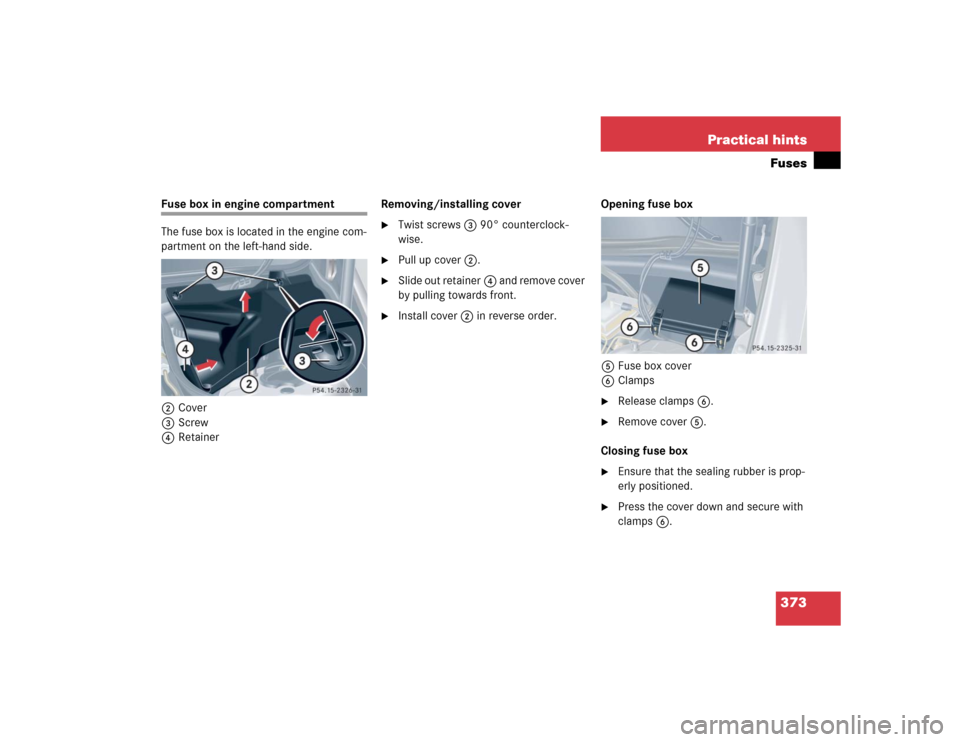
Fuse box in engine compartment
The fuse box is located in the engine com-
partment on the left-hand side.
2Cover
3Screw
4RetainerRemoving/installing cover
�
Twist screws3 90° counterclock-
wise.
�
Pull up cover2.
�
Slide out retainer4 and remove cover
by pulling towards front.
�
Install cover2 in reverse order.Opening fuse box
5Fuse box cover
6Clamps
�
Release clamps6.
�
Remove cover5.
Closing fuse box
�
Ensure that the sealing rubber is prop-
erly positioned.
�
Press the cover down and secure with
clamps6.