Page 9 of 418

ContentsTechnical data.................................. 359
Spare parts service ............................ 360
Warranty coverage ............................. 361
Loss of Service and Warranty
Information Booklet...................... 361
Identification labels............................ 362
Layout of poly-V-belt drive ................. 363
CL 500 ......................................... 363
CL 55 AMG ................................... 363
CL 600 ......................................... 363
Engine ................................................ 364
Rims and Tires ................................... 365
Same size tires ............................. 366
Mixed size tires ............................ 368
Spare wheel ................................. 369
Electrical system................................ 370
Main Dimensions and weights ........... 371
Main Dimensions.......................... 371
Weights ........................................ 371Fuels, coolants, lubricants, etc. ......... 372
Capacities .................................... 372
Engine oils.................................... 374
Engine oil additives ...................... 374
Air conditioning refrigerant .......... 374
Brake fluid .................................... 375
Premium unleaded gasoline ......... 375
Fuel requirements ........................ 375
Gasoline additives ........................ 376
Coolants....................................... 376
Windshield and headlamp washer
system ......................................... 379
Consumer information ....................... 380
Uniform tire quality grading ......... 380
Technical terms............................... 383Index................................................. 389
Page 220 of 418
219 Controls in detail
Loading
�Loading
Roof rack* Preparing roof rack installation
�
Open trim at the trim strips in the roof.
�
Secure the roof rack according to man-
ufacturer’s instructions for installation.
Loading instructions
The total load weight including vehicle oc-
cupants and luggage/cargo should not ex-
ceed the vehicle capacity weight as
indicated on the corresponding label locat-
ed on the driver’s door pillar.
Warning!
G
Use only roof racks approved by
Mercedes-Benz for your vehicle model to
avoid damage to the vehicle. Follow manu-
facturer’s installation instructions.
!Load the roof rack in such a way that
the vehicle cannot be damaged while
driving.
Make sure�
you can fully raise the sliding /
pop-up roof
�
you can fully open the trunk
Page 273 of 418

272OperationTires and wheelsTire pressure changes by approximately
1.5 psi (0.1 bar) per 18°F (10°C) of air
temperature change. Keep this in mind
when checking tire pressure where the
temperature is different from the outside
temperature.
Tire temperature and tire pressure also in-
crease while driving, depending on the
driving speed and the tire load.Check the spare tire periodically for condi-
tion and inflation pressure. Spare tires will
age and become worn over time even if
never used, and thus should be inspected
and replaced when necessary or after a
maximum of six years.
iThe pressures listed for light loads are
minimum values offering high driving
comfort.
Increased inflation pressures listed for
heavier loads may also be used for light
loads. These higher pressures produce
favorable handling characteristics. The
ride of the vehicle, however, will be
somewhat harder. Never exceed the
max. values or inflate tires below the
min. values listed on the fuel filler flap.
Warning!
G
Follow recommended tire inflation pres-
sures.
Do not overinflate tires. Overinflated tires
can result in sudden deflation (blowout) be-
cause they are more likely to become punc-
tured or damaged by road debris, potholes,
etc.
Do not underinflate tires. Underinflated tires
wear unevenly, adversely affect handling
and fuel economy, and are more likely to fail
from being overheated.
Do not overload the tires by exceeding the
specified vehicle capacity weight (as indicat-
ed by the label on the pillar in the driver’s
door opening). Overloading the tires can
overheat them, possibly causing a blowout.
Page 275 of 418

274OperationTires and wheels
Activating the tire inflation pressure
monitor
You must activate the tire inflation pres-
sure monitor in the following cases:�
If you have changed the tire pressure
�
If you have replaced the wheels or tires
�
If you have installed new wheels or
tires
�
Make sure the tire pressure is correctly
set.
�
Press buttonè orÿ on the mul-
tifunction steering wheel repeatedly
until the standard display menu ap-
pears in the multifunction display
(�page 129).
�
Press button j or k repeatedly
until you see the current inflation pres-
sures for each tire appear in the display
or the following message appears in
the displayTIRE PRES.
DISPLAY AFTER DRIVING
A FEW MINS.
REACTIVATE USING
R-BUTTON
Warning!
G
Follow recommended tire inflation pres-
sures.
Do not overinflate tires. Overinflating tires
can result in sudden deflation (blowout) be-
cause they are more likely to become punc-
tured or damaged by road debris, potholes,
etc.
Do not underinflate tires. Underinflated tires
wear unevenly, adversely affect handling
and fuel economy, and are more likely to fail
from being overheated.
Do not overload the tires by exceeding the
specified vehicle capacity weight (as indicat-
ed by the label on the pillar in the driver’s
door opening). Overloading the tires can
overheat them, possibly causing a blowout.
iIf transporting a deflated road wheel or
additional wheel sensors in the vehicle,
the tire inflation pressure monitor
should not be reactivated until the de-
flated wheel or additional wheel sen-
sors have been removed from the
vehicle. Otherwise, the deflated wheel
or additional sensors could cause the
tire inflation pressure monitor system
to malfunction.
Page 278 of 418

277 Operation
Tires and wheels
Reactivating the tire pressure monitor
The tire pressure monitor must be reacti-
vated in the following situations:�
if you have changed the tire pressure
�
if you have replaced the wheels or tires
�
if you have installed new wheels or
tires
�
Using the table on the fuel filler flap,
make sure the tire inflation pressure of
all four tires is correct.
�
Press button j or k repeatedly
until you see the current inflation pres-
sures for each tire appear in the display
or the following message appears in
the displayTIRE PRES. DISPLAY
APPEARS AFTER
DRIVING A FEW MINUTES
Warning!
G
The tire inflation pressure monitor does not
indicate a warning for wrongly selected in-
flation pressures. Always adjust tire inflation
pressure according to the label on the fuel
filler flap.
The tire inflation pressure monitor is not
able to issue a warning due to a sudden dra-
matic loss of pressure (e.g. tire blowout
caused by a foreign object). In this case
bring the vehicle to a halt by carefully apply-
ing the brakes and avoiding abrupt steering
maneuvers.iOperating radio transmission equip-
ment (e.g. wireless headsets, two-way
radios) in or near the vehicle could
cause the tire inflation pressure moni-
tor to malfunction.
Warning!
G
Follow recommended tire inflation pres-
sures.
Do not overinflate tires. Overinflating tires
can result in sudden deflation (blowout) be-
cause they are more likely to become punc-
tured or damaged by road debris, potholes,
etc.
Do not underinflate tires. Underinflated tires
wear unevenly, adversely affect handling
and fuel economy, and are more likely to fail
from being overheated.
Do not overload the tires by exceeding the
specified vehicle capacity weight (as indicat-
ed by the label on the pillar in the driver’s
door opening). Overloading the tires can
overheat them, possibly causing a blowout.
Page 348 of 418

347 Practical hints
Flat tire
Lowering the vehicle�
Lower vehicle by turning crank coun-
terclockwise until vehicle is resting ful-
ly on its own weight.
�
Remove the jack.
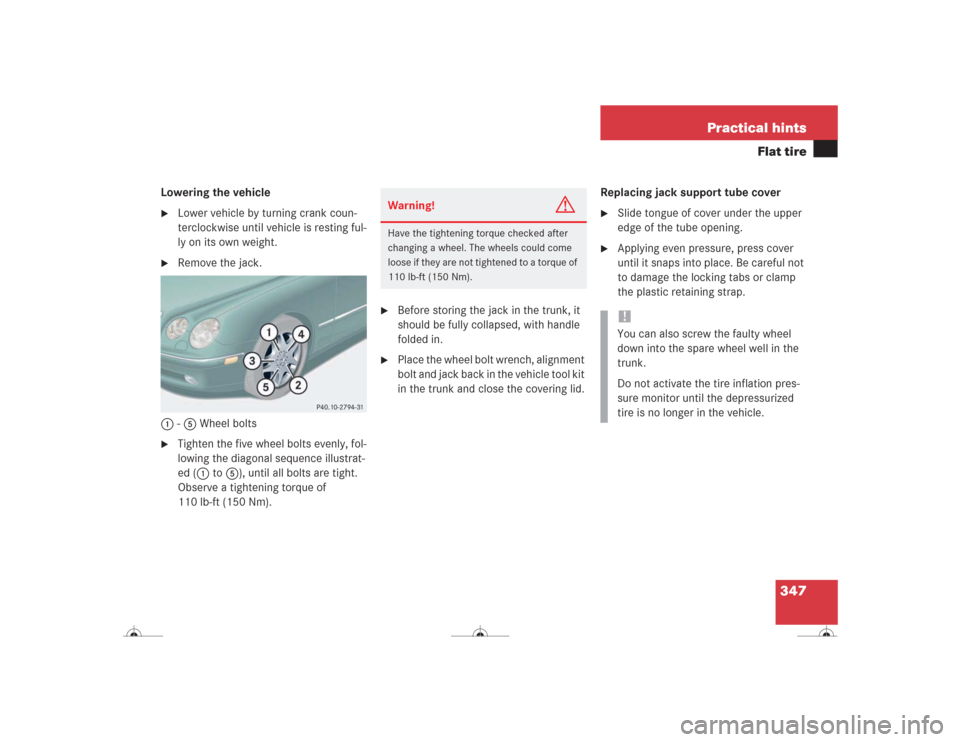
1-5 Wheel bolts
�
Tighten the five wheel bolts evenly, fol-
lowing the diagonal sequence illustrat-
ed (1 to5), until all bolts are tight.
Observe a tightening torque of
110 lb-ft (150 Nm).
�
Before storing the jack in the trunk, it
should be fully collapsed, with handle
folded in.
�
Place the wheel bolt wrench, alignment
bolt and jack back in the vehicle tool kit
in the trunk and close the covering lid.Replacing jack support tube cover
�
Slide tongue of cover under the upper
edge of the tube opening.
�
Applying even pressure, press cover
until it snaps into place. Be careful not
to damage the locking tabs or clamp
the plastic retaining strap.
Warning!
G
Have the tightening torque checked after
changing a wheel. The wheels could come
loose if they are not tightened to a torque of
110 lb-ft (150 Nm).
!You can also screw the faulty wheel
down into the spare wheel well in the
trunk.
Do not activate the tire inflation pres-
sure monitor until the depressurized
tire is no longer in the vehicle.
Page 360 of 418
359 Technical data
Spare parts service
Warranty coverage
Identification labels
Layout of poly-V-belt drive
Engine
Rims and Tires
Electrical system
Main Dimensions and weights
Fuels, coolants, lubricants, etc.
Consumer information
Page 372 of 418
371 Technical data
Main Dimensions and weights
�Main Dimensions and weights
Main DimensionsWeightsModel
CL 500
CL 55 AMG
CL 600
Overall vehicle length
196.4 in (4989 mm)
196.4 in (4989 mm)
196.4 in (4989 mm)
Overall vehicle width
73.1 in (1857 mm)
73.1 in (1857 mm)
73.1 in (1857 mm)
Overall vehicle height
55.4 in (1408 mm)
55.4 in (1408 mm)
55.4 in (1408 mm)
Wheelbase
113.6 in (2885 mm)
113.6 in (2885 mm)
113.6 in (2885 mm)
Track, front
62.1 in (1577 mm)
62.2 in (1581 mm)
62.1 in (1577 mm)
Track, rear
62.1 in (1578 mm)
62.2 in (1582 mm)
62.1 in (1578 mm))
Roof load max.
220 lbs (100 kg)
Trunk load max.
220 lbs (100 kg)