Page 223 of 418
222 Controls in detailUseful featuresStorage compartment in the glove box
A storage compartment is located in the
cover of the glove box. It can be used to
store check cards, pens, a flashlight, etc.
1Storage compartment in glove box�
Lightly press the marking on the lid of
storage compartment1.
The lid opens upward.Storage compartment in front of arm-
rest
1Storage compartment
Opening
The compartment contains a cup holder
(
�page 224).
�
Lightly touch cover plate1.
The cover opens automatically.
Closing
�
Lightly push the cover plate1 up until
it engages in lock.Storage compartment below the front
armrest
The storage compartment below the front
armrest is illuminated with the exterior
lamps switched on.
The buttons are located under the cushion
of the armrest.
1Button to open storage compartment
(except CL 55 AMG)
2Button to open storage tray and tele-
phone holder*
Page 227 of 418
226 Controls in detailUseful featuresOpening cup holder�
Push front of sliding compartment1.
The cup holder slides out.
Closing cup holder
�
Push sliding compartment1 back un-
til it engages.Parcel net in front passenger footwell
A small convenience parcel net is located
in the front passenger footwell. It is for
small and light items, such as road maps,
mail, etc.Parcel net in trunk
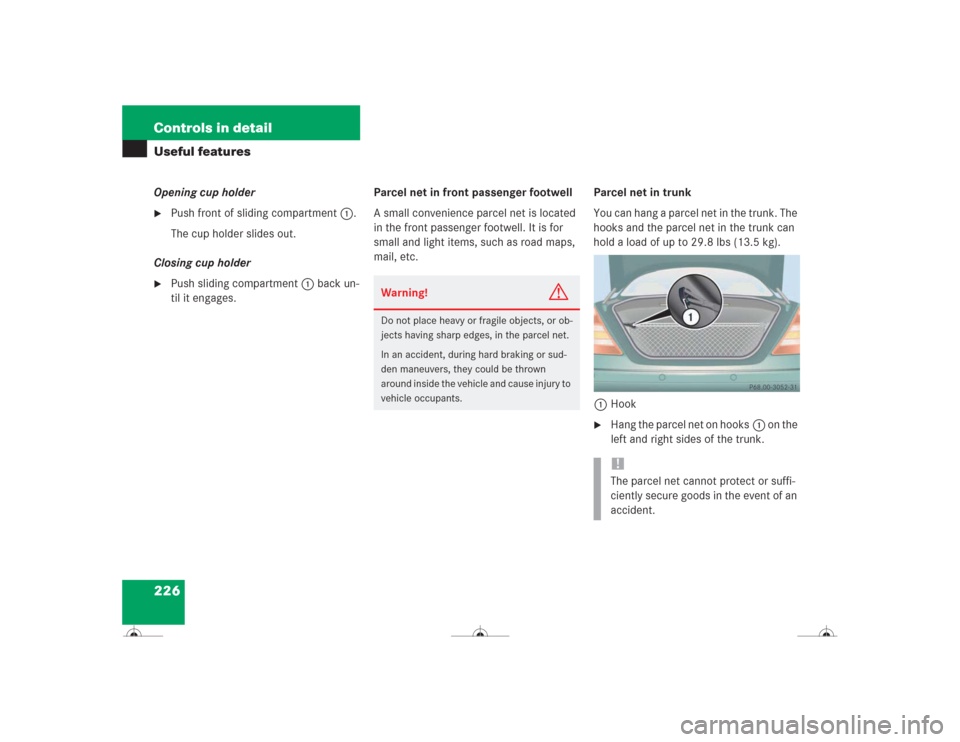
You can hang a parcel net in the trunk. The
hooks and the parcel net in the trunk can
hold a load of up to 29.8 lbs (13.5 kg).
1Hook
�
Hang the parcel net on hooks1 on the
left and right sides of the trunk.
Warning!
G
Do not place heavy or fragile objects, or ob-
jects having sharp edges, in the parcel net.
In an accident, during hard braking or sud-
den maneuvers, they could be thrown
around inside the vehicle and cause injury to
vehicle occupants.
!The parcel net cannot protect or suffi-
ciently secure goods in the event of an
accident.
Page 229 of 418

228 Controls in detailUseful featuresCigarette lighter
1Cigarette lighter�
Make sure the ignition is switched on.
All the lamps in the instrument cluster
should come on.
�
Push in cigarette lighter1.
The lighter will pop out automatically
when hot.
Heated steering wheel*
The steering wheel heating warms up the
leather area of the steering wheel.
The stalk with the heated steering wheel
switch is on the lower left-hand side of the
steering wheel.
1Switching on
2Indicator lamp
3Switching off
Warning!
G
Never touch the heating element or sides of
the lighter; they are extremely hot. Hold the
knob only.
When leaving the vehicle, always remove the
SmartKey from the starter switch, take the
SmartKey with KEYLESS-GO* with you and
lock your vehicle. Do not leave children un-
attended in the vehicle, or with access to an
unlocked vehicle. Unsupervised use of vehi-
cle equipment may cause an accident
and / or serious personal injury.iThe lighter socket can be used to ac-
commodate electrical accessories up
to a maximum 85 W.
Page 242 of 418

241 Controls in detail
Useful features
Step 5:�
When the indicator lamp 1 flashes
rapidly, release both buttons.
Step 6:
�
Press and hold the just-trained inte-
grated signal transmitter button and
observe the indicator lamp1.
If the indicator lamp1 stays on con-
stantly, programming is complete and
your device should activate when the
integrated signal transmitter button is
pressed and released.Step 7:
�
To program the remaining two buttons,
repeat the steps above starting with
step 3.
Rolling code programming
To train a garage door opener (or other roll-
ing code devices) with the rolling code fea-
ture, follow these instructions after
completing the “Programming” portion
(steps 1 through 6) of this text. (A second
person may make the following training
procedures quicker and easier.)Step 8:
�
Locate “training” button on the garage
door opener motor head unit.
Exact location and color of the button
may vary by garage door opener brand.
Depending on manufacturer, the “train-
ing” button may also be referred to as
“learn” or “smart” button. If there is dif-
ficulty locating the transmitting button,
refer to the garage door opener opera-
tor’s manual.
Step 9:
�
Press “training” button on the garage
door opener motor head unit.
The “training light” is activated.
You have 30 seconds to initiate the follow-
ing step.
Step 10:
�
Firmly press, hold for two seconds and
release the programmed integrated
signal transmitter button (2, 3
or4).
iThe indicator lamp1 flashes the first
time the signal transmitter button is
programmed. If this button has already
been programmed, the indicator lamp
will only start flashing after 20 sec-
onds.
iIf the indicator lamp1 flashes rapidly
for about two seconds and then turns
to a constant light, continue with pro-
gramming steps 8 through 12 as your
garage door opener may be equipped
with the “rolling code feature”.
��
Page 254 of 418

253 Operation
Driving instructions
Road salts and chemicals can adversely af-
fect braking efficiency. Increased pedal
force may become necessary to produce
the normal braking effect.
Depressing the brake pedal periodically
when traveling at length on salt-strewn
roads can bring road-salt impaired braking
efficiency back to normal.
If the vehicle is parked after being driven
on salt-treated roads, the braking efficien-
cy should be tested as soon as possible af-
ter driving is resumed.
For more information on winter driving, see
“Winter driving” (
�page 280).
Standing water
Warning!
G
Make sure not to endager any other road
users when carrying out these braking ma-
neuvers.
Warning!
G
If the vehicle becomes stuck in snow, make
sure that snow is kept clear of the exhaust
pipe and from around the vehicle with the
engine running. Otherwise, deadly carbon
monoxide (CO) gases may enter vehicle in-
terior resulting in unconsciousness and
death.
To assure sufficient fresh air ventilation,
open a window slightly on the side of the ve-
hicle not facing the wind.Warning!
G
The outside temperature indicator is not de-
signed to serve as an ice-warning device and
is therefore unsuitable for that purpose. In-
dicated temperatures just above the freez-
ing point do not guarantee that the road
surface is free of ice.
!Do not drive through flooded areas or
water of unknown depth. Before driving
through water, determine its depth.
Never accelerate before driving into
water. The bow wave could force water
into the engine and auxiliary equip-
ment, thus damaging them.
If you must drive through standing wa-
ter, drive slowly to prevent water from
entering the passenger compartment
or the engine compartment. Water in
these areas could cause damage to
electrical components or wiring of the
engine or transmission, or could result
in water being ingested by the engine
through the air intake causing severe
internal engine damage. Any such dam-
age is not covered by the
Mercedes-Benz Limited Warranty.
Page 260 of 418

259 Operation
At the gas station
Windshield washer system and head-
lamp cleaning system
For more information on refilling the wash-
er reservoir, see “Windshield washer sys-
tem and headlamp cleaning system”
(�page 269).
Coolant
For more information, see “Coolant”
(�page 266) and see “Coolants”
(�page 376).Brake fluid
For more information on brake fluid, see
“Brake fluid” (
�page 375).
Engine oil level
For more information on engine oil, see
“Engine oil” (
�page 261).Vehicle lighting
Check function and cleanliness. For more
information on replacing light bulbs, see
“Replacing bulbs” (
�page 336).
For more information , see “Exterior lamp
switch” (
�page 119).
Tire inflation pressure
For information on tire inflation pressure,
see “Checking tire inflation pressure”
(
�page 271).
!If you find that the brake fluid in the
brake fluid reservoir has fallen to the
minimum mark or below, have the
brake system checked for brake pad
thickness and leaks immediately.
Notify an authorized Mercedes-Benz
Center immediately. Do not add brake
fluid as this will not solve the problem.
For more information, see “Practical
hints” (
�page 293).
Page 272 of 418

271 Operation
Tires and wheels
Life of tires
The service life of a tire is dependent upon
varying factors including but not limited to:�
Driving style
�
Tire pressure
�
Distance driven
Direction of rotation
Unidirectional tires offer added advantag-
es, such as better hydroplaning perfor-
mance. To benefit, however, you must
make sure the tires rotate in the direction
specified.
An arrow on the sidewall indicates the in-
tended direction of tire rotation.
Checking tire inflation pressure
Regularly check your tire pressure at inter-
vals of no more than 14 days.
Correct the tire pressure only when tires
are cold.
If the tires are warm, you should only cor-
rect the tire pressure if it is too low for cur-
rent operating conditions.
A table on the fuel filler flap lists the spec-
ified tire inflation pressures for warm and
cold tires as well as for various operating
conditions.
Warning!
G
Tires and spare tire should be replaced after
six years, regardless of the remaining tread.!Keep unmounted tires in a cool, dry
place with as little exposure to light as
possible. Protect tires from contact
with oil, grease and gasoline.
Warning!
G
If the tire pressure repeatedly drops:�
Check the tires for punctures from for-
eign objects.
�
Check to see whether air is leaking from
the valves or from around the rim.
Page 273 of 418
 per 18°F (10°C) of air
temperature change. Keep this in mind
when checking tire pressure where the
temperatur")
272OperationTires and wheelsTire pressure changes by approximately
1.5 psi (0.1 bar) per 18°F (10°C) of air
temperature change. Keep this in mind
when checking tire pressure where the
temperature is different from the outside
temperature.
Tire temperature and tire pressure also in-
crease while driving, depending on the
driving speed and the tire load.Check the spare tire periodically for condi-
tion and inflation pressure. Spare tires will
age and become worn over time even if
never used, and thus should be inspected
and replaced when necessary or after a
maximum of six years.
iThe pressures listed for light loads are
minimum values offering high driving
comfort.
Increased inflation pressures listed for
heavier loads may also be used for light
loads. These higher pressures produce
favorable handling characteristics. The
ride of the vehicle, however, will be
somewhat harder. Never exceed the
max. values or inflate tires below the
min. values listed on the fuel filler flap.
Warning!
G
Follow recommended tire inflation pres-
sures.
Do not overinflate tires. Overinflated tires
can result in sudden deflation (blowout) be-
cause they are more likely to become punc-
tured or damaged by road debris, potholes,
etc.
Do not underinflate tires. Underinflated tires
wear unevenly, adversely affect handling
and fuel economy, and are more likely to fail
from being overheated.
Do not overload the tires by exceeding the
specified vehicle capacity weight (as indicat-
ed by the label on the pillar in the driver’s
door opening). Overloading the tires can
overheat them, possibly causing a blowout.