Page 319 of 418

318 Practical hintsWhat to do if …?Display symbol
Display messages
Possible cause
Possible solution
.
TURN SIG. MIRROR, R
CHECK LAMP!
The right turn signal in the side mirror is
malfunctioning. This message will only
appear if all light emitting diodes have
stopped working.
�
Visit an authorized Mercedes-Benz Cen-
ter as soon as possible.
<
SEAT BELT SYSTEM
VISIT WORKSHOP!
The seat belt system is malfunctioning.
�
Visit an authorized Mercedes-Benz
Center as soon as possible.
J
CLOSE
SUNROOF!
You have opened the driver’s door with
the SmartKey removed from the starter
switch and the sliding/pop up roof open.
�
Close the sliding/pop-up roof
(�page 191).
K
CLOSE
SUNROOF!
You have opened the driver’s door with
the SmartKey removed from the starter
switch and the sliding/pop up roof open.
�
Close the sliding/pop-up roof
(�page 191).
L
TELE AID MALFUNCTION
DRIVE TO WORKSHOP!
One or more main functions of the Tele
Aid system are malfunctioning.
�
Have the Tele Aid system checked by an
authorized Mercedes-Benz Center.
TELE AID BATTERY
DRIVE TO WORKSHOP!
The emergency power battery for the Tele
Aid system is malfunctioning. If the vehi-
cle battery is also discharged, Tele Aid
will not be operational.
�
Have the Tele Aid system checked by an
authorized Mercedes-Benz Center.
Page 332 of 418
331 Practical hints
Unlocking/locking in an emergency
�Unlocking/locking in an emergency
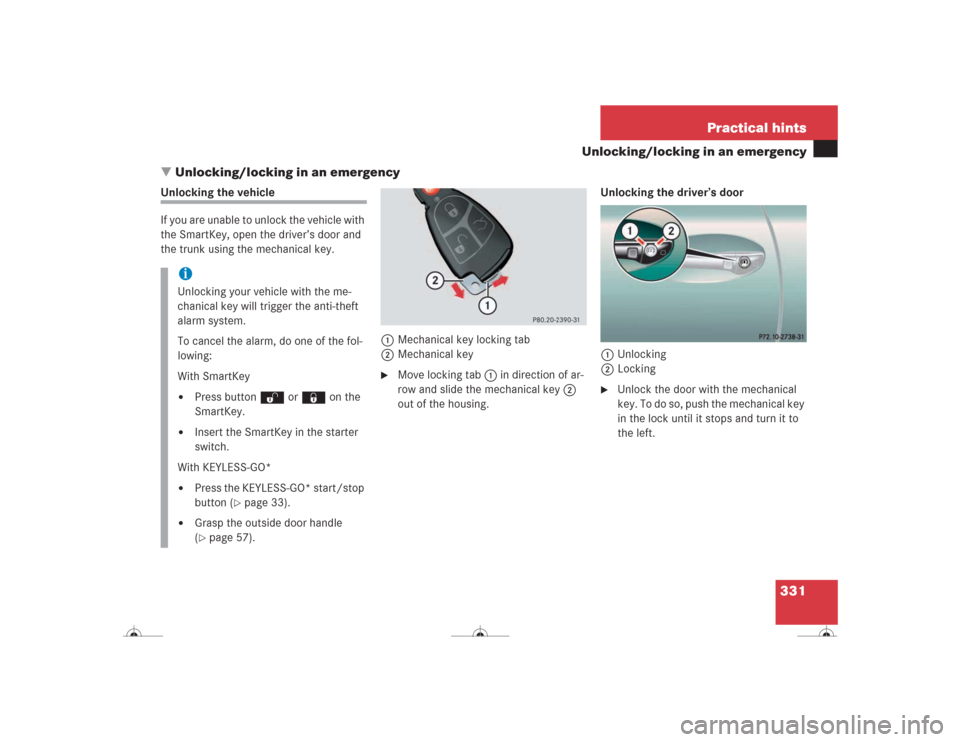
Unlocking the vehicle
If you are unable to unlock the vehicle with
the SmartKey, open the driver’s door and
the trunk using the mechanical key.
1Mechanical key locking tab
2Mechanical key
�
Move locking tab1 in direction of ar-
row and slide the mechanical key2
out of the housing.Unlocking the driver’s door
1Unlocking
2Locking
�
Unlock the door with the mechanical
key. To do so, push the mechanical key
in the lock until it stops and turn it to
the left.
iUnlocking your vehicle with the me-
chanical key will trigger the anti-theft
alarm system.
To cancel the alarm, do one of the fol-
lowing:
With SmartKey�
Press button Œ or ‹ on the
SmartKey.
�
Insert the SmartKey in the starter
switch.
With KEYLESS-GO*
�
Press the KEYLESS-GO* start/stop
button (
�page 33).
�
Grasp the outside door handle
(�page 57).
Page 346 of 418
345 Practical hints
Flat tire
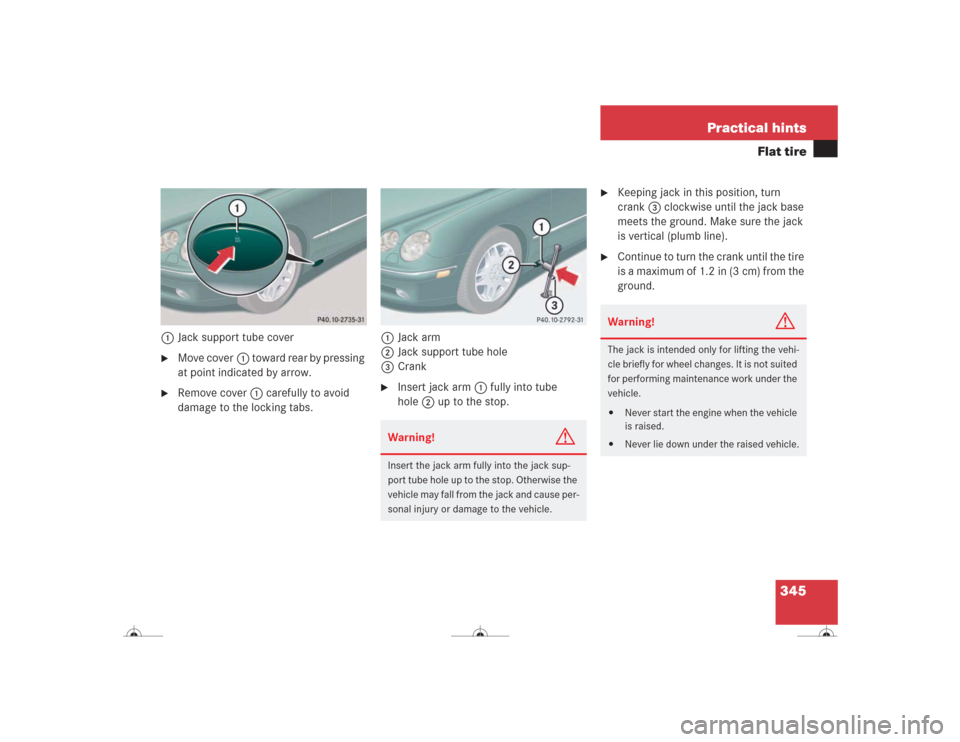
1Jack support tube cover�
Move cover1 toward rear by pressing
at point indicated by arrow.
�
Remove cover1 carefully to avoid
damage to the locking tabs.1Jack arm
2Jack support tube hole
3Crank
�
Insert jack arm1 fully into tube
hole2 up to the stop.
�
Keeping jack in this position, turn
crank3 clockwise until the jack base
meets the ground. Make sure the jack
is vertical (plumb line).
�
Continue to turn the crank until the tire
is a maximum of 1.2 in (3 cm) from the
ground.
Warning!
G
Insert the jack arm fully into the jack sup-
port tube hole up to the stop. Otherwise the
vehicle may fall from the jack and cause per-
sonal injury or damage to the vehicle.
Warning!
G
The jack is intended only for lifting the vehi-
cle briefly for wheel changes. It is not suited
for performing maintenance work under the
vehicle.�
Never start the engine when the vehicle
is raised.
�
Never lie down under the raised vehicle.
Page 349 of 418

348 Practical hintsBattery
�Battery
The battery is located in the trunk under
the right hand wheel well cover panel.
1Battery cover
2Locking knob�
Rotate and loosen locking button2
approx. one-half turn.
�
Remove battery cover1.
Warning!
G
Failure to follow these instructions can re-
sult in severe injury or death.
Never lean over batteries while connecting,
you might get injured.
Battery fluid contains sulfuric acid. Do not
allow this fluid to come in contact with eyes,
skin or clothing. In case it does, immediately
flush affected area with water and seek
medical help if necessary.
A battery will also produce hydrogen gas,
which is flammable and explosive. Keep
flames or sparks away from battery, avoid
improper connection of jumper cables,
smoking, etc.Warning!
G
Do not place metal objects on the battery as
this could result in a short circuit.
Use leak-proof battery only to avoid the risk
of acid burns in the event of an accident.
!Never loosen or detach battery termi-
nal clamps while the engine is running
or the SmartKey is in the starter switch.
Otherwise the alternator and other
electronic components could be se-
verely damaged.
Have the battery checked regularly by
an authorized Mercedes-Benz Center.
Refer to Service Booklet for mainte-
nance intervals or contact your autho-
rized Mercedes-Benz Center for further
information.Warning!
G
With a disconnected battery�
you will no longer be able to turn the
SmartKey in the starter switch and
pressing the KEYLESS-GO* start/stop
button on the gear selector lever will
have no effect
�
the gear selector lever will remain
locked in positionP
Page 356 of 418

355 Practical hints
Towing the vehicle
Installing towing eye bolt
1Cover on right side of front bumper
2Cover on right side of rear bumperRemoving cover
�
Press mark on cover in direction of ar-
row.
�
Lift cover off to reveal threaded hole for
towing eye bolt.
Installing towing eye bolt
�
Take towing eye bolt and wheel wrench
out of trunk (
�page 329).
�
Screw towing eye bolt clockwise into
its stop and tighten with wheel wrench.
Removing towing eye bolt
�
Loosen towing eye bolt counterclock-
wise with wheel wrench.
�
Unscrew towing eye bolt.
�
Store towing eye bolt and wheel
wrench in trunk.
Installing cover
�
Fit cover and snap into place.
!When towing the vehicle with all wheels
on the ground, please note the follow-
ing:
With the automatic central locking acti-
vated and the SmartKey in starter
switch position2, or KEYLESS-GO*
start/stop button in position2, the ve-
hicle doors lock if the left front wheel
as well as the right rear wheel are turn-
ing at vehicle speeds of approx. 9 mph
(15 km / h) or more.
Switch off the tow-away alarm
(�page 84).
To prevent the vehicle door locks from
locking, deactivate the automatic cen-
tral locking (
�page 153).
Towing of the vehicle should only be
done using the properly installed tow-
ing eye bolt. Never attach tow cable,
tow rope or tow rod to the vehicle chas-
sis, frame or suspension parts.
Page 359 of 418
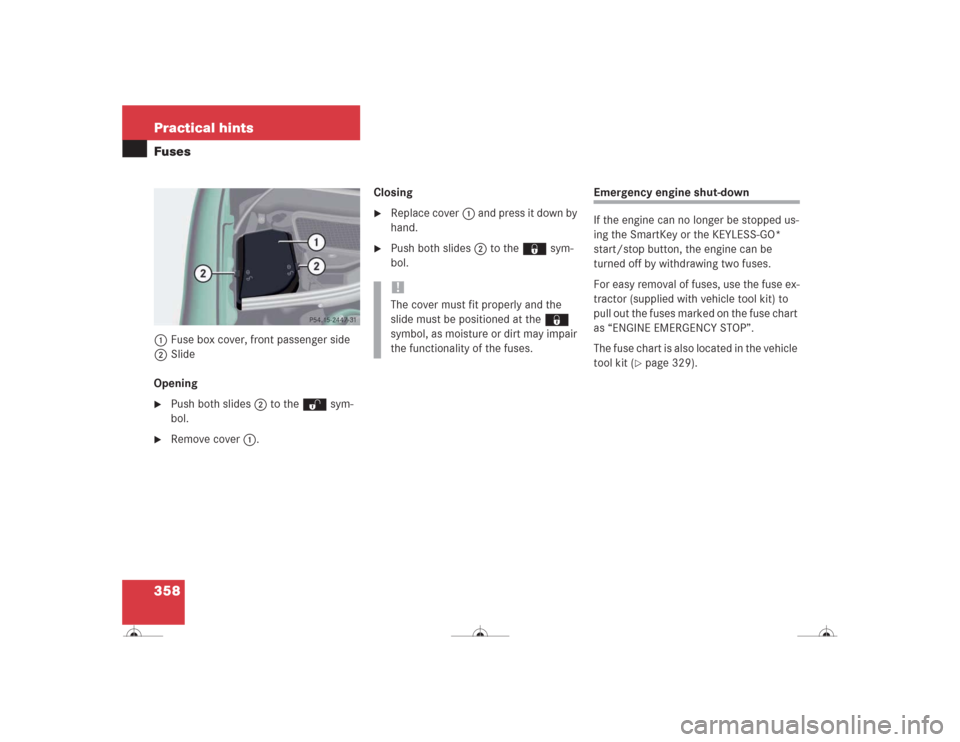
358 Practical hintsFuses1Fuse box cover, front passenger side
2Slide
Opening�
Push both slides2 to the Πsym-
bol.
�
Remove cover1.Closing
�
Replace cover1 and press it down by
hand.
�
Push both slides 2 to the ‹ sym-
bol.
Emergency engine shut-down
If the engine can no longer be stopped us-
ing the SmartKey or the KEYLESS-GO*
start/stop button, the engine can be
turned off by withdrawing two fuses.
For easy removal of fuses, use the fuse ex-
tractor (supplied with vehicle tool kit) to
pull out the fuses marked on the fuse chart
as “ENGINE EMERGENCY STOP”.
The fuse chart is also located in the vehicle
tool kit (
�page 329).
!The cover must fit properly and the
slide must be positioned at the ‹
symbol, as moisture or dirt may impair
the functionality of the fuses.
Page 390 of 418

389 Index
A
ABC 210, 383
Messages in display 300
Setting vehicle level 211
ABS 23, 77, 383
Malfunction indicator lamp 292
Messages in display 301
Warning lamp 292
Accelerator position, automatic
transmission 163
Accident
In case of 52
Activating
Air conditioner (cooling) 183
Air recirculation mode 179
Anti-theft alarm system 83
Central locking (control system) 153
Charcoal filter 181
Distance warning function* 207
Distronic* 203
Easy-entry/exit feature 154
ESP 81
Exterior headlamps 49
Exterior lamps 120Exterior rear view mirror parking
position 168
Front and rear fog lamp 121, 122
Hazard warning flasher 124
Headlamps 49
High beams 123
Ignition 31
Ignition with KEYLESS-GO*
start/stop button 33
Immobilizer 55, 82
Limiting opening height of
trunk lid 153
Rear window defroster 182
Residual heat 183
Seat heater 113, 114
Seat ventilation* 115
Tow-away alarm 84
Windshield wipers 50
Activating steering wheel gearshift control
Downshifting 162, 165
Upshifting 162, 165
Adding
Coolant 267
Engine oil 265Additional turn signals 336
Adjustable air vents, rear passenger
compartment 185
Adjusting 34
Air distribution 177
Air volume 178
Backrest tilt 35
Exterior rear view mirror 40
Folding forward front seat
backrests 37
Head restraint height 36
Head restraint tilt 36
Instrument cluster illumination 126
Interior rear view mirror 40
Lumbar support 111
Mirrors 40
Multicontour backrest* 111
Seat cushion depth 35, 111
Seat cushion tilt 35
Seat fore and aft adjustment 35
Seat height 35
Seat in the lumbar region 112
Seat in the shoulder region 111
Seats 34
Page 401 of 418

400 IndexK
Key, mechanical 331
Key, SmartKey
Battery check lamp 89
Changing the batteries 333
Checking the batteries 91
Factory setting 89
Global locking 89
Global unlocking 89
Loss of 91
Positions in starter switch 31
Remote controls 88, 92
Restoring to factory setting 90
Selective setting 89
Starting the engine 45
Turning off the engine 55
Unlocking with 30
Key,SmartKey with KEYLESS-GO*
Changing the battery 334
Key-dependency memory
Settings 154
KEYLESS-GO start/stop button* 33
KEYLESS-GO* 385
Activating ignition with 33
Closing sliding/pop-up roof 194Closing windows 189
Locking the vehicle 95
Messages in display 313
Starting the engine 46
Turning off engine 56
Unlocking with 32
Keys 88
Kickdown 163, 385
Kilometers/miles in speedometer 148
Km/h or mph in speedometer 148
L
Lamp bulbs, exterior 336
Lamps, exterior
Front 336
Light sensor 315
Messages in display 315
Rear 337
Lamps, indicator and warning
ABS 292
Battery (SmartKey) 89, 94
Brakes 293
CHECK ENGINE 294
Coolant 306
Distronic*DTR* 200
Engine diagnostics 294
ESP 81, 295
Fuel reserve 296
Instrument cluster 296
PASSENGER AIRBAG OFF 71, 298
Seat belts 296
Service indicator 282
SRS 61
Tow-away alarm 84
Turn signals 23
Language
Multifunction display 149
Setting 149
LATCH child seat anchors 74
LATCH child seat mounts 74
Layout of poly-V-belt drive 363
Leather upholstery
Cleaning 290
Lever
For cruise control 202
License plate lamps
Replacing bulbs 337, 340
Light alloy wheels
Cleaning 289