Page 227 of 418
226 Controls in detailUseful featuresOpening cup holder�
Push front of sliding compartment1.
The cup holder slides out.
Closing cup holder
�
Push sliding compartment1 back un-
til it engages.Parcel net in front passenger footwell
A small convenience parcel net is located
in the front passenger footwell. It is for
small and light items, such as road maps,
mail, etc.Parcel net in trunk
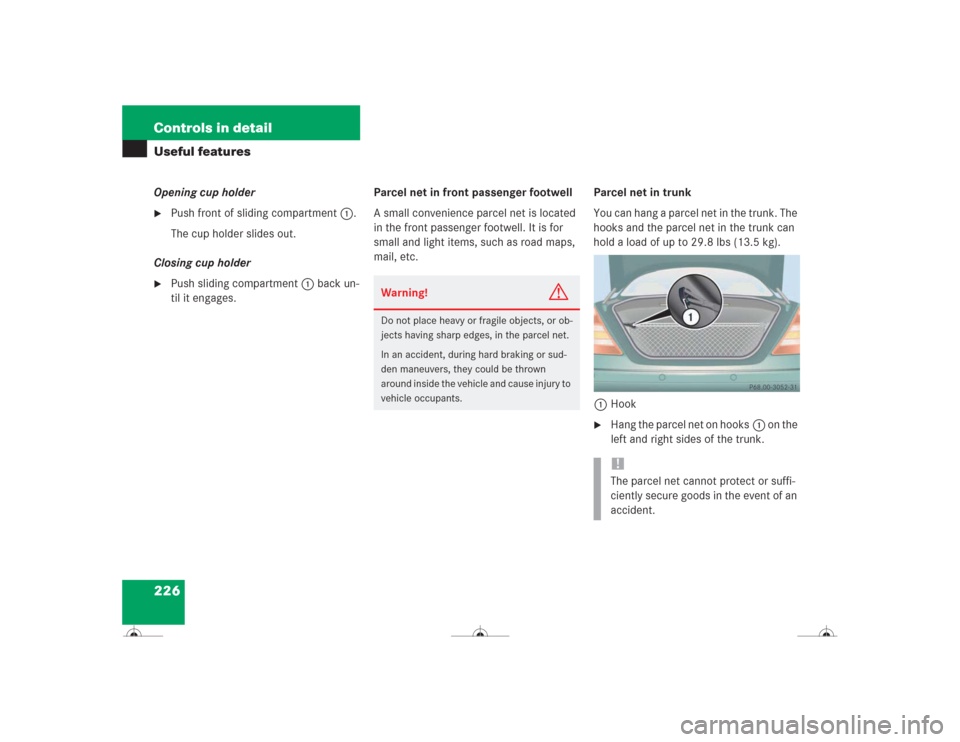
You can hang a parcel net in the trunk. The
hooks and the parcel net in the trunk can
hold a load of up to 29.8 lbs (13.5 kg).
1Hook
�
Hang the parcel net on hooks1 on the
left and right sides of the trunk.
Warning!
G
Do not place heavy or fragile objects, or ob-
jects having sharp edges, in the parcel net.
In an accident, during hard braking or sud-
den maneuvers, they could be thrown
around inside the vehicle and cause injury to
vehicle occupants.
!The parcel net cannot protect or suffi-
ciently secure goods in the event of an
accident.
Page 228 of 418

227 Controls in detail
Useful features
Ashtrays
Center console ashtray
1Button for disengaging ashtray
Opening ashtray�
Briefly touch cover plate.
The ashtray opens automatically.Removing ashtray insert
�
Secure vehicle from movement by set-
ting the parking brake. Move the gear
selector lever to positionN.
Now you have more room to remove
the insert.
�
Push sliding button1 to the right.
The ashtray is disengaged and slides
out a short way.
�
Remove insert from ashtray frame.
Reinstalling the ashtray insert
�
Install insert by pushing back into the
frame until it engages.Rear seat ashtray
1Latch
Opening ashtray
�
Pull at top of cover to open ashtray.
Removing ashtray insert
�
Pull latch1 to disengage ashtray in-
sert and remove it.
Reinstalling the ashtray insert
�
Install ashtray insert.
�
Close the ashtray.
Warning!
G
Remove front ashtray only with vehicle
standing still. Set the parking brake to se-
cure vehicle from movement. Move gear se-
lector lever to positionN. With gear selector
lever in positionN, turn off the engine.
Page 255 of 418

254OperationDriving instructionsPassenger compartmentDriving abroad
Abroad, there is an extensive
Mercedes-Benz service network at your
disposal. If you plan to drive into areas
which are not listed in the index of your
Mercedes-Benz Center directory, you
should request pertinent information from
an authorized Mercedes-Benz Center.Control and operation of radio trans-
mitters
COMAND, radio and telephone*Telephones and two-way radios
Radio transmitters, such as a portable tele-
phone or a citizens band unit should only
be used inside the vehicle if they are con-
nected to an antenna that is installed on
the outside of the vehicle.
Refer to the radio transmitter operation in-
structions regarding use of an external an-
tenna.
Warning!
G
Always fasten items being carried as secure-
ly as possible.
In an accident, during hard braking or sud-
den maneuvers, loose items will be thrown
around inside the vehicle, and cause injury
to vehicle occupants unless the items are
securely fastened in the vehicle.
The trunk is the preferred place to carry ob-
jects.
Warning!
G
Please do not forget that your primary
responsibility is to drive the vehicle safely.
Only operate the COMAND (Cockpit Man-
agement and Data System), radio or tele-
phone
1 if road, weather and traffic
conditions permit.
Bear in mind that at a speed of just 30 mph
(approximately 50 km/h), your vehicle is
covering a distance of 44 feet (approximate-
ly 14 m) every second.
1Observe all legal requirements.
Warning!
G
Never operate radio transmitters equipped
with a built-in or attached antenna (i.e. with-
out being connected to an external antenna)
from inside the vehicle while the engine is
running. Doing so could lead to a malfunc-
tion of the vehicle’s electronic system, pos-
sibly resulting in an accident and/or
personal injury.
Page 331 of 418

330 Practical hintsWhere will I find...?Vehicle jack
To prepare the vehicle jack for use�
Remove the vehicle jack from the spare
wheel well under the trunk floor.
�
Push the crank handle up.
�
Turn the crank handle clockwise until it
engages (operational position).
Storing the vehicle jack in the trunk
�
Retract the vehicle jack arm to the
base of the vehicle jack.
�
Push the crank handle up.
�
Turn the crank handle counterclock-
wise to the end of the stop (storage po-
sition).Spare wheel
Removing the spare wheel
�
Take out vehicle tool kit tray 2.
�
Turn the luggage bowl 3 counter-
clockwise.
�
Remove the spare wheel 4.
Storing the spare wheel
�
Place spare wheel 4 in wheel well and
secure it with luggage bowl 3.
�
Turn the luggage bowl 3 clockwise to
its stop.
�
Place vehicle tool kit tray 2 in luggage
bowl 3.
Warning!
G
The jack is designed exclusively for jacking
up the vehicle at the jack take-up brackets
built into both sides of the vehicle. To help
avoid personal injury, use the jack only to lift
the vehicle during a wheel change. Never
get beneath the vehicle while it is supported
by the jack. Keep hands and feet away from
the area under the lifted vehicle. Always
firmly set parking brake and block wheels
before raising vehicle with jack.
Do not disengage parking brake while the
vehicle is raised. Be certain that the jack is
always vertical (plumb line) when in use, es-
pecially on hills. Always try to use the jack
on level surface. Make sure the jack arm is
fully seated in the jack take-up bracket. Al-
ways lower the vehicle onto sufficient ca-
pacity jackstands before working under the
vehicle.
Page 341 of 418
340 Practical hintsReplacing bulbsReplacing bulbs for rear lamps
Tail lamp assemblies
1Backup lamp (black socket)
2Turn signal lamp (white socket)
3Tail, standing and parking lamp (red
socket)
4Driver’s side: tail, parking and rear fog
lamp
Passenger’s side: tail and parking lamp
(red socket)
�
Switch off lights.
�
Open trunk.
�
Turn lock counterclockwise and move
the trim to the side.
�
Turn bulb socket counterclockwise and
pull out.
�
Gently twist bulb counterclockwise and
pull out of bulb holder.
�
Insert new bulb into the holder and turn
it clockwise.
�
Reinstall bulb socket.
The bulb socket should audibly click.
�
Replace trim and secure with lock. License plate lamp
1Screws
�
Switch off the lights.
�
Loosen both screws1 and remove
lamp.
�
Replace the tubular lamp and reinstall
it.
�
Retighten the screws.
Page 350 of 418
349 Practical hints
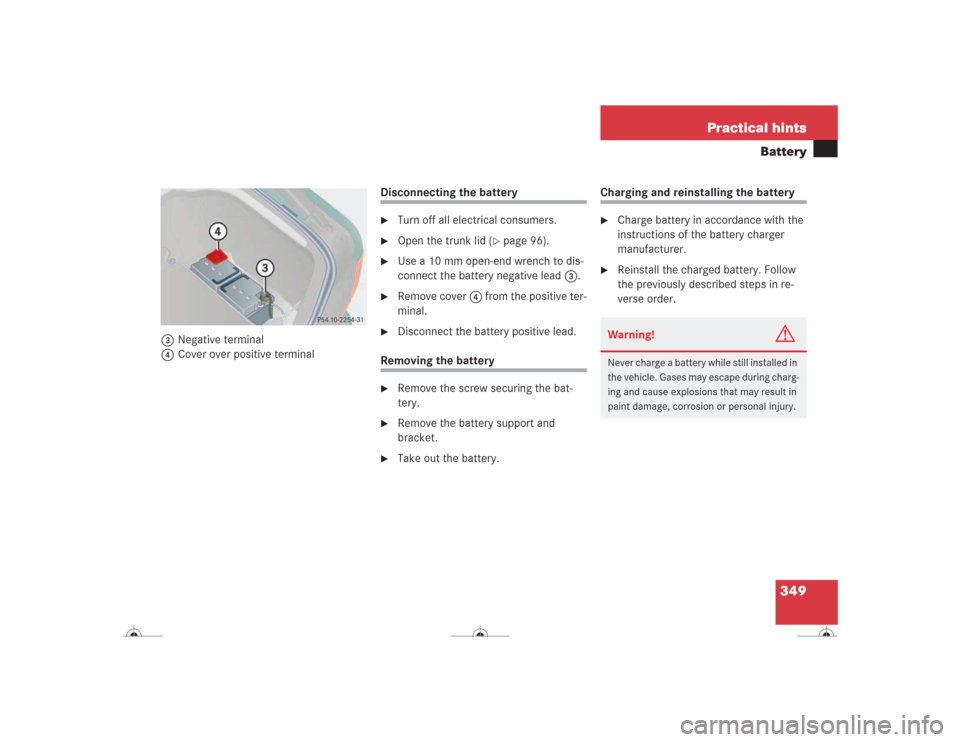
Battery
3Negative terminal
4Cover over positive terminal
Disconnecting the battery�
Turn off all electrical consumers.
�
Open the trunk lid (
�page 96).
�
Use a 10 mm open-end wrench to dis-
connect the battery negative lead3.
�
Remove cover 4 from the positive ter-
minal.
�
Disconnect the battery positive lead.
Removing the battery�
Remove the screw securing the bat-
tery.
�
Remove the battery support and
bracket.
�
Take out the battery.
Charging and reinstalling the battery�
Charge battery in accordance with the
instructions of the battery charger
manufacturer.
�
Reinstall the charged battery. Follow
the previously described steps in re-
verse order.Warning!
G
Never charge a battery while still installed in
the vehicle. Gases may escape during charg-
ing and cause explosions that may result in
paint damage, corrosion or personal injury.
Page 351 of 418
350 Practical hintsBatteryReconnecting the battery�
Turn off all electrical consumers.
�
Connect the positive lead and fasten its
cover 4.
�
Connect negative lead3.Batteries contain materials that can harm
the environment if disposed of improperly.
Large 12-volt storage batteries contain
lead. Recycling of batteries is the preferred
method of disposal. Many states require
sellers of batteries to accept old batteries
for recycling.!Never invert the terminal connections.!The battery, its filler caps and the vent
tube must always be securely installed
when the vehicle is in operation.
iThe following procedures must be car-
ried out following any interruption of
battery power (e.g. due to reconnect-
ing):�
Set the clock (see COMAND opera-
tor’s manual).
�
Resynchronize the ESP
(�page 303).
�
Resynchronize side windows
(�page 190).
�
Resynchronize sliding/pop-up roof
(�page 194).
Page 402 of 418

401 Index
Light sensor 315
Lighter see Cigarette lighter 228
Lighting 119
Automatic headlamp mode 120
Combination switch 123
Daytime running lamp mode 121
Exterior lamp switch 119
Front fog lamps 122
High beam flasher 123
High beams 123
Instrument cluster illumination 126
Interior 124
Locator lighting 121
Low beam 119
Manual headlamp mode 120
Night security illumination 121
Parking lamps 119
Rear fog lamp 122
Settings (control system) 149
Limiting the gear range 159
Limp Home Mode 166
Line of fall 385
Loading 219
Cargo tie-down hooks 220
Instructions 219Roof rack 219
Locator lighting 121
Setting 150
Lock button 385
Door handle (KEYLESS-GO*) 57
SmartKey 30, 88, 92
Trunk 95
Locking 53, 88
Central (SmartKey with
KEYLESS-GO*) 94
Fuel filler flap 257
Global, SmartKey 89
Glove box 221
The vehicle with KEYLESS-GO* 95
Trunk lid, separately 104
Vehicle in an emergency 332
Loss of
Mechanical key 91
SmartKey 91
Loss of Smartkey with KEYLESS-GO* 95
Low beam headlamps
Messages in display 315
Replacing bulbs 336
Lowering
Vehicle 347Lumbar support adjustment 111
M
Main Dimensions 371
Maintenance 12, 282
Malfunction memory 144
Calling up 144
Displaying 145
MANUAL
Shift program mode
(CL 55 AMG Kompressor) 164
Manual headlamp mode 120
Manual operations
Fuel filler flap 334
Interior lighting control 125
Locking the vehicle 332
Sliding/pop-up roof 335
Unlocking the driver’s door 331
Unlocking the trunk lid 332
Massage function 112
MAXCOOL maximum cooling 179
Mechanical key 331
Memory function 116, 385
Recalling positions from
memory 117

2Turn signal lamp (white socket)
3Tail, standing and parking lamp (red
socket)
4Drive")