Page 325 of 418
Display symbol
Display message
Possible cause
Possible solution
H
TIRE PRES.")
324 Practical hintsWhat to do if …?Tire pressure monitor messages
(vehicles produced as of approximately
October 2003)Display symbol
Display message
Possible cause
Possible solution
H
TIRE PRES.
CAUTION, TIRE
DEFECT!
One or more tires are deflating.
�
Carefully bring the vehicle to a halt, avoid-
ing abrubt steering and braking maneu-
vers. Observe the traffic situation around
you.
�
Repair or change the wheel (
�page 343).
TIRE PRES.
CHECK TIRES!
The pressure has fallen significantly in
one or more tires.
�
Carefully bring the vehicle to a halt, avoid-
ing abrubt steering and braking maneu-
vers. Observe the traffic situation around
you.
�
Repair or change the wheel (
�page 343).
TIRE PRES.
PLEASE CORRECT!
The pressure is too low in one or more
tires.
�
Check and correct tire pressure as re-
quired (
�page 275).
Warning!
G
Do not drive with a flat tire. A flat tire affects
the ability to steer or brake the vehicle.
You may lose control of the vehicle. Contin-
ued driving with a flat tire will cause exces-
sive heat build-up and possibly a fire.
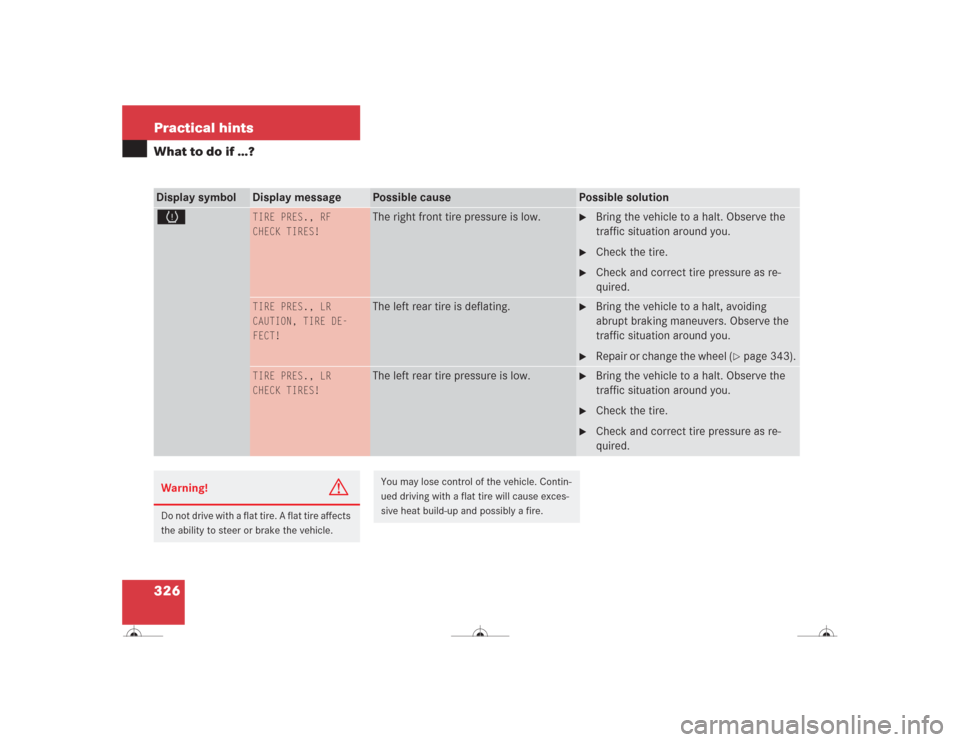
Page 326 of 418

325 Practical hints
What to do if …?
Display symbol
Display message
Possible cause
Possible solution
H
TIRE PRES., LF
CAUTION, TIRE
DEFECT!
The left front tire is deflating.
�
Bring the vehicle to a halt, avoiding
abrubt braking maneuvers. Observe the
traffic situation around you.
�
Repair or change the wheel (
�page 343).
TIRE PRES., LF
CHECK TIRES!
The left front tire pressure is low.
�
Bring the vehicle to a halt. Observe the
traffic situation around you.
�
Check the tire.
�
Check and correct tire pressure as re-
quired.
TIRE PRES., RF
CAUTION, TIRE
DEFECT!
The right front tire is deflating.
�
Bring the vehicle to a halt, avoiding
abrubt braking maneuvers. Observe the
traffic situation around you.
�
Repair or change the wheel (
�page 343).
Warning!
G
Do not drive with a flat tire. A flat tire affects
the ability to steer or brake the vehicle.
You may lose control of the vehicle. Contin-
ued driving with a flat tire will cause exces-
sive heat build-up and possibly a fire.
Page 327 of 418
326 Practical hintsWhat to do if …?Display symbol
Display message
Possible cause
Possible solution
H
TIRE PRES., RF
CHECK TIRES!
The right front tire pressure is low.
�
Bring the vehicle to a halt. Observe the
traffic situation around you.
�
Check the tire.
�
Check and correct tire pressure as re-
quired.
TIRE PRES., LR
CAUTION, TIRE DE-
FECT!
The left rear tire is deflating.
�
Bring the vehicle to a halt, avoiding
abrupt braking maneuvers. Observe the
traffic situation around you.
�
Repair or change the wheel (
�page 343).
TIRE PRES., LR
CHECK TIRES!
The left rear tire pressure is low.
�
Bring the vehicle to a halt. Observe the
traffic situation around you.
�
Check the tire.
�
Check and correct tire pressure as re-
quired.
Warning!
G
Do not drive with a flat tire. A flat tire affects
the ability to steer or brake the vehicle.
You may lose control of the vehicle. Contin-
ued driving with a flat tire will cause exces-
sive heat build-up and possibly a fire.
Page 328 of 418

327 Practical hints
What to do if …?
Display symbol
Display message
Possible cause
Possible solution
H
TIRE PRES., RR
CAUTION, TIRE
DEFECT!
The right rear tire is deflating.
�
Bring the vehicle to a halt, avoiding
abrupt braking maneuvers. Observe the
traffic situation around you.
�
Repair or change the wheel (
�page 343).
TIRE PRES., RR
CHECK TIRES!
The right rear tire pressure is low.
�
Bring the vehicle to a halt. Observe the
traffic situation around you.
�
Check the tire.
�
Check and correct tire pressure as re-
quired.
TIRE PRES. MONITOR
REACTIVE AFTER
CORRECTING PRESSURE!
There was a tire pressure warning mes-
sage.
The yellow warning lamp for the tire pres-
sure monitor is on and you have not reac-
tivated the system since the last tire
pressure check.
�
Activate the tire pressure monitor after
correcting the tire pressure values
(�page 275).
Warning!
G
Do not drive with a flat tire. A flat tire affects
the ability to steer or brake the vehicle.
You may lose control of the vehicle. Contin-
ued driving with a flat tire will cause exces-
sive heat build-up and possibly a fire.
Page 329 of 418

328 Practical hintsWhat to do if …?Display symbol
Display message
Possible cause
Possible solution
H
TIRE PRES. MONITOR
REACTIVATED
The tire pressure monitor is using the current
pressure values as the basis for monitoring.
TIRE PRES. MONITOR
CURRENTLY
UNAVAILABLE
The tire pressure monitor is temporarily inop-
erative because:�
an additional wheel sensor is in the vehi-
cle
�
the maximum temperature of the wheel
sensor has been exceeded
�
a radio source is causing interference
�
unrecognized wheel sensors have been
installed
�
Remove any additional wheel sensors
from the vehicle
As soon as the causes of the malfunction
have been removed, the tire inflation
pressure monitor automatically becomes
active again.
TIRE PRES. MONITOR
NOT OPERATIONAL
DRIVE TO WORKSHOP
The tire pressure monitor or a wheel sensor
is malfunctioning.
�
Have the tire inflation pressure moni-
tor checked by an authorized
Mercedes-Benz Center.
A wheel without proper sensor was installed.
�
Have the wheels checked.
Warning!
G
Do not drive with a flat tire. A flat tire affects
the ability to steer or brake the vehicle.
You may lose control of the vehicle. Contin-
ued driving with a flat tire will cause exces-
sive heat build-up and possibly a fire.
Page 331 of 418

330 Practical hintsWhere will I find...?Vehicle jack
To prepare the vehicle jack for use�
Remove the vehicle jack from the spare
wheel well under the trunk floor.
�
Push the crank handle up.
�
Turn the crank handle clockwise until it
engages (operational position).
Storing the vehicle jack in the trunk
�
Retract the vehicle jack arm to the
base of the vehicle jack.
�
Push the crank handle up.
�
Turn the crank handle counterclock-
wise to the end of the stop (storage po-
sition).Spare wheel
Removing the spare wheel
�
Take out vehicle tool kit tray 2.
�
Turn the luggage bowl 3 counter-
clockwise.
�
Remove the spare wheel 4.
Storing the spare wheel
�
Place spare wheel 4 in wheel well and
secure it with luggage bowl 3.
�
Turn the luggage bowl 3 clockwise to
its stop.
�
Place vehicle tool kit tray 2 in luggage
bowl 3.
Warning!
G
The jack is designed exclusively for jacking
up the vehicle at the jack take-up brackets
built into both sides of the vehicle. To help
avoid personal injury, use the jack only to lift
the vehicle during a wheel change. Never
get beneath the vehicle while it is supported
by the jack. Keep hands and feet away from
the area under the lifted vehicle. Always
firmly set parking brake and block wheels
before raising vehicle with jack.
Do not disengage parking brake while the
vehicle is raised. Be certain that the jack is
always vertical (plumb line) when in use, es-
pecially on hills. Always try to use the jack
on level surface. Make sure the jack arm is
fully seated in the jack take-up bracket. Al-
ways lower the vehicle onto sufficient ca-
pacity jackstands before working under the
vehicle.
Page 333 of 418
 is required to open the trunk lid.
If you are unable to unlock the trunk with
th")
332 Practical hintsUnlocking/locking in an emergencyUnlocking the trunk
A minimum height clearance of 6.3 ft
(1.90 m) is required to open the trunk lid.
If you are unable to unlock the trunk with
the SmartKey or KEYLESS-GO*, open the
trunk with the mechanical key.
The trunk lid lock is located above the rear
license plate recess.
1Unlocking and opening
2Trunk lid lock�
Insert the mechanical key into the
trunk lid lock2.
�
Turn the mechanical key counterclock-
wise to position1 and press trunk lid
lock2 in direction of arrow.
The trunk unlocks and opens.
Locking the vehicle
If you are unable to lock the vehicle with
the SmartKey or the SmartKey with
KEYLESS-GO*, lock it with the mechanical
key as follows:�
Close the passenger door and the trunk
lid.
�
Press the central locking switch in the
center console (
�page 106).
�
Check to see whether the locking knob
on the passenger door is still visible. If
necessary push it down manually.
�
Slide mechanical key2 out of the
SmartKey (
�page 331).
�
Lock the driver’s door with the me-
chanical key (
�page 331).
�
Lock the trunk lid necessary with the
mechanical key (if applicable)
(�page 104).
Replacing batteries in the SmartKey/
SmartKey with KEYLESS-GO*
If the batteries in the SmartKey or the
SmartKey with KEYLESS-GO* are dis-
charged, the vehicle can no longer be
locked or unlocked. It is recommended to
have the batteries replaced at an autho-
rized Mercedes-Benz Center.
!The trunk lid swings open upwards au-
tomatically. Always make sure that
there is sufficient overhead clearance.
Warning!
G
Keep the batteries out of reach of children.
If a battery is swallowed, seek medical help
immediately.
Page 338 of 418

337 Practical hints
Replacing bulbs
Rear lamps Notes on bulb replacement
�
Only use 12 volt bulbs of the same type
and with the specified watt rating.
�
Switch lights off before changing a bulb
to prevent short circuits.
�
Always use a clean lint-free cloth when
handling bulbs.
�
Your hands should be dry and free of oil
and grease.
�
If the newly installed bulb does not
come on, visit an authorized
Mercedes-Benz Center.
�
Have the LEDs and bulbs for the follow-
ing lamps replaced by an authorized
Mercedes-Benz Center:�
Additional turn signal lamps in the
exterior rear view mirrors
�
Bi-Xenon lamps
�
Front fog lamps
�
High mounted brake lamp
�
Brake lamp
�
Rear side marker
Lamp
Type
8
High mounted brake
lamp
LED
9
Brake lamp
LED
a
Tail, parking and
standing lamp
P 21/4 W
Side marker lamp
LED
b
Backup lamp
P21W
c
License plate lamps
C5W
d
Rear fog lamp,
driver’s side
P 21/4 W
e
Turn signal lamp
PY 21 W
Warning!
G
Keep bulbs out of reach of children.
Bulbs and bulb sockets can get very hot. Al-
low the lamp to cool down before changing
a bulb.
Halogen lamps contain pressurized gas. A
bulb can explode if you�
touch or move it when hot
�
drop the bulb
�
scratch the bulb
Wear eye and hand protection.
Because of high voltage in Bi-Xenon lamps,
it is dangerous to replace the bulb or repair
the lamp and its components. We recom-
mend that you have such work done by a
qualified technician.