Page 87 of 400
 is")
87 Controls in detail
Locking and unlocking
Opening the trunk from the inside
You can open the trunk from the inside if
the vehicle is stationary.
A minimum height clearance of 5.71 ft
(1.74 m) is required to open the trunk lid.
The switch is located on the driver’s door.
1Remote trunk lid switch with indicator
lamp�
Press remote trunk lid switch1.
The trunk lid opens. The indicator lamp
in the switch remains lit as long as the
trunk is open.The trunk can also be opened using the
SmartKey, see “Unlocking and opening the
trunk lid” (
�page 84) or from its inside in
an emergency, see “Trunk lid emergency
release” (
�page 88).
Closing the trunk
1Handle�
Lower trunk lid using handle1.
�
Close trunk lid with hands placed flat
on it.
!The trunk lid swings open upwards
automatically. Always make sure there
is sufficient overhead clearance.iIf the trunk lid does not open, it is still
locked separately (if applicable)
(�page 89).
If the vehicle was previously centrally
locked, the trunk lid will lock automati-
cally when closed (
�page 87). The
turn signals will flash three times to
confirm locking.
Warning!
G
To prevent possible personal injury, always
keep hands and fingers away from the trunk
opening when closing the trunk. Be espe-
cially careful when small children are
around.
Page 90 of 400
.
�
Insert the mechanical key in the trunk
lid lock.
�
Turn the mech")
90 Controls in detailLocking and unlockingSeparately unlocking the trunk�
Pull the mechanical key out of the
SmartKey (
�page 305).
�
Insert the mechanical key in the trunk
lid lock.
�
Turn the mechanical key
counterclockwise to neutral
position1 (
�page 89).
You can now open the trunk (
�page 86).
A minimum height clearance of 5.71 ft
(1.74 m) is required to open the trunk lid.
Automatic central locking
The doors and the trunk automatically lock
when the ignition is switched on and the
wheels are turning at vehicle speeds of ap-
proximately 9mph (15km/h) or more.
You can open a locked door from the in-
side. Open door only when conditions are
safe to do so.For more information on towing the vehi-
cle, see see “Towing the vehicle”
(
�page 328).
You can deactivate the automatic locking
mode using the control system, see “Set-
ting automatic locking” (
�page 133).
iYou can only cancel the separate trunk
locking mode by means of the mechan-
ical key.
Warning!
G
Only drive with the trunk closed. Among
other dangers, such as your view being
blocked, exhaust fumes may enter the
vehicle interior.
iThe doors unlock automatically after an
accident if the force of the impact
exceeds a preset threshold.
The vehicle automatically locks when
the ignition is switched on and the
wheels are turning at vehicle speeds of
approximately 9 mph (15 km/h) or
more. You could therefore lock yourself
out when the vehicle�
is pushed or towed
�
is on a test stand
Page 94 of 400

94 Controls in detailSeatsFront seat head restraints, power seat*
Removing front seat head restraints�
Press switch1 upwards and hold until
head restraint is fully extended.
�
Pull out head restraint.
Installing front seat head restraints
�
Press switch1 upwards and hold for
about five seconds.
�
Push head restraint down until it
engages.
�
Adjust head restraint to desired
position (
�page 35).
Rear seat head restraints
Head restraint height (rear outer seats)
1Release button
Raising:�
Manually adjust the height of the head
restraint by pulling it upward.
If the head restraint is fully retracted,
push release button1 and pull the
head restraint out.Lowering:
�
To lower the head restraint, push
release button1 and push down on
the head restraint.Warning!
G
For your protection, drive only with properly
positioned head restraints.
Adjust head restraint so that the head
restraint supports the back of the head at
eye level. This will reduce the potential for
injury to the head and neck in the event of
an accident or similar situation.
Do not drive the vehicle without the seat
head restraints. Head restraints are
intended to help reduce injuries during an
accident.!The center rear seat head restraint
cannot be adjusted.
Page 97 of 400
97 Controls in detail
Seats
Installing rear seat head restraints�
Insert head restraint and push it down
until it engages.
�
Push button1 and adjust head
restraint to desired position.
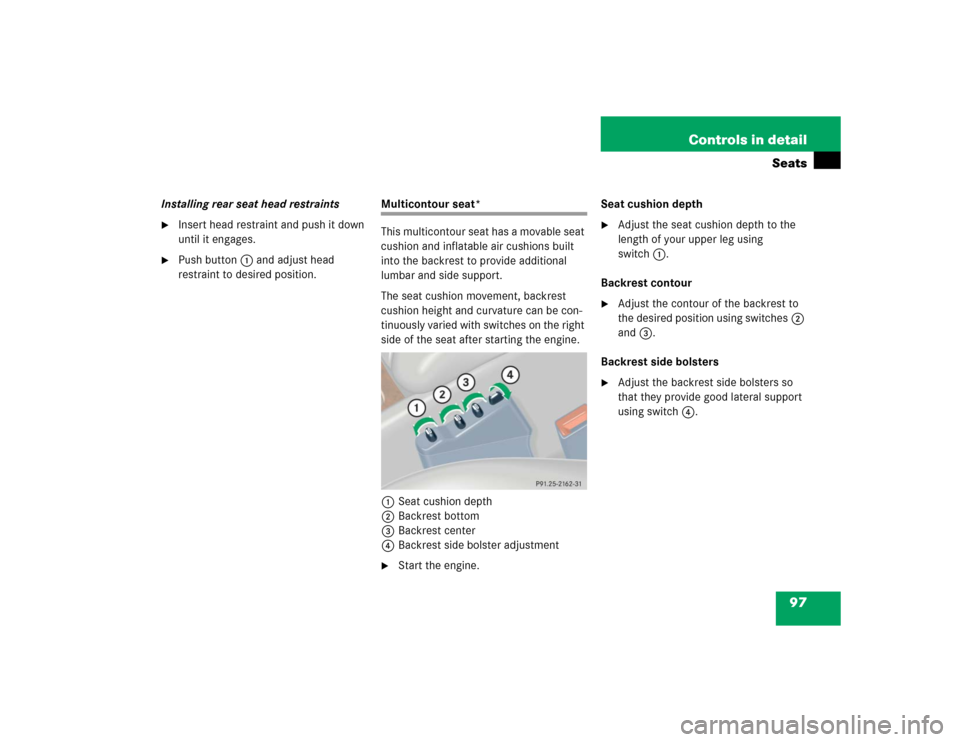
Multicontour seat*
This multicontour seat has a movable seat
cushion and inflatable air cushions built
into the backrest to provide additional
lumbar and side support.
The seat cushion movement, backrest
cushion height and curvature can be con-
tinuously varied with switches on the right
side of the seat after starting the engine.
1Seat cushion depth
2Backrest bottom
3Backrest center
4Backrest side bolster adjustment�
Start the engine.Seat cushion depth
�
Adjust the seat cushion depth to the
length of your upper leg using
switch1.
Backrest contour
�
Adjust the contour of the backrest to
the desired position using switches2
and3.
Backrest side bolsters
�
Adjust the backrest side bolsters so
that they provide good lateral support
using switch4.
Page 99 of 400

99 Controls in detail
Memory function*
�Memory function*
The memory button and stored position
switch are located on the door.
You can store up to three different settings
per SmartKey.
The following settings are saved for each
stored position:�
Driver’s seat and backrest position
�
Steering wheel position
�
Driver’s side exterior rear view mirror
position
�
Passenger side exterior rear view mir-
ror position
�
Front passenger seat position
These key-dependent memory settings
can be deactivated if desired
(
�page 135).
!Prior to operating the vehicle, the driv-
er should check and adjust the seat
height, seat position fore and aft, and
seat backrest angle if necessary, to
ensure adequate control, reach and
comfort. The head restraint should also
be adjusted for proper height. See also
the section on airbags (
�page 55) for
proper seat positioning.
In addition, adjust the steering wheel to
ensure adequate control, reach, opera-
tion and comfort. Both the interior and
exterior rear view mirrors should be
adjusted for adequate rear vision.
Fasten seat belts. Infants and small
children should be seated in a properly
secured restraint system that complies
with U.S. Federal Motor Vehicle Safety
Standards 213 and 225 and Canadian
Motor Vehicle Safety Standards 213
and 210.2.
Warning!
G
Do not activate the memory function while
driving. Activating the memory function
while driving could cause the driver to lose
control of the vehicle.
Page 217 of 400
217 Controls in detail
Useful features
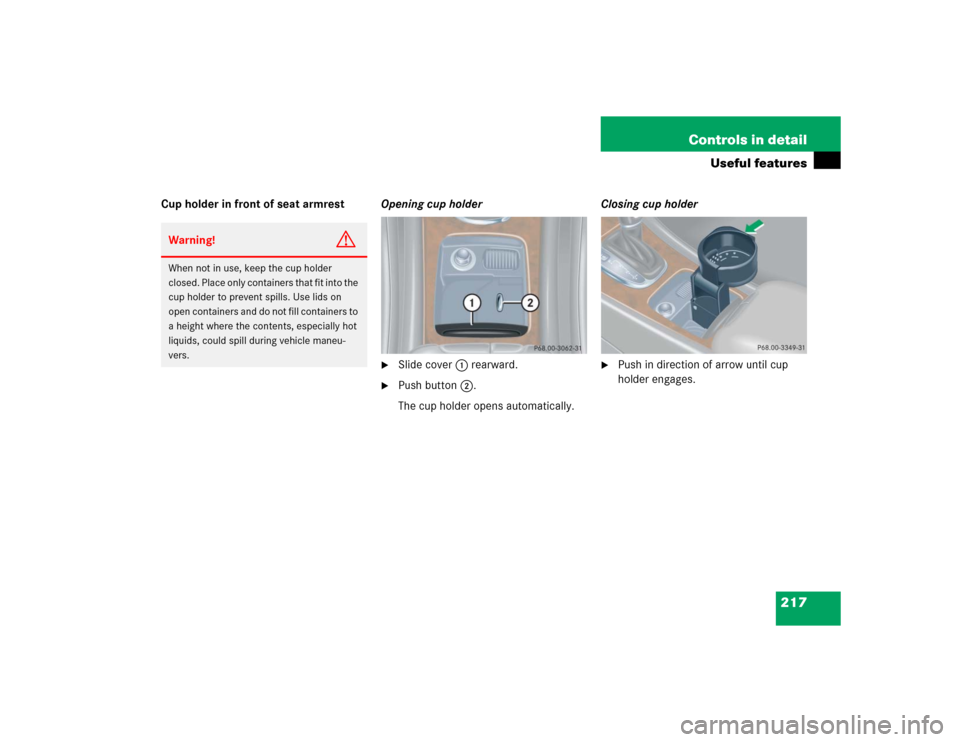
Cup holder in front of seat armrestOpening cup holder
�
Slide cover1 rearward.
�
Push button2.
The cup holder opens automatically.Closing cup holder
�
Push in direction of arrow until cup
holder engages.
Warning!
G
When not in use, keep the cup holder
closed. Place only containers that fit into the
cup holder to prevent spills. Use lids on
open containers and do not fill containers to
a height where the contents, especially hot
liquids, could spill during vehicle maneu-
vers.
Page 218 of 400
218 Controls in detailUseful featuresCup holder in rear seat armrest
Opening cup holder
�
Push front of sliding compartment1.
The cup holder slides out.
Closing cup holder
�
Push sliding compartment1 back
until it engages.Storage compartment in front of
armrest
Opening
�
Slide cover1 rearward.
The compartment contains a cigarette
lighter (
�page 221), a coin holder and
a cup holder (
�page 217).
Closing
�
Slide cover1 forward.
Warning!
G
When not in use, keep the cup holder
closed. Place only containers that fit into the
cup holder to prevent spills. Use lids on
open containers and do not fill containers to
a height where the contents, especially hot
liquids, could spill during vehicle maneu-
vers.
Page 252 of 400

252 OperationEngine compartment
�Engine compartmentHood
Opening
1Hood release�
Pull lever1 downwards.
The hood is unlocked and handle2
will extend out of the radiator grille. 2Handle for opening the hood
�
Pull handle2 to its stop out of
radiator grille.
�
Pull up on the hood (do not pull up on
the handle) and then release it.
The hood will be automatically held
open at shoulder height by gas-filled
struts.
Warning!
G
Do not pull the release lever while the
vehicle is in motion. Otherwise the hood
could be forced open by passing air flow.
!To avoid damage to the windshield
wipers or hood, never open the hood if
the wiper arms are folded forward away
from the windshield.
Warning!
G
To help prevent personal injury, stay clear of
moving parts when the hood is open and the
engine is running. Make sure the hood is
properly closed before driving. When closing
the hood, use extreme caution not to catch
hands or fingers.
The radiator fan may continue to run for
approximately 30 seconds or even restart
after the engine has been turned off. Stay
clear of fan blades.Warning!
G
If you see flames or smoke coming from the
engine compartment, or if the coolant tem-
perature gauge indicates that the engine is
overheated, do not open the hood. Move
away from vehicle and do not open the hood
until the engine has cooled. If necessary,
call the fire department.