Page 306 of 400
 is required to open the trunk lid.
The lock is located next to the recessed
han")
306 Practical hintsUnlocking/locking in an emergencyUnlocking the trunk
A minimum height clearance of 5.71 ft
(1.74 m) is required to open the trunk lid.
The lock is located next to the recessed
handle.
1Unlocking in an emergency
2Handle�
Slide mechanical key out of the
SmartKey (
�page 305).
�
Insert the mechanical key into the
trunk lid lock.
�
Turn the mechanical key counterclock-
wise completely to position1 and
hold it in this position.
�
Pull trunk lid handle2 and lift the
trunk lid.
Locking the vehicle
If you are unable to lock the vehicle with
the SmartKey, lock it with the mechanical
key as follows:�
Close the passenger doors and the
trunk.
�
Press the central locking switch in the
cockpit (
�page 91).
�
Check to see whether the locking
knobs on the passenger doors are
down. If necessary push them down
manually.
�
Slide mechanical key out of the
SmartKey (
�page 305).
�
Lock the driver’s door with the
mechanical key (
�page 305).
�
Check if the trunk is locked. If
necessary lock the trunk with the
mechanical key (
�page 89).
!Always make sure there is sufficient
overhead clearance.
Page 308 of 400

308 Practical hintsUnlocking/locking in an emergency�
Slide mechanical key1 back into the
SmartKey.
Fuel filler flap
In case the central locking system does
not release the fuel filler flap, you can open
it manually.�
Open the trunk lid.
�
Fold away right-side tail lamp trim.
�
Reach inside through opening2 in
direction of arrow.
�
Turn release knob1 clockwise
(arrow).
The fuel filler flap can now be opened.
Manually unlocking the transmission
gear selector lever
In the case of power failure the transmis-
sion gear selector lever can be manually
unlocked, e.g. to tow the vehicle.
1Coin holder
2Tool
�
Open the storage compartment in front
of the center armrest (
�page 218).
�
Release coin holder1 (e.g. using a
small coin).
�
Swing coin holder1 aside.
�
Insert a tool2 (e.g. flat blade
screwdriver) into the opening.
�
Perform the following two steps
simultaneously:�
Push tool2 down.
�
Move gear selector lever from
positionP.
�
Reinstall coin holder1 after removing
tool2 from the opening.
iWhen inserting the batteries, make
sure they are clean and free of lint.
iThe gear selector lever is locked again
when moving it to positionP.
��
Page 309 of 400
309 Practical hints
Opening/closing in an emergency
�Opening/closing in an emergency
Sliding/pop-up roof*
You can open or close the sliding/pop-up
roof manually should an electrical
malfunction occur.
The sliding/pop-up roof drive is located
behind the lens1 of the interior overhead
light.�
Pry of lens1 using a flat blade
screwdriver.
�
Slide both locking tabs2 in direction
of arrow.
�
Lower rear of cover and remove.
�
Remove cover.
�
Obtain crank3.
�
Insert crank3 through hole.
�
Turn crank3 clockwise to:�
slide roof closed
�
raise roof at the rear
�
Turn crank3 counterclockwise to:�
slide roof open
�
lower roof at the rear
The sliding/pop-up roof must be
resynchronized after being operated
manually (
�page 205).
iDo not disconnect electrical
connectors.
Page 312 of 400

312 Practical hintsReplacing bulbsReplacing bulbs for front lamps
Halogen headlamps
1Bulb socket for turn signal lamp
2Headlamp cover for high beam head-
lamp, parking and standing lamp
3Headlamp cover for low beam head-
lamp4Low beam headlamp bulb
5High beam headlamp bulb
6Bulb socket for parking and standing
lamp bulb
Low and high beam bulb
�
Switch off the lights.
�
Open the hood (
�page 252).
�
Press the clamp and remove headlamp
cover2 or3.
�
Pull electrical connector off.
�
Unclip the retainer springs and take out
the bulb.
�
Insert the new bulb so that the base
locates in the recess on the holder.
�
Clip the retainer springs and plug the
connector onto the bulb.
�
Align headlamp cover2 or3 and
click into place.
Front turn signal lamp bulb
�
Switch off the lights.
�
Open the hood (
�page 252).
�
Twist bulb socket1 counterclockwise
and pull out.
�
Push bulb into socket, turn counter-
clockwise and remove.
�
Insert new bulb in socket, push in and
twist clockwise.
�
Reinsert bulb socket in lamp and twist
clockwise.
Page 314 of 400
.
�
Pull the bulb out of the socket.
�
Insert the new bulb so that the base
locates in the rece")
314 Practical hintsReplacing bulbs�
Twist bayonet socket5 counterclock-
wise to the stop (do not remove).
�
Pull the bulb out of the socket.
�
Insert the new bulb so that the base
locates in the recess in bayonet
socket5.
�
Twist bayonet socket clockwise until
you hear it snap into place.
�
Plug the connector onto the bulb.
�
Align lamp cover2 and click into
place.
Front turn signal lamp bulb
�
Switch off the lights.
�
Open the hood (
�page 252).
�
Twist bulb socket1 counterclockwise
and pull out.
�
Push bulb into socket, turn counter-
clockwise and remove.
�
Insert new bulb in socket, push in and
twist clockwise.
�
Reinsert bulb socket in lamp and twist
clockwise.
Parking and standing lamp bulb
�
Switch off the lights.
�
Open the hood (
�page 252).
�
Press the clamp and remove headlamp
cover2.
�
Pull out bulb socket6 with the bulb.
�
Pull the bulb out of bulb socket.
�
Insert a new bulb in the socket.
�
Reinstall bulb socket.
�
Align headlamp cover2 and click into
place.
Side marker lamp bulb�
Switch off the lights.
�
Carefully slide lamp towards rear.
�
Remove front end first.
�
Twist bulb socket counterclockwise
and pull out.
�
Pull bulb out of the bulb socket.
�
Insert new bulb in socket.
�
Reinstall bulb socket, push in and twist
clockwise.
�
To reinstall lamp, set rear end in
bumper and let front end snap into
place.
��
Page 315 of 400
315 Practical hints
Replacing bulbs
Replacing bulbs for rear lamps
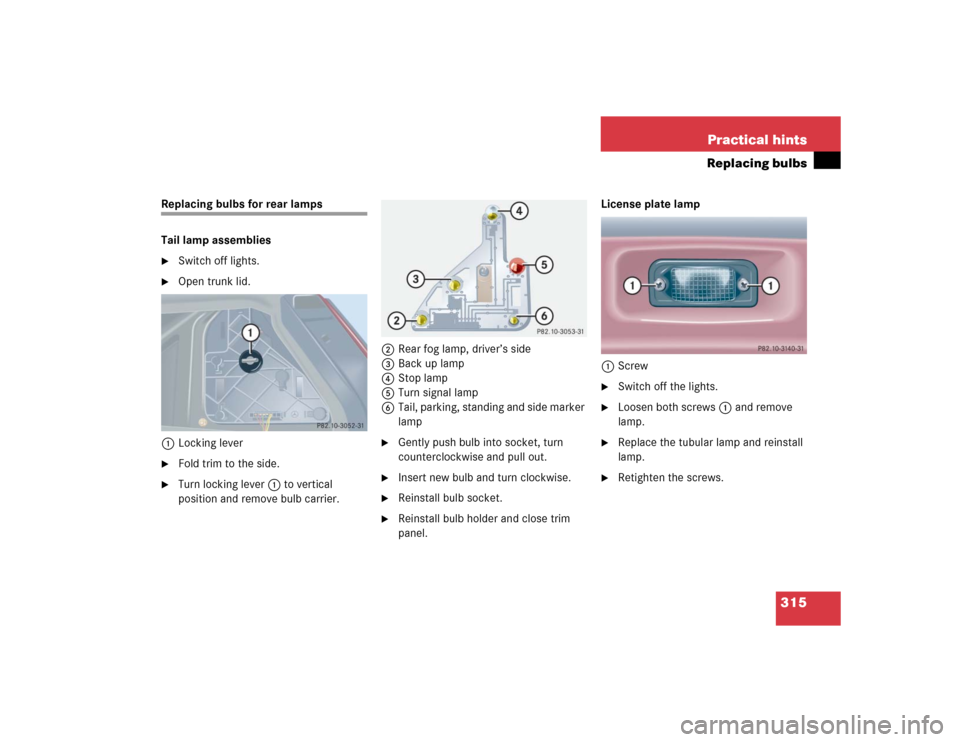
Tail lamp assemblies�
Switch off lights.
�
Open trunk lid.
1Locking lever
�
Fold trim to the side.
�
Turn locking lever1 to vertical
position and remove bulb carrier.2Rear fog lamp, driver’s side
3Back up lamp
4Stop lamp
5Turn signal lamp
6Tail, parking, standing and side marker
lamp
�
Gently push bulb into socket, turn
counterclockwise and pull out.
�
Insert new bulb and turn clockwise.
�
Reinstall bulb socket.
�
Reinstall bulb holder and close trim
panel.License plate lamp
1Screw
�
Switch off the lights.
�
Loosen both screws1 and remove
lamp.
�
Replace the tubular lamp and reinstall
lamp.
�
Retighten the screws.
Page 321 of 400

321 Practical hints
Flat tire
�
Unscrew the alignment bolt, install last
wheel bolt and tighten slightly.Lowering the vehicle
�
Lower vehicle by turning crank
counterclockwise until vehicle is
resting fully on its own weight.
�
Remove the jack.
1 - 5Wheel bolts
�
Tighten the five wheel bolts evenly,
following the diagonal sequence
illustrated (1to5), until all bolts are
tight. Observe a tightening torque
of 80 lb-ft (110 Nm).Before storing the jack, it should be fully
collapsed, with handle folded in (storage
position) (
�page 302).
�
Store the jack and the other vehicle
tools in the vehicle tool kit storage well
casing (
�page 303).
�
Store the wheel cover (Canada only)
and the damaged wheel in the trunk.
Warning!
G
Only use genuine equipment
Mercedes-Benz wheel bolts. Other wheel
bolts may come loose.
Do not tighten the wheel bolts when the
vehicle is raised. Otherwise the vehicle
could tip over.
Warning!
G
Have the tightening torque checked after
changing a wheel. The wheels could come
loose if they are not tightened to a torque
of 80 lb-ft (110 Nm).
Page 325 of 400
325 Practical hints
Battery
Reconnecting the battery�
Turn off all electrical consumers.
�
Connect the positive lead and fasten its
cover2.
�
Connect negative lead1.
�
Reinstall the filter box (
�page 323).Batteries contain materials that can harm
the environment if disposed of improperly.
Large 12 volt storage batteries contain
lead. Recycling of batteries is the preferred
method of disposal. Many states require
sellers of batteries to accept old batteries
for recycling.
!NEVER invert the terminal connections!!The battery, its filler caps and the vent
tube must always be securely installed
when the vehicle is in operation.
iThe following procedures must be
carried out following any interruption of
battery power (e.g. due to reconnec-
tion):�
Set the clock (
�page 126).
Vehicles with COMAND*:
See COMAND operator’s manual.
�
Resynchronize the ESP
(�page 282).
�
Resynchronize side windows
(�page 202).
�
Resynchronize sliding/pop-up
roof* (
�page 205).