Page 311 of 400

311 Practical hints
Replacing bulbs
Rear lamps Notes on bulb replacement
�
12 volt bulbs of the same type and
with the specified watt rating.
�
Switch lights off before changing a bulb
to prevent short circuits.
�
Always use a clean lint-free cloth when
handling bulbs.
�
Your hands should be dry and free of oil
and grease.
�
If the newly installed bulb does not
come on, visit an authorized
Mercedes-Benz Center.
�
Have the LEDs and bulbs for the
following lamps replaced by an
authorized Mercedes-Benz Center:�
Additional turn signals in the
exterior rear view mirrors
�
High mounted brake lamp
�
Xenon lamps
�
Front fog lamps
Lamp
Type
7
High mounted brake
lamp
LED
8
Brake lamp
P21W
9
Turn signal lamp
PY 21 W
a
Backup lamp
P21W
b
Tail, parking,
standing and side
marker lamp
P21/5W
c
License plate lamps
C5W
d
Rear fog lamp,
driver’s side
P21/4W
Warning!
G
Keep bulbs out of reach of children.
Bulbs and bulb sockets can be very hot.
Allow the lamp to cool down before
changing a bulb.
Halogen lamps contain pressurized gas.
A bulb can explode if you�
touch or move it when hot
�
drop the bulb
�
scratch the bulb
Wear eye and hand protection.
Because of high voltage in Xenon lamps, it is
dangerous to replace the bulb or repair the
lamp and its components. We recommend
that you have such work done by a qualified
technician.
Page 312 of 400

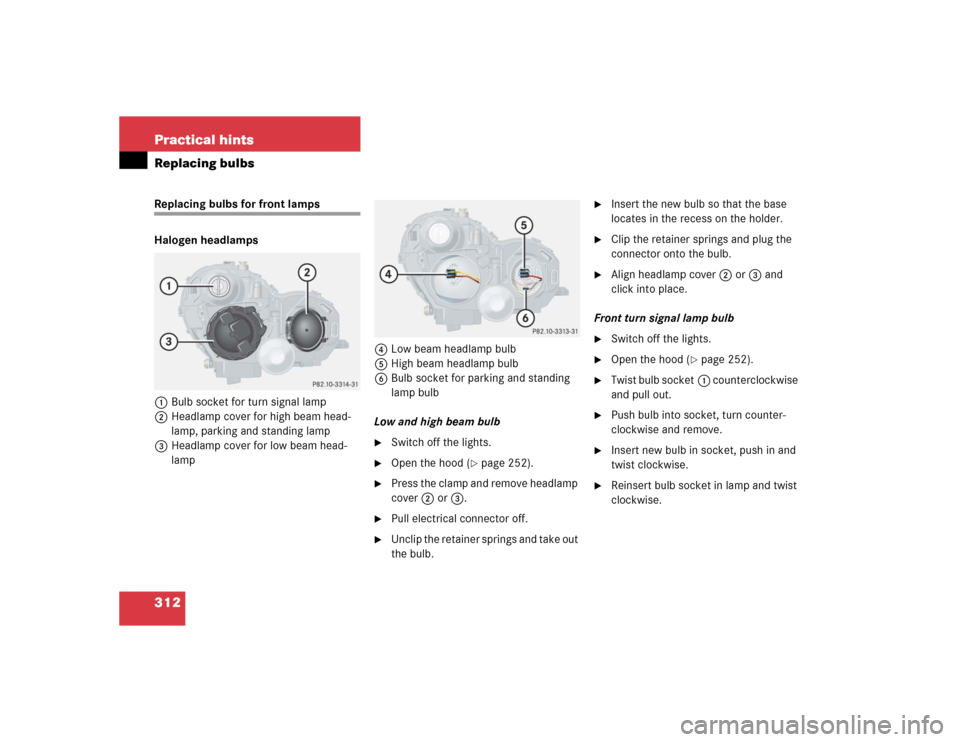
312 Practical hintsReplacing bulbsReplacing bulbs for front lamps
Halogen headlamps
1Bulb socket for turn signal lamp
2Headlamp cover for high beam head-
lamp, parking and standing lamp
3Headlamp cover for low beam head-
lamp4Low beam headlamp bulb
5High beam headlamp bulb
6Bulb socket for parking and standing
lamp bulb
Low and high beam bulb
�
Switch off the lights.
�
Open the hood (
�page 252).
�
Press the clamp and remove headlamp
cover2 or3.
�
Pull electrical connector off.
�
Unclip the retainer springs and take out
the bulb.
�
Insert the new bulb so that the base
locates in the recess on the holder.
�
Clip the retainer springs and plug the
connector onto the bulb.
�
Align headlamp cover2 or3 and
click into place.
Front turn signal lamp bulb
�
Switch off the lights.
�
Open the hood (
�page 252).
�
Twist bulb socket1 counterclockwise
and pull out.
�
Push bulb into socket, turn counter-
clockwise and remove.
�
Insert new bulb in socket, push in and
twist clockwise.
�
Reinsert bulb socket in lamp and twist
clockwise.
Page 313 of 400

313 Practical hints
Replacing bulbs
Parking and standing lamp bulb�
Switch off the lights.
�
Open the hood (
�page 252).
�
Press the clamp and remove headlamp
cover2.
�
Pull out bulb socket6 with the bulb.
�
Pull the bulb out of bulb socket.
�
Insert a new bulb in the socket.
�
Reinstall bulb socket.
�
Align headlamp cover2 and click into
place.Bi-Xenon* headlamps
1Bulb socket for turn signal lamp
2Headlamp cover for high beam flasher,
parking and standing lamp
3Cover for Bi-Xenon lamp4High beam flasher bulb
5Bayonet socket for high beam flasher
bulb
6Bulb socket for parking and standing
lamp bulb
High beam bulb
�
Switch off the lights.
�
Open the hood (
�page 252).
�
Press the clamp and remove lamp
cover2.
�
Pull electrical connector4 off.
Warning!
G
Do not remove the cover3 for the
Bi-Xenon headlamp. Because of high voltage
in Bi-Xenon lamps, it is dangerous to replace
the bulb or repair the lamp and its compo-
nents. We recommend that you have such
work done by a qualified technician.
��
Page 314 of 400

314 Practical hintsReplacing bulbs�
Twist bayonet socket5 counterclock-
wise to the stop (do not remove).
�
Pull the bulb out of the socket.
�
Insert the new bulb so that the base
locates in the recess in bayonet
socket5.
�
Twist bayonet socket clockwise until
you hear it snap into place.
�
Plug the connector onto the bulb.
�
Align lamp cover2 and click into
place.
Front turn signal lamp bulb
�
Switch off the lights.
�
Open the hood (
�page 252).
�
Twist bulb socket1 counterclockwise
and pull out.
�
Push bulb into socket, turn counter-
clockwise and remove.
�
Insert new bulb in socket, push in and
twist clockwise.
�
Reinsert bulb socket in lamp and twist
clockwise.
Parking and standing lamp bulb
�
Switch off the lights.
�
Open the hood (
�page 252).
�
Press the clamp and remove headlamp
cover2.
�
Pull out bulb socket6 with the bulb.
�
Pull the bulb out of bulb socket.
�
Insert a new bulb in the socket.
�
Reinstall bulb socket.
�
Align headlamp cover2 and click into
place.
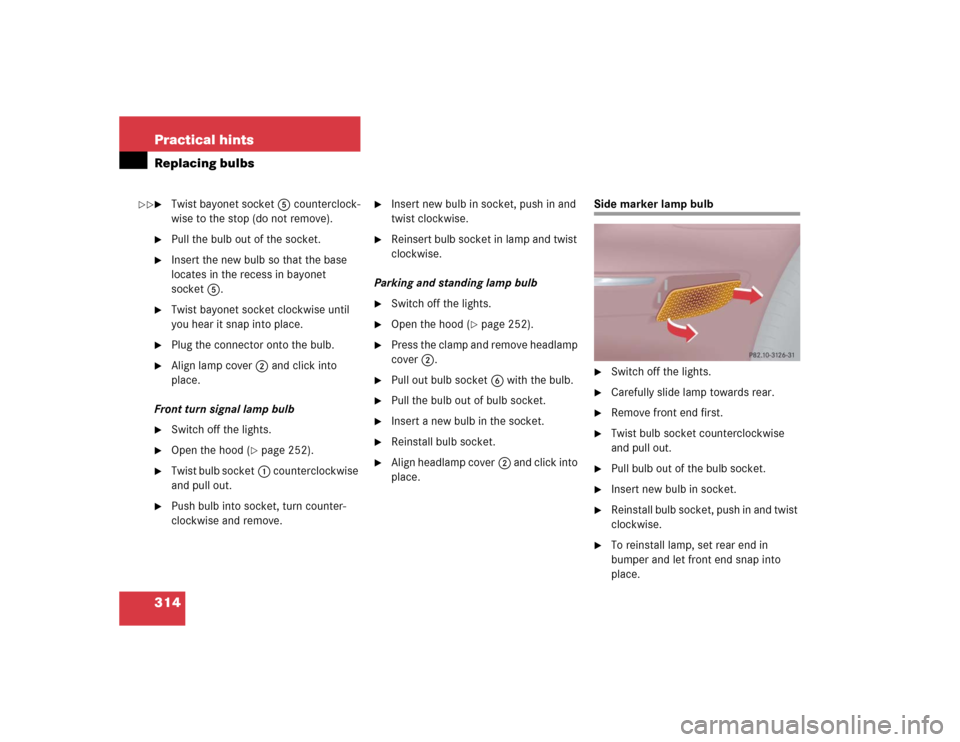
Side marker lamp bulb�
Switch off the lights.
�
Carefully slide lamp towards rear.
�
Remove front end first.
�
Twist bulb socket counterclockwise
and pull out.
�
Pull bulb out of the bulb socket.
�
Insert new bulb in socket.
�
Reinstall bulb socket, push in and twist
clockwise.
�
To reinstall lamp, set rear end in
bumper and let front end snap into
place.
��
Page 315 of 400
315 Practical hints
Replacing bulbs
Replacing bulbs for rear lamps
Tail lamp assemblies�
Switch off lights.
�
Open trunk lid.
1Locking lever
�
Fold trim to the side.
�
Turn locking lever1 to vertical
position and remove bulb carrier.2Rear fog lamp, driver’s side
3Back up lamp
4Stop lamp
5Turn signal lamp
6Tail, parking, standing and side marker
lamp
�
Gently push bulb into socket, turn
counterclockwise and pull out.
�
Insert new bulb and turn clockwise.
�
Reinstall bulb socket.
�
Reinstall bulb holder and close trim
panel.License plate lamp
1Screw
�
Switch off the lights.
�
Loosen both screws1 and remove
lamp.
�
Replace the tubular lamp and reinstall
lamp.
�
Retighten the screws.
Page 370 of 400

370 IndexAutomatic climate control* 162
Activating 163
Adjusting air distribution 166
Adjusting air volume 166
Air recirculation mode 167
Deactivating 163
Defrosting 167
Rear window defroster 153
Residual heat utilization 171
Residual ventilation 171
Setting the temperature 165
Automatic headlamp mode 103
Automatic lighting control
Activating 107
Deactivating 107
Automatic locking when driving 90
Automatic transmission fluid see ATF
Automatic transmission* 142
Accelerator position 147
Comfort program mode 146
Emergency operation
(Limp Home Mode) 147
Fluid level 256Gear ranges 144
Gear selector lever 44
Gear selector lever position 142, 145
Gear shifting malfunctions 147
Kickdown 147
Manual shifting 143
One-touch gearshifting 143
Program mode selector switch 146
Starting with 44
Transmission fluid 256
Auxiliary fuse box 334
B
BabySmart
TM
Airbag deactivation system 66, 361
Compatible child seats 66, 361
Self-test 66
Backrest
Folding forward 213
Folding rearward 213
Backrest contour
Adjusting 97Backrest side bolsters
Adjusting 97
Backrest tilt
Manual seat 33
Power seat* 35
Backup lamps 311, 315
Bulbs 310
BAS 73, 361
Messages in display 281
Batteries, SmartKey
Changing 307
Check lamp 83
Checking 84
Battery discharged
Jump starting 326
Battery, vehicle 258, 323
Charging 324
Disconnecting 324
Messages in display 285
Reconnecting 325
Reinstalling 324
Removing 324
Page 371 of 400

371 Index
Bi-Xenon headlamps* 361
Bi-Xenon type*
Front lamp bulbs 313
Block heater 264
Blocking
Rear door window operation 70
Bolts
For Minispare wheel 304
Brake Assist System see BAS
Brake fluid 352
Checking 251
Message in display 286
Brake lamp bulbs 311
Brake lamp, high mounted 311
Brake pads
Message in display 286
Brakes 240
Warning lamp 275
Break-in period 238Bulbs, replacing 310
Additional turn signals 310
Backup lamps 311
Brake lamps 311
Fog lamps 310
Front lamps 310
High beam 310
High beam flasher 310
High mounted brake lamp 311
License plate lamps 311, 315
Low beam 310
Parking lamps 310, 311, 313, 314
Rear fog lamp 311, 315
Rear lamps 311
Side marker lamps 310, 314
Standing lamps 310, 311, 313, 314
Tail lamp assemblies 311, 315
Turn signal lamps 310, 311
Button
Audio system 176C
CAC 361
California
Important notice 11
Calling up
Range (distance to empty) 138
Service indicator 266
CAN system 361
Capacities
Fuels, coolants, lubricants, etc. 349
Cargo area see Trunk
Cassette operation
Playing cassettes 186
Cassette player
Operating 121
Catalytic converter 247
CD changer* 189
CD player*
Operating 120
CD* operation 189
Page 377 of 400

377 Index
ETD 63, 362
Safety guidelines 58
Ethanol fuel
At the gas station 249
Requirements 354
Switching fuels 354
Exterior lamp switch 46, 102
Exterior lamps
Delayed shut-off 131
Exterior rear view mirrors
Adjusting 38
Parking position* for 136
F
Fahrenheit
Setting temperature units 127
Fastening the seat belts 40
Filler neck
C 230 Kompressor Sport 256
C 240, C 320, and C 32 AMG 256Fine adjustment
Cruise control 208
First aid kit 300
Flat tire 317
Lowering the vehicle 321
Minispare wheel 302
Mounting the Minispare wheel 317
Preparing the vehicle 317
Flexible fuel vehicles 354
At the gas station 249
Switching fuels 354
Flexible Service System see FSS
Fog lamp, rear
Message in display 294
Replacing bulb 311
Switching on 105
Fog lamps, front
Messages in display 294
Replacing bulbs 310
Switching on 105Four wheel electronic traction
system (4MATIC) with ESP 77
4MATIC 77
Front airbags 59
Front lamps
Bi-Xenon* type 313
Halogen-type 312
Messages in display 293–296
Replacing bulbs 310, 312
Switching on 102
Front seat head restraints
Installing
Manual seat 93
Power seat* 94
Manual seat 93
Power seat* 94
Removing
Manual seat 93
Power seat* 94
Front seats
Heating* 98