Page 205 of 400

205 Controls in detail
Sliding/pop-up roof*
Opening (Summer opening feature)�
Press and hold buttonΠafter
unlocking the vehicle.
The windows and the sliding/pop-up
roof begin to open after approximately
one second.
�
Release theΠbutton to stop
procedure.Closing (Convenience feature)
�
Press and hold button‹ after
locking the vehicle.
The windows and the sliding/pop-up
roof begin to close after approximately
one second.
�
Release the‹ button to stop
procedure.
Make sure all side windows and the
sliding/pop-up roof are properly closed
before leaving the vehicle.
Synchronizing the sliding/pop-up roof
The power sliding/pop-up roof must be
resynchronized each time�
after the battery has been
disconnected.
�
after the sliding/pop-up roof has been
closed manually.
�
if the sliding/pop-up roof does not
open smoothly.
�
after a malfunction.
Synchronizing
�
Switch on ignition.
�
Press and hold the switch in
direction1 until the sliding/pop-up
roof is fully raised at the rear.
Hold the switch for approximately one
second.
The sliding/pop-up roof is adjusted.
Page 212 of 400

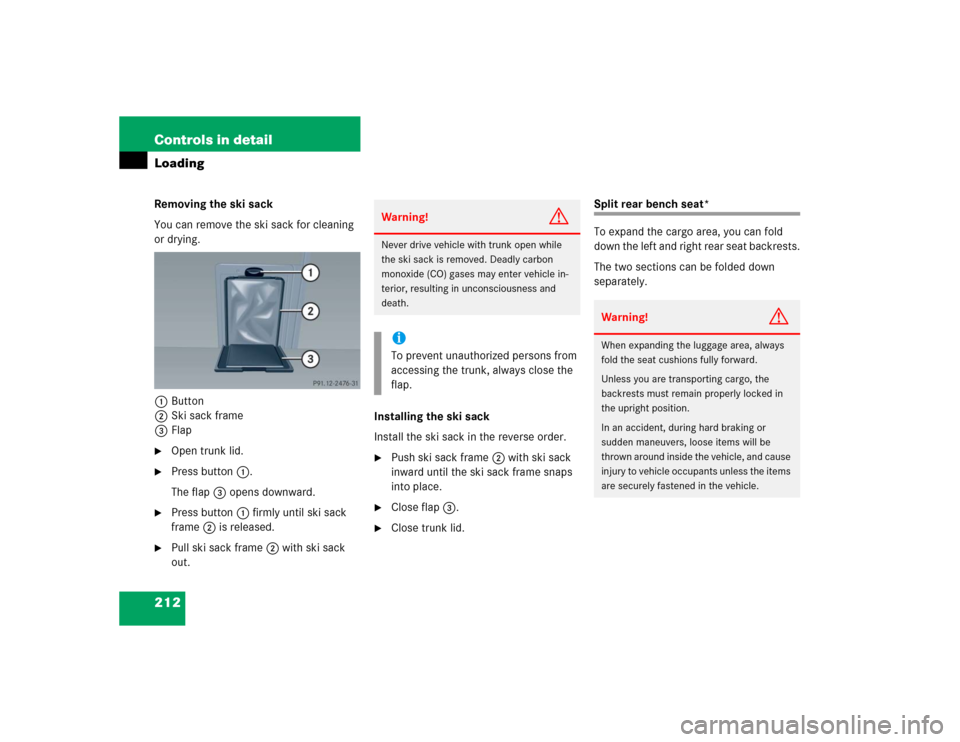
212 Controls in detailLoadingRemoving the ski sack
You can remove the ski sack for cleaning
or drying.
1Button
2Ski sack frame
3Flap�
Open trunk lid.
�
Press button1.
The flap3 opens downward.
�
Press button1 firmly until ski sack
frame2 is released.
�
Pull ski sack frame2 with ski sack
out.Installing the ski sack
Install the ski sack in the reverse order.
�
Push ski sack frame2 with ski sack
inward until the ski sack frame snaps
into place.
�
Close flap3.
�
Close trunk lid.
Split rear bench seat*
To expand the cargo area, you can fold
down the left and right rear seat backrests.
The two sections can be folded down
separately.
Warning!
G
Never drive vehicle with trunk open while
the ski sack is removed. Deadly carbon
monoxide (CO) gases may enter vehicle in-
terior, resulting in unconsciousness and
death.iTo prevent unauthorized persons from
accessing the trunk, always close the
flap.
Warning!
G
When expanding the luggage area, always
fold the seat cushions fully forward.
Unless you are transporting cargo, the
backrests must remain properly locked in
the upright position.
In an accident, during hard braking or
sudden maneuvers, loose items will be
thrown around inside the vehicle, and cause
injury to vehicle occupants unless the items
are securely fastened in the vehicle.
Page 213 of 400
213 Controls in detail
Loading
Folding the backrest forward
The release handle1 is located in the
trunk.�
Pull release handle1.
�
Fully retract and fold rearward head
restraints (
�page 95).
�
Pull release handle2.
�
Fold seat cushion3 forward.
�
Fold backrest4 forward.Setting up rear seat bench
�
Fold backrest4 rearward until it
engages.
�
Fold seat cushion3 rearward until it
locks into position.
Page 214 of 400

214 Controls in detailLoadingIf the backrest is not locked into position,
a red indicator5 will be visible.�
Check for secure locking by pushing
and pulling on the backrest.
Loading instructions
The total load weight including vehicle oc-
cupants and luggage/cargo should not ex-
ceed the vehicle capacity weight indicated
on the certification tag which can be found
on the left door pillar.
The handling characteristics of a fully load-
ed vehicle depend greatly on the load dis-
tribution. It is therefore recommended to
load the vehicle according to the illustra-
tions shown, with the heaviest items being
placed towards the front of the vehicle.
Warning!
G
If a red indicator is visible with the backrest
up, then the backrest is not properly locked
into position.
Always lock backrest in its upright position
when rear seat bench is occupied, cargo is
being carried in the trunk, or the extended
cargo compartment is not in use. Check for
secure locking by pushing and pulling on the
backrest.
In an accident, during hard braking or sud-
den maneuvers, loose items will be thrown
around inside the vehicle, and cause injury
to vehicle occupants unless the items are
securely fastened in the vehicle.
To help avoid personal injury during a
collision or sudden maneuver, exercise care
when transporting cargo.iTo prevent unauthorized persons from
access to the trunk, always lock
backrest in its upright position.
Page 216 of 400

216 Controls in detailUseful features
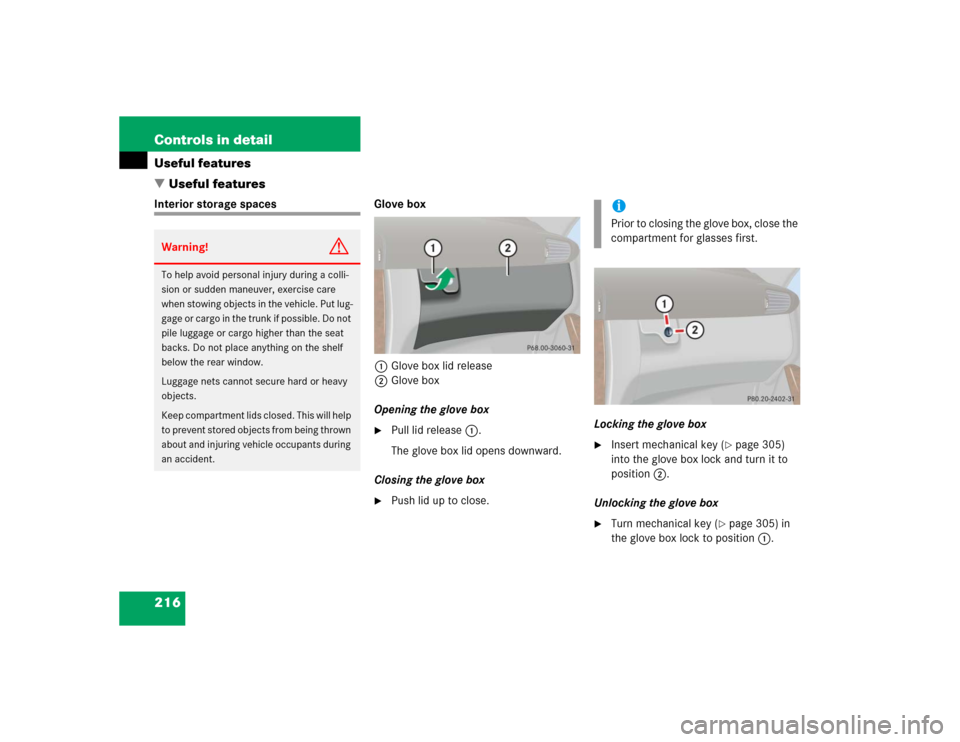
�Useful featuresInterior storage spaces Glove box
1Glove box lid release
2Glove box
Opening the glove box
�
Pull lid release1.
The glove box lid opens downward.
Closing the glove box
�
Push lid up to close.Locking the glove box
�
Insert mechanical key (
�page 305)
into the glove box lock and turn it to
position2.
Unlocking the glove box
�
Turn mechanical key (
�page 305) in
the glove box lock to position1.
Warning!
G
To help avoid personal injury during a colli-
sion or sudden maneuver, exercise care
when stowing objects in the vehicle. Put lug-
g a g e o r c a r g o i n t h e t r u n k i f p o s s i b l e . D o n o t
pile luggage or cargo higher than the seat
backs. Do not place anything on the shelf
below the rear window.
Luggage nets cannot secure hard or heavy
objects.
Keep compartment lids closed. This will help
to prevent stored objects from being thrown
about and injuring vehicle occupants during
an accident.
iPrior to closing the glove box, close the
compartment for glasses first.
Page 221 of 400

221 Controls in detail
Useful features
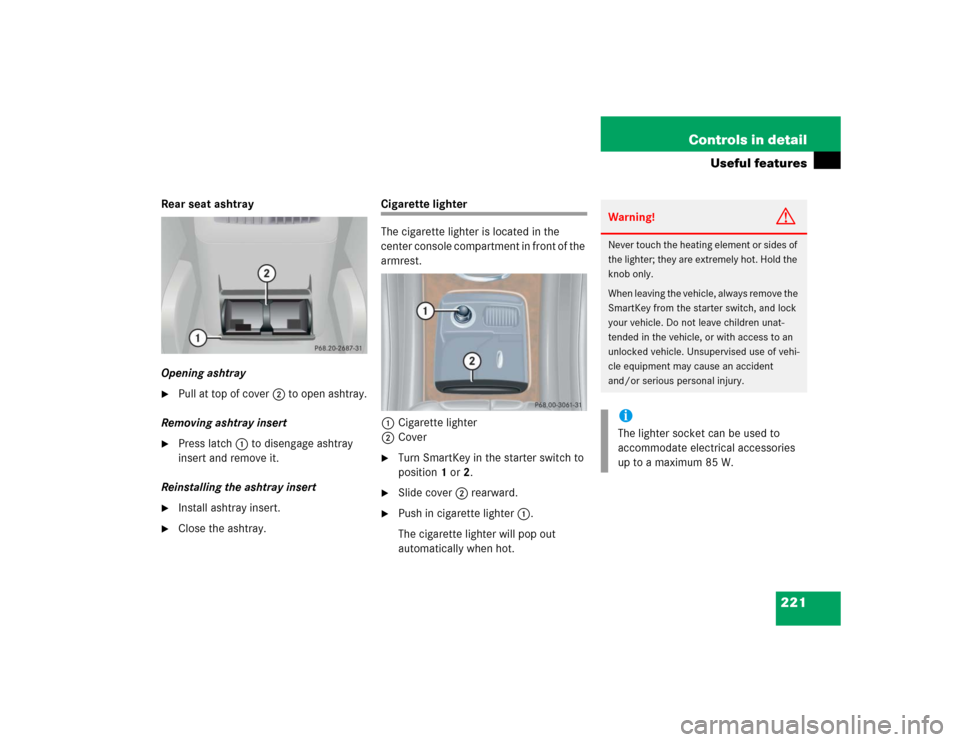
Rear seat ashtray
Opening ashtray�
Pull at top of cover2 to open ashtray.
Removing ashtray insert
�
Press latch1 to disengage ashtray
insert and remove it.
Reinstalling the ashtray insert
�
Install ashtray insert.
�
Close the ashtray.
Cigarette lighter
The cigarette lighter is located in the
center console compartment in front of the
armrest.
1Cigarette lighter
2Cover�
Turn SmartKey in the starter switch to
position1 or2.
�
Slide cover2 rearward.
�
Push in cigarette lighter1.
The cigarette lighter will pop out
automatically when hot.
Warning!
G
Never touch the heating element or sides of
the lighter; they are extremely hot. Hold the
knob only.
When leaving the vehicle, always remove the
SmartKey from the starter switch, and lock
your vehicle. Do not leave children unat-
tended in the vehicle, or with access to an
unlocked vehicle. Unsupervised use of vehi-
cle equipment may cause an accident
and/or serious personal injury.iThe lighter socket can be used to
accommodate electrical accessories
up to a maximum 85 W.
Page 223 of 400

223 Controls in detail
Useful features
Tele Aid* The Tele Aid system
(Tele
matic A
larm I
dentification on
D
emand)
The Tele Aid system consists of three
types of response:�
automatic and manual emergency
�
roadside assistance and
�
information
The Tele Aid system is operational provid-
ing that the vehicle’s battery is charged,
properly connected, not damaged and
cellular and GPS coverage is available.
The speaker volume of a Tele Aid call can
be adjusted when using the volume control
on the multifunction steering wheel. To
raise, press buttonæ and to lower,
press buttonç.
�
To activate, press the SOS button, the
Roadside Assistance button• or
the Information button¡, depend-
ing on the type of response required.Shortly after the completion of your Tele
Aid acquaintance call, you will receive a
user ID and password via first call mail. By
visiting www.mbusa.com and selecting
“Tele Aid” (USA only), you will have access
to account information, remote door
unlock, Info Services profile and more.
!The initial activation of the Tele Aid
system may only be performed by
completing the subscriber agreement
and placing an acquaintance call using
the SOS button. Failure to complete
either of these steps will result in a
system that is not activated. If the
system is not activated, the indicator
lamp in the SOS button stays on after
turning SmartKey in starter switch to
position2 and the message
TELE AID
EMERG. CALL – NOT ACTIVATED
will be
shown in the multifunction display for
approximately ten seconds.
If you have any questions regarding
activation, please call the Response
Center at 1-800-756-9018 (in the USA)
or 1-888-923-8367 (in Canada).
iThe SOS button is located above the
interior rear view mirror.
The Roadside Assistance button•
and the Information button¡ are
located below the center armrest
cover.!The Tele Aid system utilizes the cellular
network for communication and the
GPS (Global Positioning System) satel-
lites for vehicle location. If either of
these signals are unavailable, the
Tele Aid system may not function and if
this occurs, assistance must be sum-
moned by other means.
Page 230 of 400

230 Controls in detailUseful featuresRemote door unlock
In case you have locked your vehicle unin-
tentionally (e.g. SmartKey inside vehicle),
and the reserve SmartKey is not handy:�
Contact the Mercedes-Benz Response
Center at 1-800-756-9018 (in the USA)
or 1-888-923-8367 (in Canada).
You will be asked to provide your pass-
word which you provided when you
completed the subscriber agreement.
�
Then return to your vehicle and pull the
trunk recessed handle for a minimum
of 20 seconds until the SOS button is
flashing.
The message
EMERGENCY CALL –
CALL CONNECTED appears in the multi-
function display.
As an alternative, you may unlock the vehi-
cle via Internet using the ID and password
sent to you shortly after the completion of
your acquaintance call.The Response Center will then unlock your
vehicle with the remote door unlocking
feature.Stolen vehicle tracking services
In the event your vehicle was stolen:
�
Report the incident to the police.
The police will issue a numbered
incident report.
�
Pass this number on to the
Mercedes-Benz Response Center along
with your password issued to you when
you subscribed to the service.
The Response Center will then attempt
to covertly contact the vehicle’s
Tele Aid system. Once the vehicle is
located, the Response Center will
contact the local law enforcement and
you. The vehicle’s location will only be
provided to law enforcement.
iThe remote door unlock feature is avail-
able if the relevant cellular phone net-
work is available.
The SOS button will flash and the
message
EMERGENCY CALL –
CALL CONNECTED
will appear in the
multifunction display to indicate
receipt of the door unlock command.
Once the vehicle is unlocked, a
Response Center specialist will
attempt to establish voice contact with
the vehicle occupants.
If the trunk recessed handle was pulled
for more than 20 seconds before door
unlock authorization was received by
the Response Center, you must
wait 15 minutes before pulling the
trunk recessed handle again.