Page 31 of 400

31 Getting started
Unlocking
Starter switch positionsStarter switch0For removing SmartKey
The steering is locked when the
SmartKey is removed from the starter
switch. If necessary, move steering
wheel slightly to allow the locking
mechanism to engage.
1Power supply to some electrical con-
sumers, such as seat adjustment
2Ignition (power supply for all electrical
consumers) and driving position
3Starting position
Warning!
G
When leaving the vehicle, always remove the
SmartKey from the starter switch and lock
the vehicle. Do not leave children unattend-
ed in the vehicle, or with access to an un-
locked vehicle. Unsupervised use of vehicle
equipment may cause an accident and/or
serious personal injury.iThe SmartKey can only be removed
from the starter switch with the gear
selector lever in positionP.
!If the SmartKey cannot be turned in the
starter switch, the battery may not be
sufficiently charged.�
Check the battery and charge it if
necessary (
�page 324)
�
Get a jump start (
�page 327).
To prevent accelerated battery
discharge and a possible dead battery,
always remove the SmartKey from the
starter switch when the engine is not in
operation.
Page 39 of 400

39 Getting started
Adjusting
The buttons are located above the exterior
lamp switch.
1Driver’s side exterior rear view mirror
button
2Adjustment button
3Passenger-side exterior rear view
mirror button�
Make sure the ignition is switched on.
All lamps in the instrument cluster
come on.
�
Press button1 for the left mirror or
button3 for the right mirror.
�
Push adjustment button2 up, down,
left, or right according to the desired
setting.
For more information, see “Activating exte-
rior rear view mirror parking position”
(
�page 147).
!If an exterior rear view mirror was
forcibly pushed forward (hit from the
rear) or forcibly pushed rearward (hit
from the front), reposition it by
applying firm pressure until it snaps
into place. The mirror housing is now
properly positioned and you can adjust
the mirror normally.
iThe memory function* (
�page 97) lets
you store the setting for the exterior
rear view mirrors together with the set-
tings for the steering wheel and seat
position.
iAt low ambient temperatures, the
mirrors will be heated automatically.
Page 47 of 400

47 Getting started
Driving
High beam�
Push combination switch forward.
The high beam symbolA in the
instrument cluster comes on.
For more information on high beam, see
“Combination switch” (
�page 103).
Windshield wipers
The combination switch is located on the
left of the steering column.Combination switch1Single wipe
2Switching on windshield wipers �
Make sure the ignition is switched on.Switching on windshield wipers
�
Turn the combination switch to the
desired position depending on the
intensity of the rain.
0Windshield wipers off
IIntermittent wiping
IINormal wiper speed
IIIFast wiper speed
iTo signal minor directional changes,
move combination switch to point of
resistance only and release. The turn
signal flashes three times.
iVehicles without rain sensor*:
Fast wiper speedIII goes to settingII
when the vehicle is standing still.
Vehicles with rain sensor*:
Intermittent wiping interval is depen-
dent on wetness of windshield. Wiping
will not occur with a front door open.
Page 49 of 400
49 Getting started
Driving
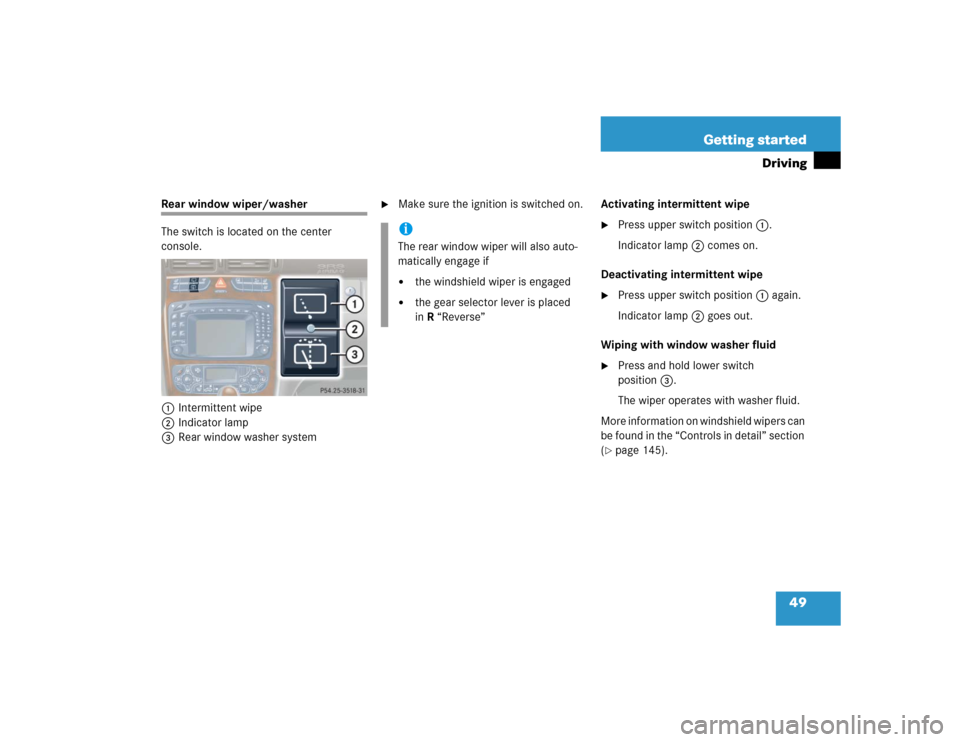
Rear window wiper/washer
The switch is located on the center
console.
1Intermittent wipe
2Indicator lamp
3Rear window washer system
�
Make sure the ignition is switched on.Activating intermittent wipe
�
Press upper switch position1.
Indicator lamp2 comes on.
Deactivating intermittent wipe
�
Press upper switch position1 again.
Indicator lamp2 goes out.
Wiping with window washer fluid
�
Press and hold lower switch
position3.
The wiper operates with washer fluid.
More information on windshield wipers can
be found in the “Controls in detail” section
(
�page 145).
iThe rear window wiper will also auto-
matically engage if�
the windshield wiper is engaged
�
the gear selector lever is placed
inR “Reverse”
Page 50 of 400

50 Getting startedDrivingProblems while driving
The engine runs erratically and misfires�
An ignition cable may be damaged.
�
The engine electronics may not be op-
erating properly.
�
Unburned gasoline may have entered
the catalytic converter and damaged it.
�
Give very little gas.
�
Have the problem repaired by an au-
thorized Mercedes-Benz Center as
soon as possible.The coolant temperature is over 248°F
(120°C)
The coolant is too hot and is no longer
cooling the engine.
�
Stop the vehicle as soon as possible
and turn off the engine. Allow engine
and coolant to cool.
�
Check the coolant level and add cool-
ant if necessary (
�page 257).In case of accident
If the vehicle is leaking gasoline:
�
Do not start the engine under any cir-
cumstances.
�
Notify local fire and/or police authori-
ties.
If the extent of the damage cannot be de-
termined:
�
Notify an authorized Mercedes-Benz
Center.
If no damage can be determined on the
�
major assemblies
�
fuel system
�
engine mount
�
Start the engine in the usual manner.
Page 82 of 400
82 Safety and SecurityAnti-theft systemsArming tow-away alarm
When you lock your vehicle, the tow-away
alarm is automatically armed after about
30 seconds.
When you unlock your vehicle, the
tow-away protection disarms
automatically.
Disarming tow-away alarm
To prevent triggering the tow-away alarm,
switch off the tow-away alarm feature
before towing the vehicle, or when parking
on a surface subject to movement, such as
a ferry or auto train.The switch is located on the center
console.
1Tow-away alarm off switch
2Indicator lamp
�
Switch off the ignition and remove the
SmartKey.
�
Press upper switch position1.
Indicator lamp2 in switch comes on
briefly.
�
Exit and lock your vehicle with the
SmartKey.
The tow-away alarm remains disarmed
until you lock your vehicle again.
Canceling the alarm
To cancel the alarm:
�
Insert the SmartKey in the starter
switch.
or
�
Press theŒ or‹ button on the
SmartKey.
iYou cannot disarm the tow-away alarm
while the ignition is switched on.
Page 88 of 400

88 Controls in detailLocking and unlockingClosing the tailgate
1Handle�
Lower tailgate by pulling firmly on
handle1.
�
Close tailgate with hands placed flat on
it.
Automatic central locking
The doors and the tailgate automatically
lock when the ignition is switched on and
the wheels are turning at vehicle speeds of
approximately 9 mph (15 km/h) or more.
You can open a locked door from the in-
side. Open door only when conditions are
safe to do so.
iThe vehicle must be unlocked.
Warning!
G
To prevent possible personal injury, always
keep hands and fingers away from the tail-
gate opening when closing the tailgate. Be
especially careful when small children are
around.Warning!
G
Only drive with the tailgate closed as
exhaust fumes may enter the vehicle
interior.iDo not place the SmartKey in the open
cargo compartment. You may lock
yourself out.
iThe doors unlock automatically after an
accident if the force of the impact
exceeds a preset threshold.
The vehicle automatically locks when
the ignition is switched on and the
wheels are turning at vehicle speeds of
approximately 9 mph (15 km/h) or
more. You could therefore lock yourself
out when the vehicle�
is pushed or towed
�
is on a test stand
Page 95 of 400
95 Controls in detail
Seats
Multicontour seat*
This multicontour seat has a movable seat
cushion and inflatable air cushions built
into the backrest to provide additional
lumbar and side support.
The seat cushion movement, backrest
cushion height and curvature can be con-
tinuously varied with switches on the right
side of the seat after starting the engine.
1Seat cushion depth
2Backrest bottom
3Backrest center
4Backrest side bolster adjustment
�
Start the engine.
Seat cushion depth
�
Adjust the seat cushion depth to the
length of your upper leg using
switch1.
Backrest contour
�
Adjust the contour of the backrest to
the desired position using switches2
and3.
Backrest side bolsters
�
Adjust the backrest side bolsters so
that they provide good lateral support
using switch4.
Heated seats*
Both switches for the front seats are
located in the center console.
1Normal heating
2Rapid heating�
Make sure the ignition is switched on.
All the lamps in the instrument cluster
come on.