Page 314 of 400
.
�
Pull the bulb out of the socket.
�
Insert the new bulb so that the base
locates in the rece")
314 Practical hintsReplacing bulbs�
Twist bayonet socket5 counterclock-
wise to the stop (do not remove).
�
Pull the bulb out of the socket.
�
Insert the new bulb so that the base
locates in the recess in bayonet
socket5.
�
Twist bayonet socket clockwise until
you hear it snap into place.
�
Plug the connector onto the bulb.
�
Align lamp cover2 and click into
place.
Front turn signal lamp bulb
�
Switch off the lights.
�
Open the hood (
�page 252).
�
Twist bulb socket1 counterclockwise
and pull out.
�
Push bulb into socket, turn counter-
clockwise and remove.
�
Insert new bulb in socket, push in and
twist clockwise.
�
Reinsert bulb socket in lamp and twist
clockwise.
Parking and standing lamp bulb
�
Switch off the lights.
�
Open the hood (
�page 252).
�
Press the clamp and remove headlamp
cover2.
�
Pull out bulb socket6 with the bulb.
�
Pull the bulb out of bulb socket.
�
Insert a new bulb in the socket.
�
Reinstall bulb socket.
�
Align headlamp cover2 and click into
place.
Side marker lamp bulb�
Switch off the lights.
�
Carefully slide lamp towards rear.
�
Remove front end first.
�
Twist bulb socket counterclockwise
and pull out.
�
Pull bulb out of the bulb socket.
�
Insert new bulb in socket.
�
Reinstall bulb socket, push in and twist
clockwise.
�
To reinstall lamp, set rear end in
bumper and let front end snap into
place.
��
Page 315 of 400
315 Practical hints
Replacing bulbs
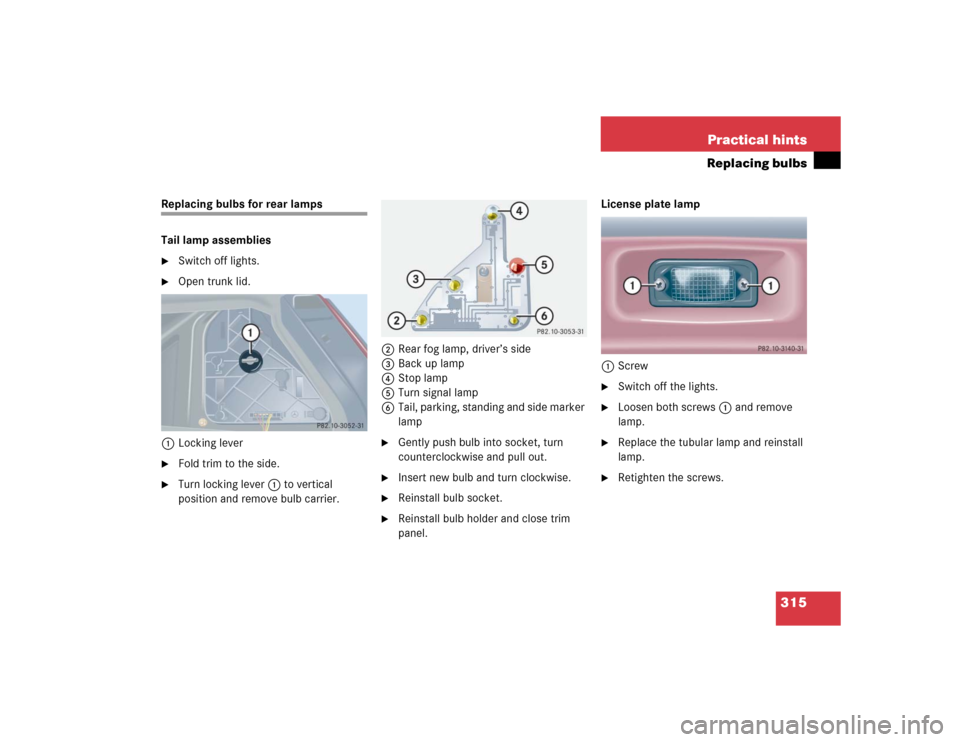
Replacing bulbs for rear lamps
Tail lamp assemblies�
Switch off lights.
�
Open trunk lid.
1Locking lever
�
Fold trim to the side.
�
Turn locking lever1 to vertical
position and remove bulb carrier.2Rear fog lamp, driver’s side
3Back up lamp
4Stop lamp
5Turn signal lamp
6Tail, parking, standing and side marker
lamp
�
Gently push bulb into socket, turn
counterclockwise and pull out.
�
Insert new bulb and turn clockwise.
�
Reinstall bulb socket.
�
Reinstall bulb holder and close trim
panel.License plate lamp
1Screw
�
Switch off the lights.
�
Loosen both screws1 and remove
lamp.
�
Replace the tubular lamp and reinstall
lamp.
�
Retighten the screws.
Page 317 of 400

317 Practical hints
Flat tire
�Flat tire
Preparing the vehicle�
Park the vehicle as far as possible from
moving traffic on a hard surface.
�
Turn on the hazard warning flashers.
�
Engage the steering wheel lock in the
straight ahead position and set the
parking brake.
�
Move the gear selector lever toP
(manual transmission to first or reverse
gear).
�
Have any passenger exit the vehicle at
a safe distance from the roadway.
Mounting the Minispare wheel
In the case of a flat tire, you may
temporarily use the Minispare wheel when
observing the following restrictions:�
Do not exceed vehicle speed of 50 mph
(80 km/h).
�
Drive to the nearest tire repair facility
to have the flat tire repaired or
replaced as appropriate.
�
Do not operate vehicle with more than
one spare wheel mounted.Preparing the vehicle
Prepare the vehicle as described on
(
�page 317).
�
Take the wheel wrench and the jack
out of the vehicle tool kit storage well
casing underneath the trunk floor
(�page 300).
�
Take the Minispare wheel and wheel
bolts out of the storage compartment
underneath the trunk floor
(�page 302).
Lifting the vehicle
�
Prevent the vehicle from rolling away
by blocking wheels with wheel chocks
(not included) or other sizable objects.
When changing wheel on a level surface:
�
Place one chock in front of and one
behind the wheel that is diagonally
opposite to the wheel being changed.
When changing wheel on a hill:
�
Place chocks on the downhill side
blocking both wheels of the other axle.
Warning!
G
The dimensions of the Minispare wheel are
different from those of the road wheels. As
a result, the vehicle handling characteristics
change when driving with a Minispare wheel
mounted.
The spare wheel should only be used
temporarily, and replaced with a regular
road wheel as quick as possible.
Page 318 of 400
�
On wheel to be changed, remove wheel
cover by reaching into two openings of
the wheel cover and pulling away from")
318 Practical hintsFlat tire
Wheel cover on vehicles with steel rims
(Canada only)�
On wheel to be changed, remove wheel
cover by reaching into two openings of
the wheel cover and pulling away from
the wheel.
�
On wheel to be changed, loosen but do
not yet remove the wheel bolts
(approximately one full turn with
wrench).
Warning!
G
The jack is designed exclusively for jacking
up the vehicle at the jack take-up brackets
built into both sides of the vehicle. To help
avoid personal injury, use the jack only to lift
the vehicle during a wheel change. Never
get beneath the vehicle while it is supported
by the jack. Keep hands and feet away from
the area under the lifted vehicle. Always
firmly set parking brake and block wheels
before raising vehicle with jack.
Do not disengage parking brake while the
vehicle is raised. Be certain that the jack is
always vertical (plumb line) when in use,
especially on hills. Always try to use the jack
on level surface. Make sure the jack arm is
fully seated in the jack take-up bracket. Al-
ways lower the vehicle onto sufficient ca-
pacity jackstands before working under the
vehicle.
Page 327 of 400

327 Practical hints
Jump starting
The battery is located in the engine
compartment on the right hand side. The
terminals for jump starting are located in
front of the battery.�
Make sure the two vehicles do not
touch.
�
Turn off all electrical consumers.
�
Apply parking brake.
�
Shift gear selector lever to positionP
(manual transmission to Neutral).1Positive terminal of charged battery
2Positive under hood terminal in front of
discharged battery
3Negative terminal of charged battery
4Negative under hood terminal in front
of discharged battery
�
Connect positive terminal1 of the
charged battery with positive under
hood terminal2 in front of the
discharged battery with the jumper
cables. Clamp cable to charged
battery1 first.
�
Start engine of the vehicle with the
charged battery and run at idle speed.
�
Connect negative terminal3 of the
charged battery with negative under
hood terminal4 of the discharged
battery with the jumper cables. Clamp
cable to charged battery3 first.
�
Start the engine of the disabled
vehicle.
You can now again turn on the electrical
consumers. Do not turn on the lights under
any circumstances.
�
Remove the jumper cables first from
negative terminals3 and4 and then
from positive terminals1 and2.
You can now turn on the lights.
�
Have the battery checked at the near-
est authorized Mercedes-Benz Center.
Warning!
G
Keep flames or sparks away from battery.
Do not smoke.
Observe all safety instructions and precau-
tions when handling automotive batteries
(�page 258).
!Vehicles with automatic transmission
and/or 4MATIC:
Do not tow-start the vehicle.
Page 367 of 400

367 Index
A
ABS 23, 72, 361
ABS control 72
Malfunction indicator lamp 274
Messages in display 284
Accelerator position,
automatic transmission* 147
Accident
In case of 49
Activating
Air conditioning (cooling)
Automatic climate control* 170
Climate control 160
Air recirculation mode
Automatic climate control* 167
Climate control 158
Anti-theft alarm system* 78
Automatic climate control* 163
Central locking (control system) 133
Charcoal filter 169
Climate control 155Climate control system 159
Defrosting
Automatic climate control* 167
Climate control 158
Easy-entry/exit feature* 134
ESP 76
Exterior headlamps 46
Exterior lamps 103
Exterior rear view mirror
parking position* 150
Hazard warning flasher 106
Headlamps 46
High beams 106
Ignition 31
Immobilizer 52
Rapid seat heating* 98
Rear fog lamp 104, 105
Rear window defroster 153
Residual heat 171
Seat heating* 98
Tow-away alarm* 80
Windshield wipers 48Adding
Coolant 257
Engine oil 255
Additional turn signals 310
Adjustable air vents,
rear passenger compartment
Automatic climate control* 172
Climate control 161
Adjusting 32
Air distribution
Automatic climate control* 166
Climate control 157
Air volume
Automatic climate control* 166
Climate control 157
Backrest contour 97
Backrest side bolsters 97
Backrest tilt
Manual seat 33
Power seat* 35
Exterior rear view mirrors 38
Page 371 of 400

371 Index
Bi-Xenon headlamps* 361
Bi-Xenon type*
Front lamp bulbs 313
Block heater 264
Blocking
Rear door window operation 70
Bolts
For Minispare wheel 304
Brake Assist System see BAS
Brake fluid 352
Checking 251
Message in display 286
Brake lamp bulbs 311
Brake lamp, high mounted 311
Brake pads
Message in display 286
Brakes 240
Warning lamp 275
Break-in period 238Bulbs, replacing 310
Additional turn signals 310
Backup lamps 311
Brake lamps 311
Fog lamps 310
Front lamps 310
High beam 310
High beam flasher 310
High mounted brake lamp 311
License plate lamps 311, 315
Low beam 310
Parking lamps 310, 311, 313, 314
Rear fog lamp 311, 315
Rear lamps 311
Side marker lamps 310, 314
Standing lamps 310, 311, 313, 314
Tail lamp assemblies 311, 315
Turn signal lamps 310, 311
Button
Audio system 176C
CAC 361
California
Important notice 11
Calling up
Range (distance to empty) 138
Service indicator 266
CAN system 361
Capacities
Fuels, coolants, lubricants, etc. 349
Cargo area see Trunk
Cassette operation
Playing cassettes 186
Cassette player
Operating 121
Catalytic converter 247
CD changer* 189
CD player*
Operating 120
CD* operation 189
Page 373 of 400

373 Index
Climate control 154
Adjusting air distribution
and volume 157
Defogging windshield 157
Defrosting 158
Setting the temperature 156
Clock 23, 126
Closing
Glove box 216
Hood 253
Sliding/pop-up roof* 204
Sliding/pop-up roof*
in an emergency 309
Sliding/pop-up roof*
with SmartKey 204
Trunk lid 87
Windows 201
Windows with SmartKey 202
Cloth upholstery
Cleaning 272
Cockpit 20, 361Cockpit Management and Data System
see COMAND*
COMAND* 362
COMAND*
see separate operating instructions
Combination switch 105
High beam flasher 47
Turn signals 47
Windshield wipers 47
Comfort driving
Transmission program mode 146
Consumer information 359
Control and operation of radio
transmitters 246
Control system 113, 362
AUDIO menu 118
Convenience submenu 133
Display digital speedometer 118
Functions 114, 117
Instrument cluster submenu 126
Lighting submenu 129Malfunction memory menu 122
Menus 116, 117, 363
Multifunction display 113
Multifunction steering wheel 114
NAVI* menu 121
Selecting radio system 119
Selecting satellite radio* system 119
Settings menu 123
Standard display menu 118
Submenus 115, 117
TEL* menu 138
Trip computer menu 136
Vehicle submenu 132
Controller Area Network see CAN system
Convenience submenu 133
Activating easy-entry/exit
feature* 134
Setting key dependency 135
Setting parking position* for exterior
rear view mirror 136