Page 251 of 400

251 Operation
At the gas station
Check regularly and before a long trip
1Coolant level
For more information on coolant, see
“Coolant level” (
�page 257).
2Brake fluid (fuse box cover removed)
Removing fuse box cover
(
�page 333).
3Windshield washer and headlamp
cleaning system*
For more information on filling up the
washer reservoir, see “Windshield
washer system and headlamp cleaning
system*” (
�page 259).Engine oil level
For more information on engine oil level,
see “Engine oil” (
�page 253).
Opening hood (
�page 252).
Vehicle lighting
Check function and cleanliness. For more
information on replacing light bulbs, see
“Replacing bulbs” (�page 310).
Exterior lamp switch (�page 102).
Tire inflation pressure
More information on tire inflation pressure
(
�page 261).
!If you find that the brake fluid in the
brake fluid reservoir has fallen to the
minimum mark or below, have the
brake system checked for brake pad
thickness and leaks immediately.
Notify an authorized Mercedes-Benz
Center immediately. Do not add brake
fluid as this will not solve the problem.
For more information, see “Practical
hints” (
�page 275).
Page 270 of 400
270 OperationVehicle careWiper blades�
Fold wiper arms forward.
�
Clean the wiper blade inserts with a
clean cloth and detergent solution.Window cleaning
�
Fold wiper arms forward.
�
Use a window cleaning solution on all
glass surfaces.
An automotive glass cleaner is
recommended.Light alloy wheels
Mercedes-Benz approved Wheel Care
should be used for regular cleaning of the
light alloy wheels.
If possible, clean wheels once a week with
Mercedes-Benz approved Wheel Care,
using a soft bristle brush and a strong
spray of water.
Follow the instructions on container.
Instrument cluster
Use a gentle dishwashing detergent or
mild detergent for delicate fabrics as a
washing solution. Wipe with a cloth moist-
ened in lukewarm solution. Do not use
scouring agents.
Warning!
G
For safety reasons, switch off wipers and
remove SmartKey from starter switch
before cleaning the wiper blades, otherwise
the wiper motor might suddenly turn on and
cause injury.!Fold the windshield wiper arms back
onto the windshield before turning the
SmartKey in the starter switch.
Hold on to the wiper when folding the
wiper arm back. If released, the force
of the impact from the tensioning
spring could crack the windshield.
Warning!
G
For safety reasons, switch off wipers and
remove SmartKey from starter switch
before cleaning the windshield, otherwise
the wiper motor might suddenly turn on and
cause injury.!Fold the windshield wiper arms back
onto the windshield before turning the
SmartKey in the starter switch.
Hold on to the wiper when folding the
wiper arm back. If released, the force
of the impact from the tensioning
spring could crack the windshield.
iOnly use acid-free cleaning materials.
Acid may cause corrosion or damage
the clear coat.
Page 293 of 400

293 Practical hints
What to do if …
Display symbol
Display message
Possible cause
Possible solution
A
RESERVE FUEL
GO TO GAS STATION!
The fuel level has dropped below the
reserve mark.
�
Refuel at the next gas station
(�page 249).
CHECK GAS CAP!
SEE OPERATOR’S MANUAL
The fuel cap is not closed tightly.
�
Check the fuel cap (
�page 249).
Y
HOOD OPEN!
You are driving with the hood open.
�
Close the hood (
�page 252).
I
REMOVE KEY!
You have forgotten to remove the
SmartKey.
�
Remove the SmartKey from the starter
switch.
REPLACE KEY!
DRIVE TO WORKSHOP!
No additional code available for
SmartKey.
�
Change the SmartKey.
.
3RD BRAKE LIGHT
CHECK LIGHT!
The high mounted brake lamp is
malfunctioning.
�
Visit an authorized Mercedes-Benz
Center as soon as possible.
AUTOM. LIGHT ON
REMOVE KEY!
SmartKey in starter switch position1
or2.
�
Remove SmartKey from the starter
switch.
BRAKE LIGHT
DRIVE TO WORKSHOP!
Brake lamp illumination is delayed or
lamp is permanently on.
�
Visit an authorized Mercedes-Benz
Center as soon as possible.
BRAKE LIGHT, L
CHECK LIGHT!
The left brake lamp is malfunctioning.
�
Visit an authorized Mercedes-Benz
Center as soon as possible.
BRAKE LIGHT, R
CHECK LIGHT!
The right brake lamp is malfunctioning.
�
Visit an authorized Mercedes-Benz
Center as soon as possible.
DISPLAY MALFUNCTION
VISIT WORKSHOP!
The display for the lamps or the system is
malfunctioning.
�
Visit an authorized Mercedes-Benz
Center as soon as possible.
Page 294 of 400

294 Practical hintsWhat to do if …Display symbol
Display message
Possible cause
Possible solution
.
FRONT FOGLIGHT, L
CHECK LIGHT!
The left front fog lamp is malfunctioning.
�
Replace the bulb as soon as possible.
FRONT FOGLIGHT, R
CHECK LIGHT!
The right front fog lamp is malfunctioning.
�
Replace the bulb as soon as possible.
REAR FOGLIGHT
CHECK LIGHT!
The rear fog lamp is malfunctioning.
�
Replace the bulb as soon as possible.
HIGH BEAM, L
CHECK LIGHT!
The left high beam lamp is
malfunctioning.
�
Replace the bulb as soon as possible.
HIGH BEAM, R
CHECK LIGHT!
The right high beam lamp is
malfunctioning.
�
Replace the bulb as soon as possible.
LIGHT SENSOR
VISIT WORKSHOP!
The lamp sensor is malfunctioning. The
headlamps switch on automatically.
�
In the control system, set lamp
operation to manual (
�page 123).
�
Switch on headlamps using the
exterior lamp switch.
�
Visit an authorized Mercedes-Benz
Center as soon as possible.
LICENSE PLATE LIGHT, L
CHECK LIGHT!
The left license plate lamp is
malfunctioning.
�
Replace the bulb as soon as possible.
LICENSE PLATE LIGHT, R
CHECK LIGHT!
The right license plate lamp is
malfunctioning.
�
Replace the bulb as soon as possible.
Page 295 of 400

295 Practical hints
What to do if …
Display symbol
Display message
Possible cause
Possible solution
.
LIGHTS
TURN OFF LIGHTS!
This display appears if the driver’s door is
opened and no SmartKey in the starter
switch.
�
Insert SmartKey in the starter switch.
�
Switch off the headlights.
LOW BEAM, L
CHECK LIGHT!
The left low beam lamp is malfunctioning.
�
Visit an authorized Mercedes-Benz
Center as soon as possible.
LOW BEAM, R
CHECK LIGHT!
The right low beam lamp is
malfunctioning.
�
Visit an authorized Mercedes-Benz
Center as soon as possible.
REVERSE LIGHT, L
CHECK LIGHT!
The left backup lamp is malfunctioning.
�
Replace the bulb as soon as possible.
REVERSE LIGHT, R
CHECK LIGHT!
The right backup lamp is malfunctioning.
�
Replace the bulb as soon as possible.
MARKER LIGHT, FL
CHECK LIGHTS!
BACK-UP LIGHT ON!
The left parking lamps are
malfunctioning. A backup bulb is being
used.
�
Visit an authorized Mercedes-Benz
Center as soon as possible.
MARKER LIGHT, FR
CHECK LIGHTS!
BACK-UP LIGHT ON!
The right parking lamps are
malfunctioning. A backup bulb is being
used.
�
Visit an authorized Mercedes-Benz
Center as soon as possible.
TAIL LIGHT, L
CHECK LIGHTS!
BACK-UP LIGHT ON!
The left tail lamp is malfunctioning.
A backup bulb is being used.
�
Visit an authorized Mercedes-Benz
Center as soon as possible.
Page 311 of 400

311 Practical hints
Replacing bulbs
Rear lamps Notes on bulb replacement
�
12 volt bulbs of the same type and
with the specified watt rating.
�
Switch lights off before changing a bulb
to prevent short circuits.
�
Always use a clean lint-free cloth when
handling bulbs.
�
Your hands should be dry and free of oil
and grease.
�
If the newly installed bulb does not
come on, visit an authorized
Mercedes-Benz Center.
�
Have the LEDs and bulbs for the
following lamps replaced by an
authorized Mercedes-Benz Center:�
Additional turn signals in the
exterior rear view mirrors
�
High mounted brake lamp
�
Xenon lamps
�
Front fog lamps
Lamp
Type
7
High mounted brake
lamp
LED
8
Brake lamp
P21W
9
Turn signal lamp
PY 21 W
a
Backup lamp
P21W
b
Tail, parking,
standing and side
marker lamp
P21/5W
c
License plate lamps
C5W
d
Rear fog lamp,
driver’s side
P21/4W
Warning!
G
Keep bulbs out of reach of children.
Bulbs and bulb sockets can be very hot.
Allow the lamp to cool down before
changing a bulb.
Halogen lamps contain pressurized gas.
A bulb can explode if you�
touch or move it when hot
�
drop the bulb
�
scratch the bulb
Wear eye and hand protection.
Because of high voltage in Xenon lamps, it is
dangerous to replace the bulb or repair the
lamp and its components. We recommend
that you have such work done by a qualified
technician.
Page 312 of 400
312 Practical hintsReplacing bulbsReplacing bulbs for front lamps
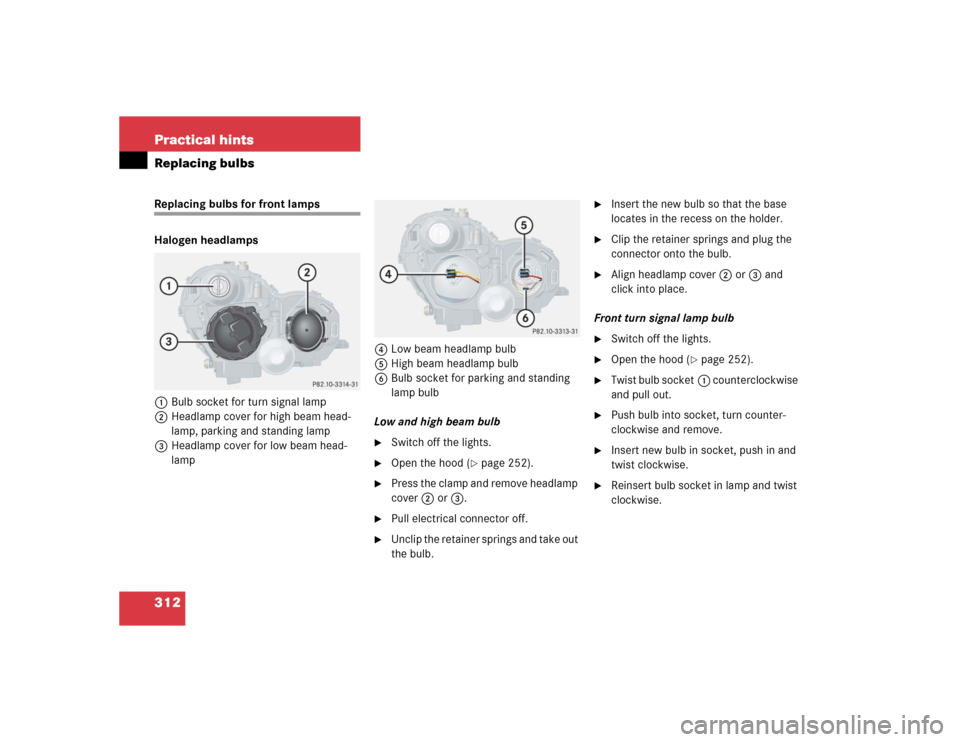
Halogen headlamps
1Bulb socket for turn signal lamp
2Headlamp cover for high beam head-
lamp, parking and standing lamp
3Headlamp cover for low beam head-
lamp4Low beam headlamp bulb
5High beam headlamp bulb
6Bulb socket for parking and standing
lamp bulb
Low and high beam bulb
�
Switch off the lights.
�
Open the hood (
�page 252).
�
Press the clamp and remove headlamp
cover2 or3.
�
Pull electrical connector off.
�
Unclip the retainer springs and take out
the bulb.
�
Insert the new bulb so that the base
locates in the recess on the holder.
�
Clip the retainer springs and plug the
connector onto the bulb.
�
Align headlamp cover2 or3 and
click into place.
Front turn signal lamp bulb
�
Switch off the lights.
�
Open the hood (
�page 252).
�
Twist bulb socket1 counterclockwise
and pull out.
�
Push bulb into socket, turn counter-
clockwise and remove.
�
Insert new bulb in socket, push in and
twist clockwise.
�
Reinsert bulb socket in lamp and twist
clockwise.
Page 313 of 400

313 Practical hints
Replacing bulbs
Parking and standing lamp bulb�
Switch off the lights.
�
Open the hood (
�page 252).
�
Press the clamp and remove headlamp
cover2.
�
Pull out bulb socket6 with the bulb.
�
Pull the bulb out of bulb socket.
�
Insert a new bulb in the socket.
�
Reinstall bulb socket.
�
Align headlamp cover2 and click into
place.Bi-Xenon* headlamps
1Bulb socket for turn signal lamp
2Headlamp cover for high beam flasher,
parking and standing lamp
3Cover for Bi-Xenon lamp4High beam flasher bulb
5Bayonet socket for high beam flasher
bulb
6Bulb socket for parking and standing
lamp bulb
High beam bulb
�
Switch off the lights.
�
Open the hood (
�page 252).
�
Press the clamp and remove lamp
cover2.
�
Pull electrical connector4 off.
Warning!
G
Do not remove the cover3 for the
Bi-Xenon headlamp. Because of high voltage
in Bi-Xenon lamps, it is dangerous to replace
the bulb or repair the lamp and its compo-
nents. We recommend that you have such
work done by a qualified technician.
��