Page 177 of 400
177 Controls in detail
Audio system
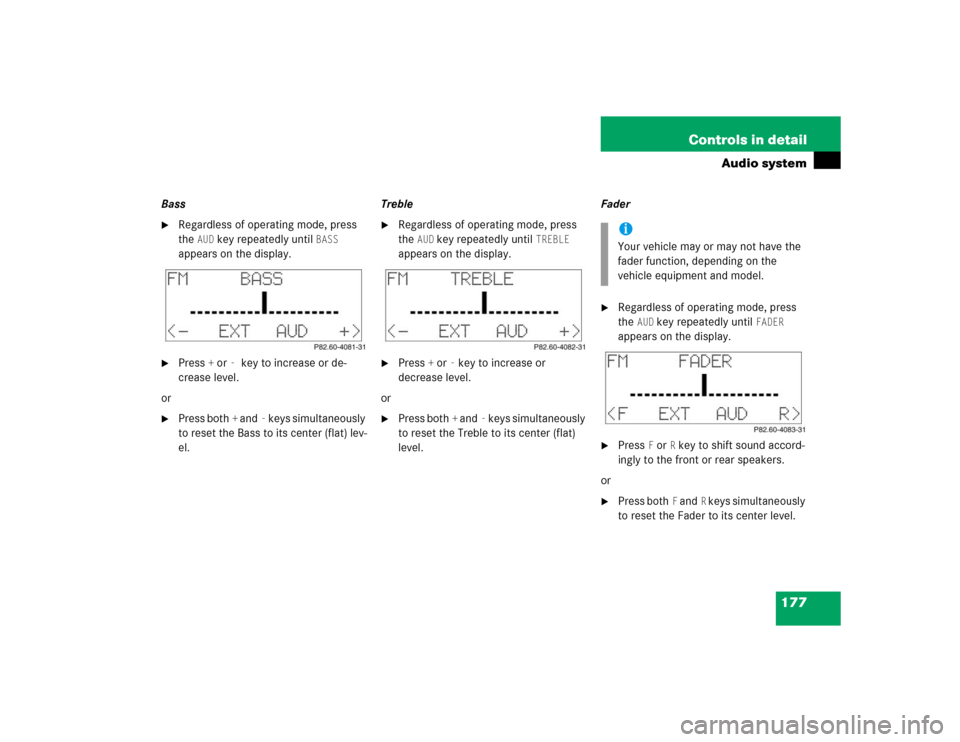
Bass�
Regardless of operating mode, press
the
AUD
key repeatedly until
BASS
appears on the display.
�
Press
+ or
- key to increase or de-
crease level.
or
�
Press both
+ and
- keys simultaneously
to reset the Bass to its center (flat) lev-
el.Treble
�
Regardless of operating mode, press
the
AUD
key repeatedly until
TREBLE
appears on the display.
�
Press
+ or
- key to increase or
decrease level.
or
�
Press both
+ and
- keys simultaneously
to reset the Treble to its center (flat)
level.Fader
�
Regardless of operating mode, press
the
AUD
key repeatedly until
FADER
appears on the display.
�
Press
F or
R key to shift sound accord-
ingly to the front or rear speakers.
or
�
Press both
F and
R keys simultaneously
to reset the Fader to its center level.
iYour vehicle may or may not have the
fader function, depending on the
vehicle equipment and model.
Page 178 of 400
178 Controls in detailAudio systemBalance�
Regardless of operating mode, press
the
AUD
key repeatedly until
BALANCE
appears on the display.
�
Press
L or
R key to shift sound accord-
ingly to the left or right speakers.
or
�
Press both
L and
R keys simultaneously
to reset the Balance to its center level.Returning audio functions to factory
settings
�
Regardless of operating mode, press
and hold
AUD
key longer than two
seconds.
RESET
will appear on the
display.
All settings for bass, treble and balance
are returned to the center level and the
volume is set to a predefined level.Audio system sound selection (EXT)*
�
Regardless of operating mode, press
the
AUD
key.
The sound settings menu appears on
the display.
�
Press the
EXT
key.
�
Press one of the function keys.
Page 179 of 400

179 Controls in detail
Audio system
You can select from among the
following settings:�
DRV
: The tone level is set to the
Driver position; sound is directed
toward the passengers.
�
SP: The tone level is set for Speech,
optimizing the sound for the spoken
word.
�
AMB
: The tone level is set for
Ambience, producing a
three-dimensional sound.
�
OFF
: The audio system sound
selection is turned off.
Telephone* muting
If a telephone has been installed in the
vehicle, the radio will switch to telephone
mode when a call is incoming. The current
audio source is muted.
Radio operation
Selecting radio mode�
Pressb button.
�
You can now receive radio stations
over the analog FM, AM or WB station
frequencies or you can receive chan-
nels digitally via satellite radio (SAT)*.
Analog station frequencies
Selecting the band
You can select from among FM, AM or WB
frequency bands.
Weather band (
�page 182).
�
Press FM, AM or WB key repeatedly un-
til desired band has been selected.
The FM, AM and WB frequency bands
are called up one after the other.
The frequency band currently selected
appears in the upper left-hand corner
of the display.
Selecting a station
The following options are available for
selecting a station:
�
Direct frequency band input
(�page 180)
�
Manual tuning (
�page 180)
�
Automatic seek tuning (
�page 180)
�
Scan tuning (
�page 181)
�
Preset buttons (
�page 181)
�
Automatic station memory (Autostore)
(�page 181)
iFM frequency band:
FM 87.7......107.9 MHz
AM frequency band:
MW (medium wave) 530......1 710 KHz
Page 181 of 400

181 Controls in detail
Audio system
Scan tuning�
Starting scan tuning�
Select desired frequency band.
�
Press2 button.SC will appear on the display. The
radio briefly tunes in all receivable
stations on the band selected. The
first scan cycle will tune in only the
stations with a strong signal. The
second scan cycle will tune in every
receivable station.
�
Ending scan tuning�
Press2 button ord, c,
f or ebutton.SC disappears from the display.Manual station memory (Presets)
You can store ten AM and ten FM stations.
�
Storing stations�
Tune in the desired station.
�
Press and hold desired station
button4 toM until a brief
signal tone is heard.
The frequency is stored on the
selected station button.
The frequency band and station
button number are shown in the up-
per left-hand corner of the display.
�
Retrieving a station from memory�
Press desired station button4
toM.Automatic station memory (Autostore)
The Autostore memory function provides
an additional memory level. The station
memory for manually stored stations is not
overwritten.
�
Calling up Autostore memory level�
Briefly press the
AS key.
AS is highlighted in the display.
The radio finds the ten stations with
the strongest signals. These
stations are stored on the station
buttons4 toM in order of
signal strength.
�
Retrieving a station from memory�
Press desired station button4
toM.
�
Leaving the Autostore memory level�
Press the
AS key.
The highlighted
AS in the display
disappears.
Page 184 of 400
184 Controls in detailAudio systemChannel selection
The following options are available for se-
lecting a channel:�
Direct channel input (
�page 184)
�
Manual tuning (
�page 184)
�
Preset channels (
�page 184)
Direct channel input
�
Press“key.
�
Enter desired channel number using
buttons4 toM.Manual tuning
�
Press and holdf, d, c or
e button until the desired channel
has been reached.
Preset channels
You can store up to ten channels.
�
Retrieving a channel from memory�
Press the desired channel
button4 toM.
�
Storing channels�
Tune in the desired channel.
�
Press and hold desired channel
button4 toM until a brief
signal tone sounds.
The channel is stored on the selected
channel button.
iOnly inputs for available channels are
possible.
If a button is not pressed within four
seconds, the radio will return to the last
station tuned.
Page 280 of 400

280 Practical hintsWhat to do if …Messages in the display
The control system shows warning and
malfunction messages in the multifunction
display.
Certain warning and malfunction messag-
es are accompanied by an audible signal.
Address these messages accordingly and
follow the additional instructions given in
this Operator’s Manual.
Selecting the malfunction memory menu in
the control system (
�page 122) displays
both cleared and uncleared messages.
High-priority messages appear in the
multifunction display in red color.
Certain messages of high priority cannot
be cleared from the multifunction display
using the reset button.
Other messages of high priority and
messages of less immediate priority can
be cleared from the multifunction display
using the reset button (�page 22) and are
then stored in the malfunction message
memory (
�page 122).On the pages that follow, you will find a
compilation of the most important warning
and malfunction messages that may
appear in the display. High priority
messages appear on a red background.
Warning!
G
All categories of messages contain
important information which should be
taken note of and, where a malfunction is
indicated, addressed as soon as possible at
an authorized Mercedes-Benz Center.
Failure to repair condition noted may cause
damage not covered by the Mercedes-Benz
Limited Warranty, or result in property
damage or personal injury.Warning!
G
No messages will be displayed if either the
instrument cluster or the multifunction
display is inoperative.
Contact your nearest authorized
Mercedes-Benz Center.
iTurning the SmartKey in starter switch
to position2, causes all lamps as well
as the multifunction display to come
on. Ensure that they are all in working
order before starting your journey.
Page 390 of 400

Automatic climate control* 165
Climate control 156
Temperature indicator 127
Time display mode (Clock) 127
Unit")
390 Index
Speedometer display mode 128
Station selection mode 132
Temperature (Interior)
Automatic climate control* 165
Climate control 156
Temperature indicator 127
Time display mode (Clock) 127
Units
Speedometer 128
Temperature 127
Setting current speed 207
Settings
Convenience functions 133
Factory, SmartKey 83
Individual, SmartKey 135
Lighting (control system) 129
Menus and submenus 115
Resetting all (control system) 123
Resetting in the submenu 124
Selective, SmartKey 83Settings menu
Functions in 123
Individual vehicle settings 123
Submenus 124
Shift lock 364
Shifting
Gear selector lever 44
Gear selector lever positions 145
Gearshift lever 43
Into optimal gear range
(Automatic transmission*) 143
Into reverse
(Manual transmission) 141
Side impact airbags 60
Side marker lamps
Replacing bulbs 310, 311, 314
Side markers
Cleaning 269Side windows
Automatic opening 201
Cleaning 270
Closing 200, 201, 202
Closing fully 201
Closing with SmartKey 202
Opening 200, 201, 202
Opening fully 201
Opening with SmartKey 202
Stopping 201
Synchronizing power windows 202
Signal strength (telephone*) 139
Simultaneous wiping and washing
Windshield wipers 48
Single wipe 48
Ski sack* 209
Installing 212
Removing 212
Unfolding and loading 209
Unloading and folding 211