Page 39 of 400

39 Getting started
Adjusting
The buttons are located above the exterior
lamp switch.
1Driver’s side exterior rear view mirror
button
2Adjustment button
3Passenger-side exterior rear view
mirror button�
Make sure the ignition is switched on.
All lamps in the instrument cluster
come on.
�
Press button1 for the left mirror or
button3 for the right mirror.
�
Push adjustment button2 up, down,
left, or right according to the desired
setting.
For more information, see “Activating exte-
rior rear view mirror parking position*”
(
�page 150).
!If an exterior rear view mirror was
forcibly pushed forward (hit from the
rear) or forcibly pushed rearward (hit
from the front), reposition it by
applying firm pressure until it snaps
into place. The mirror housing is now
properly positioned and you can adjust
the mirror normally.
iThe memory function* (
�page 99) lets
you store the setting for the exterior
rear view mirrors together with the set-
tings for the steering wheel and seat
position.
iAt low ambient temperatures, the
mirrors will be heated automatically.
Page 83 of 400

83 Controls in detail
Locking and unlocking
Factory setting
Global unlocking�
Press buttonŒ.
All turn signal lamps flash once. The
locking knobs in the doors move up.
The vehicle will lock again automatically
within approximately 40 seconds of
unlocking if:
�
neither door nor trunk is opened
�
the SmartKey is not inserted in the
starter switch
�
the central locking switch is not
activatedGlobal locking
�
Press button‹.
All turn signal lamps flash three times.
The locking knobs in the doors move
down.
Selective setting
If you frequently travel alone, you may wish
to reprogram the SmartKey so that
pressingŒ only unlocks the driver’s
door and the fuel filler flap.
�
Press and hold buttonsŒ and‹
simultaneously for about five seconds
until battery check lamp5 flashes
twice.
The SmartKey will then function as
follows:
Unlocking driver’s door and fuel filler
flap�
Press buttonΠonce.Global unlocking
�
Press buttonΠtwice.
Global locking
�
Press button‹.
Restoring to factory setting
�
Press and hold buttonsŒ and‹
simultaneously for about six seconds
until battery check lamp5 flashes
twice.
!To prevent possible malfunction, avoid
exposing the SmartKey to high levels of
electromagnetic radiation.
Warning!
G
When leaving the vehicle, always remove the
SmartKey from the starter switch, take it
with you and lock the vehicle. Do not leave
children unattended in the vehicle, or with
access to an unlocked vehicle. It is possible
for children to open a locked door from the
inside, which could result in an accident
and/or serious injury.
Page 84 of 400

84 Controls in detailLocking and unlocking
Checking the batteries�
Press button‹ orŒ.
Battery check lamp5 comes on
briefly to indicate that the SmartKey
batteries are in order.Unlocking and opening the trunk lid
You can unlock and open the trunk
separately.
A minimum height clearance of 5.71 ft
(1.74 m) is required to open the trunk lid.
�
Press buttonŠ until trunk unlocks
and begins to open.
The trunk can also be opened from its
inside in an emergency, see “Trunk lid
emergency release” (
�page 88).
!If you can no longer lock or unlock the
vehicle with the SmartKey, then either
the batteries in the SmartKey are dis-
charged, the SmartKey is malfunction-
ing or the vehicle battery is drained.�
Check the batteries in the
SmartKey (
�page 84) and replace
them if necessary (
�page 307).
or
�
Use the mechanical key to unlock
the doors (
�page 305) and the
trunk lid (
�page 306) as required.
or
�
Use the mechanical key to lock the
doors (
�page 306) and the trunk
lid (
�page 306) as required.
or
�
Have the vehicle battery and the
battery connections checked.
If the SmartKey is malfunctioning,
contact an authorized Mercedes-Benz
Center.!If battery check lamp5 does not
come on briefly during check, then the
SmartKey batteries are discharged.
Replace the batteries (
�page 307).
You can obtain the required batteries
at any authorized Mercedes-Benz
Center.
iIf the batteries are checked within
signal range of the vehicle, pressing
the‹ orŒ button will lock or
unlock the vehicle accordingly. !The trunk lid swings open upwards
automatically. Always make sure there
is sufficient overhead clearance.
Page 114 of 400

114 Controls in detailControl systemMultifunction steering wheel
The displays in the multifunction display
and the settings in the control system are
controlled by the buttons on the multifunc-
tion steering wheel.Pressing any of the buttons on the multi-
function steering wheel will alter what is
shown in the multifunction display.
The information available in the multifunc-
tion display is arranged in menus, each
containing a number of functions or sub-
menus.
The individual functions are then found
within the relevant menu (radio or CD op-
erations under
AUDIO
, for example). These
functions serve to call up relevant informa-
tion or to customize the settings for your
vehicle.
1
Multifunction display in the
speedometerOperating the control system
2
Selecting the submenu or setting
the volumeçdown/to decreaseæup/to increase
3
Telephone*íto take a callìto end a call
4
Menu systemsèfor next menuÿfor previous menu
5
Moving within a menujfor next displaykfor previous display
Page 175 of 400
175 Controls in detail
Audio system
Item
Page
1
CD mode selector
189
2
Manual tuning
(radio)
179
Fast forward/reverse
(cassette, CD)
188,
192
Speed dialing memory
(telephone*)
197
3
Radio mode selector
179
4
Display panelCassette compartment
behind display panel
Item
Page
5
Alpha-numeric keypadBand selection,
station buttons (radio)
179
CD selection (CD)
191
Telephone number entry,
retrieving speed dialing
memory (telephone)
194
6
Scanning (radio, cassette,
CD)
181,
188,
192
7
Function button
180
8
Light-emitting diode
Item
Page
9
Function keys
a
Cassette eject
187
b
Cassette mode selector
186
c
Telephone* mode selector
193
d
Seek tuning (radio)
180
Track search (cassette,
CD)
187,
192
Speed dialing memory
(telephone)
197
e
On/off
176
Volume
176
Page 176 of 400
 and the
function buttons (left side of radio panel)
are r")
176 Controls in detailAudio systemButton and soft key operation
In these instructions, the alpha-numeric
keypad (right side of radio panel) and the
function buttons (left side of radio panel)
are referred to as “buttons”. The four keys
below the display panel are referred to as
“soft keys”.
Operation
Switching on/off
Switching on:�
Turn SmartKey in starter switch to
position1 or2 .
or
�
Turn control knoba.
Switching off:
�
Remove SmartKey from starter switch.
or
�
Turn control knoba.Adjusting the volume
�
Turn control knoba.
The volume will increase or decrease
depending on the direction turned.
Adjusting audio functions
Press the AUD key to call up the bass, tre-
ble, balance and fader functions in the var-
ious operating modes. Settings for bass
and treble are stored separately for the AM
and FM frequency bands, satellite radio
(SAT) mode, cassette mode and CD mode.
!Do not press directly on the display
face. Otherwise, the display will be
damaged.
iIf the radio is switched on without the
SmartKey in the starter switch, it will
automatically switch off again after ap-
prox. 30 minutes.
iThe volume setting can be selected
separately for the telephone*, audio
system and voice control system*.
Page 179 of 400

179 Controls in detail
Audio system
You can select from among the
following settings:�
DRV
: The tone level is set to the
Driver position; sound is directed
toward the passengers.
�
SP: The tone level is set for Speech,
optimizing the sound for the spoken
word.
�
AMB
: The tone level is set for
Ambience, producing a
three-dimensional sound.
�
OFF
: The audio system sound
selection is turned off.
Telephone* muting
If a telephone has been installed in the
vehicle, the radio will switch to telephone
mode when a call is incoming. The current
audio source is muted.
Radio operation
Selecting radio mode�
Pressb button.
�
You can now receive radio stations
over the analog FM, AM or WB station
frequencies or you can receive chan-
nels digitally via satellite radio (SAT)*.
Analog station frequencies
Selecting the band
You can select from among FM, AM or WB
frequency bands.
Weather band (
�page 182).
�
Press FM, AM or WB key repeatedly un-
til desired band has been selected.
The FM, AM and WB frequency bands
are called up one after the other.
The frequency band currently selected
appears in the upper left-hand corner
of the display.
Selecting a station
The following options are available for
selecting a station:
�
Direct frequency band input
(�page 180)
�
Manual tuning (
�page 180)
�
Automatic seek tuning (
�page 180)
�
Scan tuning (
�page 181)
�
Preset buttons (
�page 181)
�
Automatic station memory (Autostore)
(�page 181)
iFM frequency band:
FM 87.7......107.9 MHz
AM frequency band:
MW (medium wave) 530......1 710 KHz
Page 180 of 400
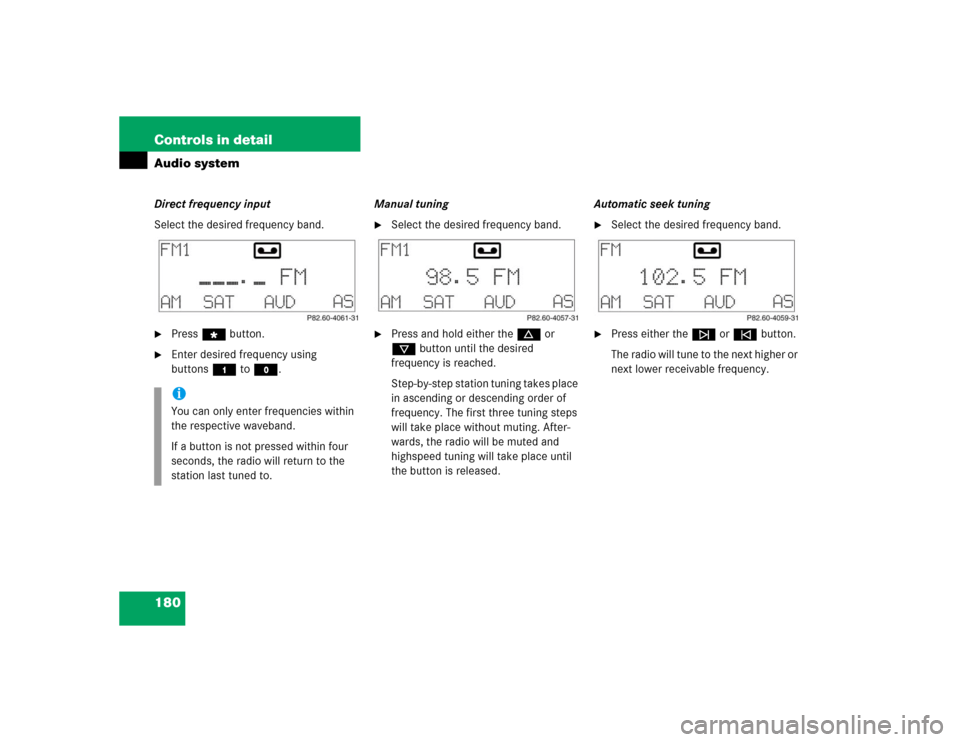
180 Controls in detailAudio systemDirect frequency input
Select the desired frequency band.�
Press“ button.
�
Enter desired frequency using
buttons4 toM.Manual tuning
�
Select the desired frequency band.
�
Press and hold either thed or
cbutton until the desired
frequency is reached.
Step-by-step station tuning takes place
in ascending or descending order of
frequency. The first three tuning steps
will take place without muting. After-
wards, the radio will be muted and
highspeed tuning will take place until
the button is released.Automatic seek tuning
�
Select the desired frequency band.
�
Press either thef or ebutton.
The radio will tune to the next higher or
next lower receivable frequency.
iYou can only enter frequencies within
the respective waveband.
If a button is not pressed within four
seconds, the radio will return to the
station last tuned to.

179
Fast forward/reverse
(cassette, CD)
188,
192
Speed dialing memory
(telephone*)
197
3
Radio mode selec")